
Preserving an Original Xbox

The original Xbox, also known as the OG Xbox, was released in November 2001 and discontinued in late 2005 with the launch of the Xbox 360. Nearly all OG Xboxes are now over 20 years old, so it's time to take care of them to extend their lifespan.
In this article, I'll share what I did to preserve mine. Nothing fancy—just the key steps to help it stand the test of time. Some may want to go further and replace the power supply unit and all surface-mounted capacitors.
For context, my Xbox was the very first console I owned. In the '80s, I
was gaming on the Apple II, and throughout the '90s, I stuck
exclusively to PC gaming. Console games never really caught my interest
back then. In fact, I initially bought the Xbox to use as a media
center. But, of course, I ended up playing games on it and grew to
appreciate the experience of gaming from the comfort of a couch.
This Xbox is also one of only two machines in my collection that I owned
when it was still a current model, rather than something I picked up
later as a vintage collectible. That’s why it holds a special place for
me!
Recapping
Like any console that's over a decade old, the capacitors in the Xbox need to be replaced—or at the very least, checked to ensure they're in good condition and won’t start leaking soon. But the Xbox has a unique issue. It's equipped with a 1F 2.5V Super-Capacitor to back up the real-time clock, while most other systems use a cell battery that lasts for years. Microsoft opted for a large capacitor that can keep the clock running for up to 48 hours when unplugged. Unfortunately, this capacitor is prone to leaking, which can easily damage the motherboard.
If you own an Xbox, it's crucial to remove this capacitor and clean any potential residue as soon as possible!
 My super-capacitor started to leak. Fortunately it was not too late
Replacing this capacitor is not mandatory, but without one, the Xbox will lose some of its settings immediately after being unplugged.
Every other chemical capacitor doesn't have the same tendency to spill its internals, but remember that they were made during the “capacitor plague“...
Here are the chemical capacitor present on depending on the model, courtesy of braxtron
V1.0 and V1.1
| Qty | Components | Value | Voltage | Dimension | OG Part |
| 13 | C1G3, C1G5, C2G2, C3F2, C3G4, C4G3, C4G6, C5F6, C6G1, C7B7, C7C3, C7G5, C8E4 | 22µF | 25v | 5x11mm | nipon sme |
| 6 | C3B3, C3F6, C5F5, C5G1, C6G2, C6G6 | 100µF | 25v | 6x11mm | nichicon vr |
| 3 | C7G1, C8F2, C8G1 | 1500µF | 16v | 12x20mm | nichicon pw |
| 2 | C1G1, C2F3 | 3300µF | 10v | 12.5x25mm | nichicon pw |
| 5 | C1E1, C2E1, C2E2, C2E5, C3E2 | 1500µF | 6.3v | 10x20mm | nippon kze / nichicon hd |
| 1 | C5A3 | 680µF | 16v | 8x15mm | nichicon pw / nichicon hm |
| 1 | C7B3 | 47µF | 16v | 6.3x5.4mm smd | nichicon wx |
| 7 | C5A4, C6A11, C6A12, C6A4, C6B4, C6B6, C6E2 | 10µF | 16v | 3x5.4mm smd | nichicon wx |
V1.2
| Qty | Components | Value | Voltage | Dimension | OG Part |
| 13 | C1G3, C1G6, C2G2, C3F6, C3G1, C4G4, C4G8, C5F5, C6G1, C7B5, C7G6, C8C2, C8E3 | 22uF | 25v | 5x11mm | nipon sme |
| 7 | C3B2, C3F10, C4G1, C5F4, C5G1, C6G2, C6G3 | 100uF | 25v | 6x11mm | nichicon vr |
| 2 | C1G1, C7G1 | 3300uF | 10v | 12.5x25mm | nichicon pw |
| 3 | C4F9, C7E2, C7F1 | 1500uF | 6.3v | 10x20mm | nippon kze / nichicon hd |
| 3 | C1E1, C2E4, C3E2 | 3300uF | 6.3v | 10x25mm | nichicon hm / rubycon mbz(1.6) |
| 1 | C5A4 | 680uF | 16v | 8x15mm | nichicon pw / nichicon hm |
| 1 | C7B2 | 47uF | 16v | 6.3x5.4mm smd | nichicon wx |
| 5 | C6A10, C6A11, C6A4, C6B4, C6B6 | 10uF | 16v | 3x5.4mm smd | nichicon wx |
V1.6
| Qty | Components | Value | Voltage | Dimension | OG Part |
| 11 | C1G7, C1G9, C3G8, C4G5, C6G3, C7G3, C7A2, C7G11, C8E3, C8G1 | 22uF | 25v | 5x11mm | nipon sme |
| 3 | C1B1, C6G2, C8F5 | 100uF | 25v | 6x11mm | nichicon vr |
| 3 | C2B2, C5G2, C7F1 | 1500uF | 6.3v | 10x20mm | nippon kze / nichicon hd |
| 5 | C1E1, C1E2, C1F2, C1G10, C2E2 | 3300uF | 6.3v | 10x25mm | nichicon hm / rubycon mbz(1.6) |
| 1 | C7B5 | 47uF | 16v | 6.3x5.4mm smd | nichicon wx |
| 3 | C3B1, C6A1, C6A3 | 10uF | 16v | 3x5.4mm smd | nichicon wx |
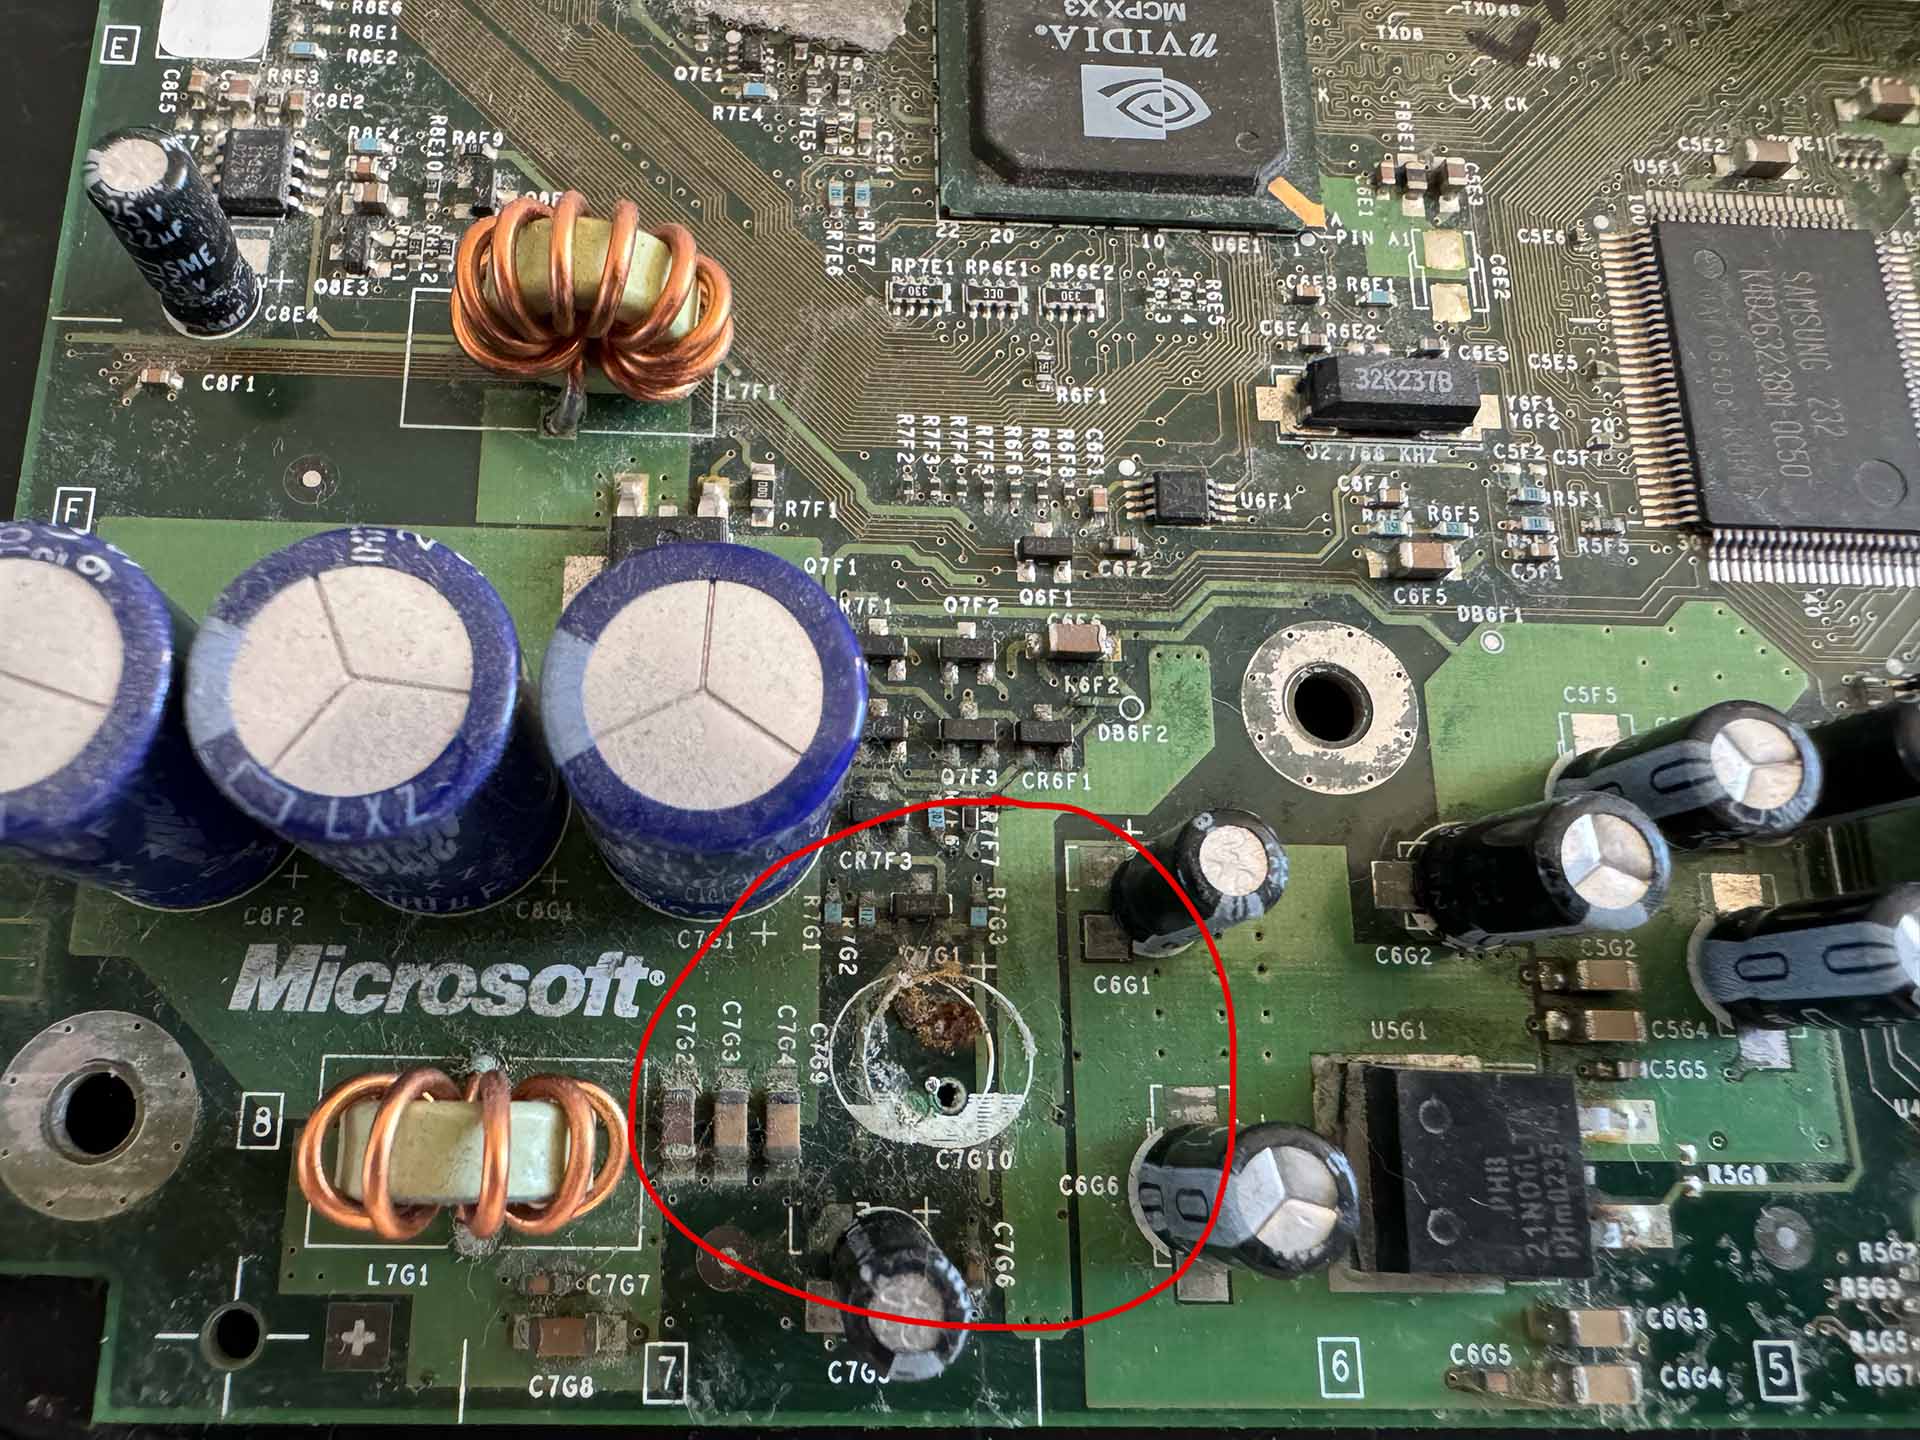
Corroded traces on the motherboard
After many years, my Xbox started behaving oddly. Turning it on would sometimes cause the DVD tray to open, and pressing the DVD button to close it could unexpectedly power the console off. Eventually, the power button stopped working altogether, but I could still turn the console on using the DVD button. Quite confusing…
This is a common issue with many Xboxes. It’s caused by corrosion on a section of the motherboard. Fortunately, the fix is relatively straightforward.
If you ever come across an Xbox that won’t power up, there’s a good chance that the same corrosion is the culprit, and it might be easily revived! 🙂
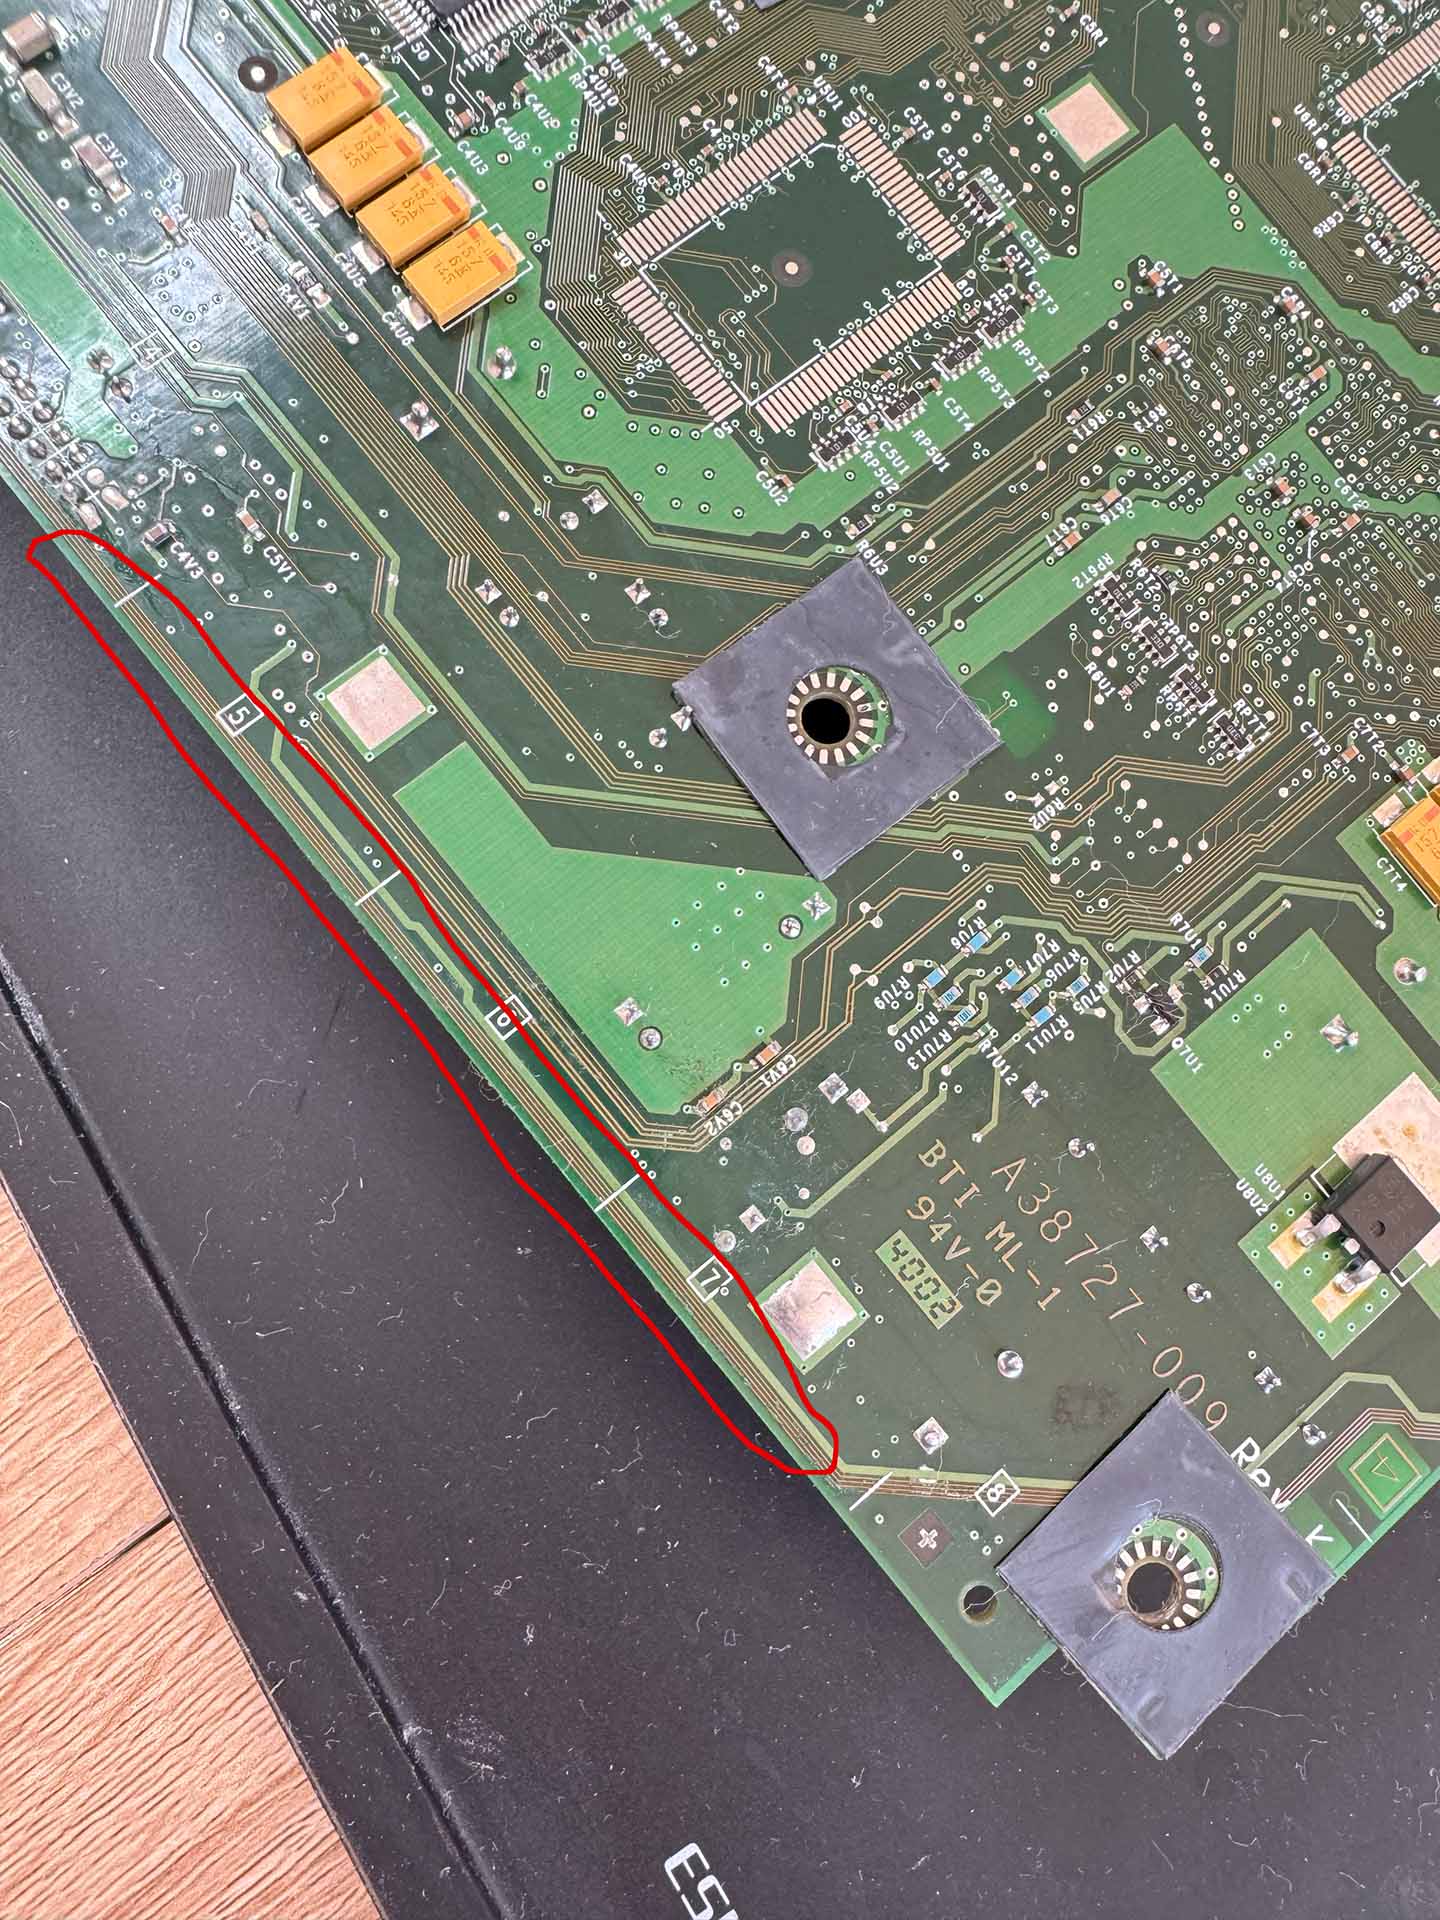
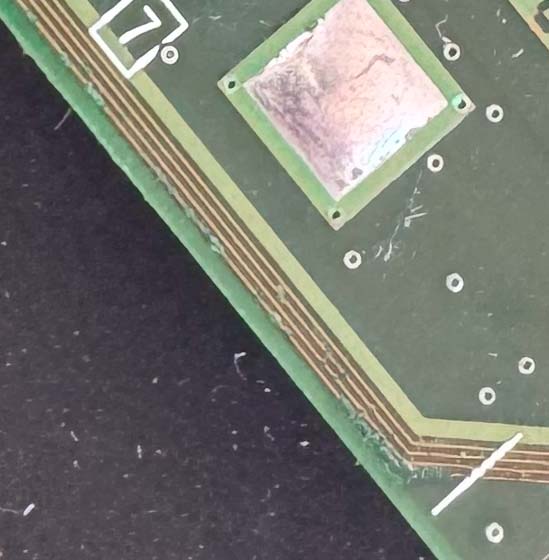
Five traces run along the edge of the motherboard, controlling the functions mentioned earlier. The repair involves soldering a wire-strap between two points to bypass each corroded trace. Here’s a link to a tutorial on how to do it.
|
The five traces run along the edge of the motherboard |
As you can see, they are in bad shape |
The big trace, the ground, was OK but the four others needed a wire-strap.
Replacing the DVD drive belt
After the repair, the DVD tray still wouldn’t open, but this time the issue was due to the belt becoming too stiff with age. Fortunately, the drive is easy to open and fix, and finding a replacement belt was simple. For my Samsung drive, the same belt used for the Xbox 360 works perfectly.
Replacing and preserving the Hard Drive
About the HDD
The Xbox was notable for being the first console to include an internal 8-GiB hard drive right out of the box. This drive had several uses: it offered ample storage for game saves, provided a space to cache frequently accessed data to reduce loading times, and allowed developers to update games and add new content. The system itself could even be updated, sometimes offline, when certain games were run for the first time.
However, hard drives are fragile and prone to failure. The concerning part is that this hard drive is locked to its specific motherboard. So if your original Xbox is still in pristine condition, a hard drive failure could completely brick the console! Well, almost…
The role of the HDD in the boot-chain
Glossary
- MCPX: the NVDIA South-bridge that contains a small protected and inaccessible ROM
- KERNEL: a very small derivative of Windows 2000 Kernel (ntoskrnl.exe)
Boot process
- The code stored in the protected ROM is executed by the CPU, which initializes the hardware, copies sensitive data into RAM, and uses it to decrypt and verify the integrity of the boot-loader, known as B2L.
- B2L quickly erases all sensitive data. It then checks the integrity of the ciphered Kernel, its deciphering RC4 key and any pre-existing data. The Kernel is then decompressed, decrypted and run.
- Next, the Kernel sends unlock commands to the hard drive using standard ATA commands. The password is unique to each hard drive and is generated from the unique HDKey stored in the motherboard’s EEPROM, combined with the hard drive’s model and serial number. If the password doesn’t match, the Xbox will display the dreaded red ring and show “error 6”
- The Dashboard is verified and loaded.
In a soft-modded Xbox, the mod alters certain data files on the hard drive, such as the FONTS, which aren't checked during the boot process. These modified files hijack the Dashboard every time it's loaded. However, the Kernel remains unmodified and will continue to attempt to unlock the hard drive. Therefore, on a soft-modded Xbox, the hard drive must remain locked using the key tying it to the motherboard.
In a hard-modded Xbox, the mod either replaces the code in the EEPROM via a TSOP flash or alters it in-RAM using a modchip. Since the Kernel is modified in this case, a hard-modded Xbox can boot without issue, even with an unlocked hard drive.
Creating a new hard-drive
Most hard drives today use SATA, while the Xbox uses a PATA interface. To connect a modern drive, you'll need a SATA-to-IDE adapter that supports configuring the drive as either a master or slave IDE device. Be aware that this feature is not always supported by the cheaper adapters.
Although it's not mandatory, upgrading to a more modern 80-wire PATA cable can be beneficial as a replacement for the older 40-wire cable that came with the console. The extra 40 wires reduce inter-wire interference, which can improve performance and stability with newer drives. If you decide to replace the cable, a length of 65 cm should be sufficient, but you'll also need to learn how to fold it properly.
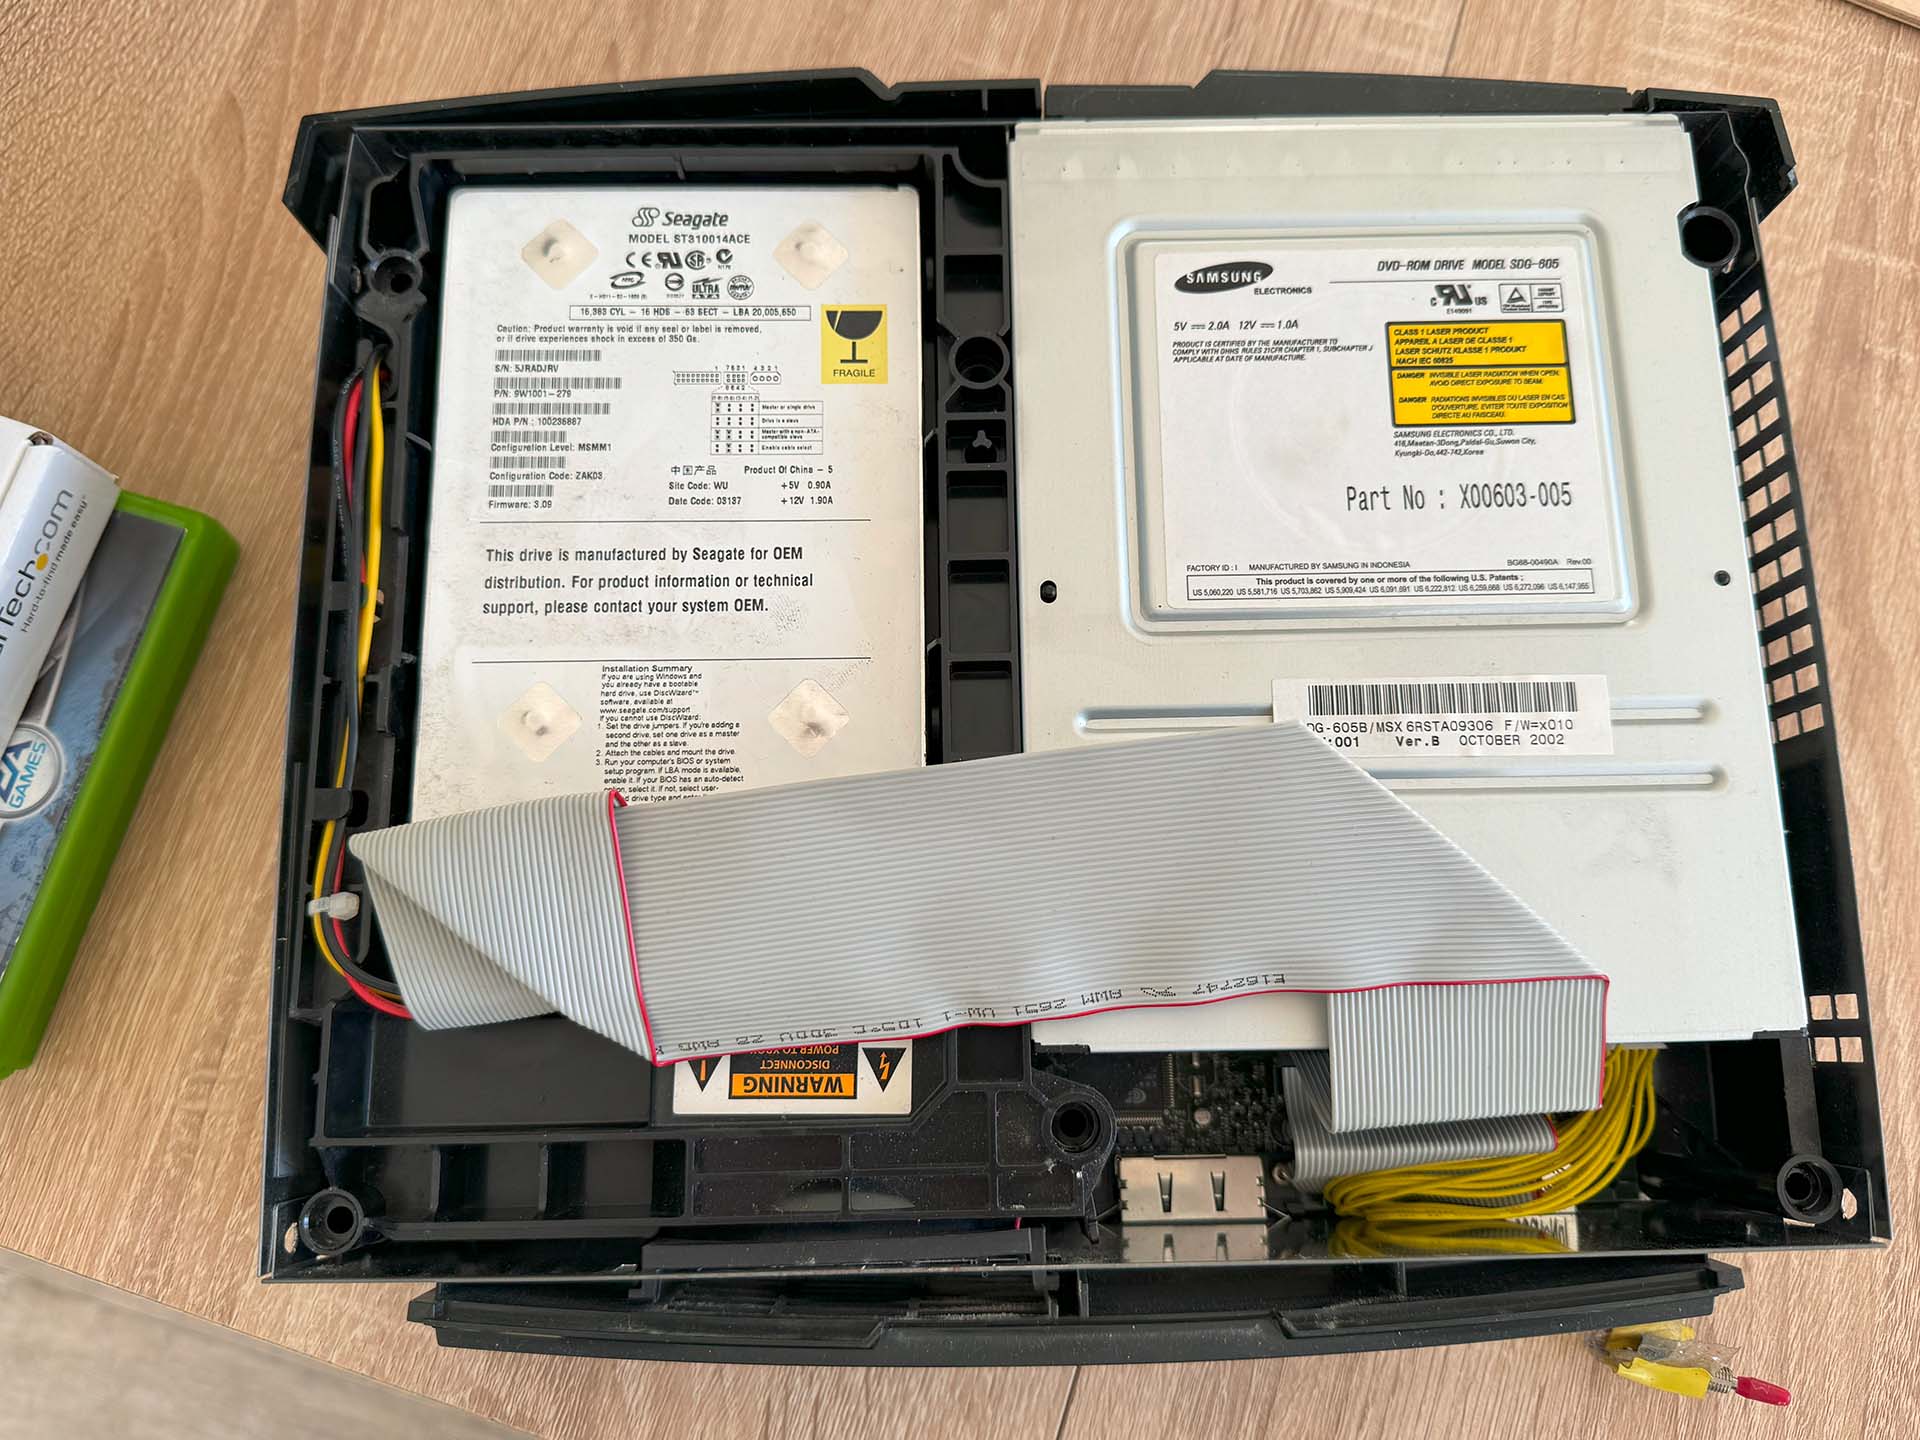 The DVD and the original HDD
Xbox hard drives are formatted in FatX and, naturally, contain essential operating system files. The simplest way to prepare a new drive is by cloning the old one.
For this, I used Chimp, a homebrew application designed to clone Xbox hard drives. It also allows you to extract the drive's unique key and lock a new hard drive using it.
To use Chimp, your Xbox must already be modded. Additionally, since the Xbox checks for the presence of the DVD drive during boot, the process requires a specific protocol to follow.
- Boot your modded Xbox
- Launch Chimp
- When the program asks for it, unplug your DVD drive and plug your new HDD instead. In order to succeed, it needs to be a slave device: the main HDD is the master.
- Clone the drive. You can then choose to lock the new one with the secret key of the original one. This is mandatory if your console is soft-modded.
- Configure the new drive as master, plug-it instead of the original one and plug back the DVD.
- Enjoy 😊
The original Xbox had a hard drive that was only 8 GiB. Any new drive you use will likely be larger than that. Chimp will ask what you want to do with the extra space. You can either create a new partition called F or split the space between two partitions, F and G. However, keep in mind that older BIOS can only recognize up to 128 GiB (≈137.4 GB). In order to overcome that limit, you’ll need a BIOS that support LBA48 such as Cerbios. My old modchip was too cheap and is not writable, so I cannot replace its BIOS for something more modern. Fortunately Chimp can use 137.4-GB value as a limit for F:\ and everything works fine.
If you have an old modchip and won’t update the BIOS, there’s no need to invest in a very large hard drive.
Another option for setting up a compatible hard drive is to use FAtXplorer. This software allows you to mount Xbox disks to view their contents, format them correctly, and create the necessary partitions for Xbox use. It can even lock any hard drive using provided keys, which is useful if you have a backup of your original hard drive.
However, it won't copy the Microsoft-proprietary files located in C:\ that are needed for booting. For this reason, using Chimp to clone your drive is the most convenient method when replacing your hard drive.
Backuping key-files
Now that your Xbox is up and running with the new hard drive, it’s a good time to back up important files. If you can connect your Xbox to an ethernet cable, this process is simple since most homebrew dashboards come with an FTP server.
Personally, I copied everything from the C:\ partition. Since it’s only 500 MiB, it doesn’t take up much space on modern systems and it contains all the system files required to boot. If you want to preserve your game saves, you can also copy the contents of the E:\ partition.
However, the most crucial file to back up is EEPROM.bin. Dashboards have an option to save the EEPROM data to C:\. This file contains your original hard drive key, which could be invaluable in the future if you need to lock another drive using FATXplorer or any other suitable tool.