
iPhone 15 Pro for "serious" photography
This article will present the hardware and software strong points of photographing with the iPhone 15 Pro Max. It is of course technology oriented: the artistic merit of a photograph still lays in the skill of the photographer. Yet it is important to know if a given camera won’t imped his expression.
A lot of unprocessed files are proposed to be downloaded, so that the reader can make his own opinion. All these images are shared with a CC-BY-SA 4.0 license.
A bit of context
I started “serious” photography as a hobby since I purchased my first Digital SLR twenty years ago. By serious I do not mean that I am a great artist nor that I intend to sell my photos for a living. I simply mean that I take this hobby seriously. I carefully frame each picture and I try to press the shutter at the best moment. Then I take some length to process it and try to get the best final image. That means shooting in RAW, a file format close to the raw data from the digital sensor. It is not of much use straight from the camera, but it is the first step to get the best quality and the most headroom to be creative during post-processing.
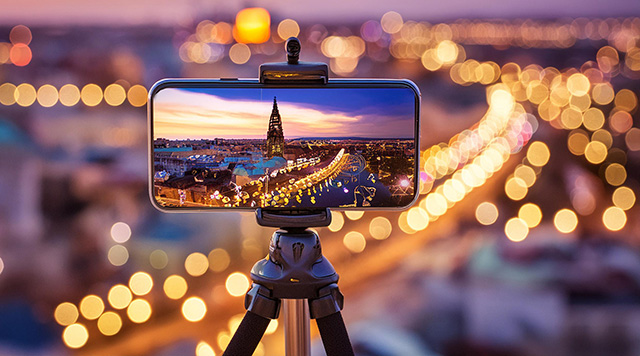
A few years ago I got a new job located in central Paris. Wandering in
Paris during the lunch break or after-work is of course the perfect
opportunity to take pictures. But my DSLR is bulky, so I decided to buy a
day to day camera. A camera that I could have perpetually in my handbag,
so I would never miss a photographic opportunity.
I searched for the perfect small camera. It would be light and not too
expensive, while producing good-enough digital files so that I would not
miss my DSLR too much in that regard. I searched in vain for more than
two years 😅.
Then, I discovered that an iPhone Pro could fill the bill. It is obviously not cheap, but its camera also comes with a good smartphone and mine was a bit old…
Lenses
The iPhone Pro and Pro Max both are equipped with three physical lenses, and only differ by the long focal one.
They both come with the following lenses (given in full frame equivalent):
- A 13mm f/2.2
- A 24mm f/1.78
As the iPhone 14 Pro, the 15 Pro is also equipped with
- A 77mm f/2.8
Whereas the iPhone 15 Pro Max comes with
- A 120mm f/2.8 with optical stabilization
Apple often advertises other focal lenses, but they are only achieved via software crops.
The main sensor
The main lens is the equivalent 24mm f1.78, coupled with a stabilized 1/1.28 inch sensor. I will refer to it as the main sensor.
Its size appears of course tiny in regard to a full frame DSLR. But it is not that far from the CX format introduced by Nikon with its first line of interchangeable lens compact cameras. It is in any-case bigger than the sensor in most smartphones and even most dedicated compact cameras from ten years ago.The main sensor, from Sony, sports 48 mega-pixels arranged in a Quad-Bayer pattern.
This pixel arrangement allows the use of adjacent pixels to increase the sensitivity when shooting in a dark environment. If the light is strong enough, it is also possible to get a behavior close to a standard Bayer arrangement resulting in a high definition picture.
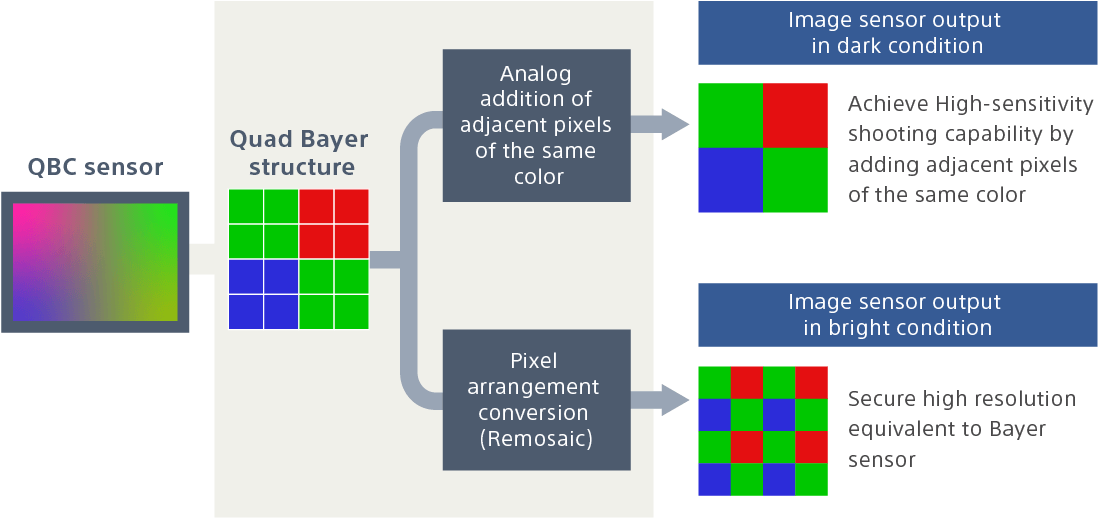 Image © Sony Group Corporation
Embedded software to the rescue
Even with small sensors and lenses, modern smartphones provide surprisingly good low light sensitivity, noise amount and high dynamic range. This is possible thanks to heavy post-processing, sometimes often on “image stacking”. When you press the shutter, multiple photos are shot then combined to feed the algorithms and produce the final image. This is something that cannot be easily done with a DSLR, at least not automatically.
The Apple marketing department calls that “Deep Fusion”. Pairs of photos, for low noise and high details, are continuously shot while the Camera app is in focus. When the user presses the shutter, a ninth picture, the intended one, is shot and combined with the previous four pairs to produce the final photograph.
 “Deep Fusion” process
There is also “Smart HDR”, which uses bracketing to expose for shadows and highlights and increase the overall dynamic range.
The photographer has no control on these algorithms that may, or may not, be used at the discretion of the Camera application.
They greatly enhances the capabilities of the small sensors, but there are some caveats. Usually the digital processing is too strong. The final image is very nice and clean on a small smartphone screen, but artifacts are clearly visible on a computer screen. And the final image is not a RAW but a JPEG or an equivalent format (HEIC on the iPhone). This leaves very little headroom for post-processing.
Some smartphones with advanced photographic features allow you to shoot in RAW, but you lose all the advantages of smartphone specific post-processing I just described and you are left with what the small camera is able to produce natively. And to be honest, the result is ofter not great.
Enter Apple ProRAW.
Apple ProRAW
Around the time of the iPhone 12, Apple partnered with Adobe to enhance the DNG file format. DNG is an open image format dedicated to raw images that is supported by almost all camera and smartphone manufacturers.
Those enhanced DNG files are called “ProRAW” and are only supported by the Pro line of iPhones.
After the demosaicing, post processing results are added to the raw
files as metadata. Neural networks detect zones of
interest and “semantic maps” are also added into the metadata. While
depth maps, used to simulate depth of field, could technically also be
added, this is unfortunately still not the case.
These files also benefit from most of the processing that rely on
combining images as exposed above. In a way, they are less “pristine”
than DNG raw files from other cameras. But those algorithms greatly enhance the data, while retaining almost all the
advantages of a “true” raw file. Including the ability to alter the
white balance and the wide dynamic range.
Of course, ProRaw files are supported by Adobe softwares.
DNG that are produced by the main sensor at 24mm are composed of 48 megapixels. The two other, smaller sensors only produce 12 megapixel images.
Sample photos
Most photographers know that while smartphone pictures look nice on a small screen, they exhibit a lot of artifacts when seen on a computer. The following photos compare some scenes photographed directly in HEIC, the file format Apple prefers over JPEG, with others that are saved as ProRAW DNG.
The three photos shot with the main lense are 48-Mpx images. As their HEIC counterparts are only 24-Mpx images (HEIC does not give access to the full resolution of the main sensor), they are presented resampled to 24-Mpx and in full resolution.
No processing is applied to the DNG except the Lightroom’s “Apple ProRaw” profile during import, and of course the JPEG compression.
You can open the full picture by clicking the corresponding square thumbnail.
Please bear in mind that the DNG files presented above have a lot of headroom for post-processing and that their white balance can still be adjusted. Only the “Apple ProRAW profile” was applied so the default Apple processing are applied. That’s why they closely look like their HEIC counterpart.
ProRAW is really friendly to post-processing. But there is a price to pay: non-compressed DNG files weight around 80MiB!!!
My opinion
After a few months, I must say that I am quite satisfied with the iPhone as a “serious” camera. Of course, the pictures produced by my Nikon D810 are superior. And the camera body itself along with its lenses are vastly superior, both in ergonomics and capabilities. But they are also way heavier and I only carry them for a specific purpose that can be scheduled in advance.
On the contrary, my smartphone is always in my pocket. If the photographic situation is not too challenging, it’s a quite capable and always ready camera 🙂.
One thing that is missing, and I hope will come with a future software update, is the inclusion of the depth map data into the DNG file. Built using a LIDAR, this map is used to compute the blur in “Portrait mode” and is included into HEIC files, so it should be technically possible.
 Using the “depth range” mask in Lightroom would be great
But I'll let you judge by yourself: download all the photos presented here, plus more, shot in various lighting conditions and at various focal lengths. They are all in raw format. If you use Adobe Lightroom, a good starting point is to apply the “Apple ProRaw” profile.
A last word about Apple’s cloud ecosystem: I don’t like it and I don’t
pay for it!
Furthermore, the files on the iPhone cannot be directly accessed as with
an Android phone. Fortunately if you plug the phone via USB, you can
import them as with any camera. One caveat, though: using Lightroom on
Windows, HEIC files are converted to JPEG. There is no problem with raw
files, and Lightroom on macOS handles HEIC files quite normally.