
Timing on the PC family under DOS
This article was written during the mid-90s by Kris Heidenstrom. It is reproduced in its integrality here, with a more modern and readable layout, as permitted by its license.
It contains all you ever wanted to knwow about Timers on PC/AT. It is so huge that the table of content on the right does not work very well 😅. Fortunately, the one embedded in the article is fully functionnal (1.2 CONTENTS).
You can also download the original, unformatted, text along with its sample programs.
Description: FAQ / Application notes: Timing on the PC family under DOS
Author:      Kris Heidenstrom ([email protected])
Version:     19951220, Release 3
1 INTRODUCTION AND DOCUMENT INFORMATION
1.1 DOCUMENT OVERVIEW
This article describes techniques for timing on the IBM PC family under MS-DOS, and many related subjects. Sample functions and programs are included. After the brief overview, the features of each technique are listed, so you can find the most appropriate one for your needs. Subjects covered in this document include:
- The DOS and BIOS date/time and alarm functions
- The BIOS tick count variable
- Trapping and handling critical errors
- Using interrupt 1C hex and interrupt 8
- The counter/timer’s internal operation
- Reprogramming the timer operating mode
- Measuring short time intervals (three techniques)
- Reading the timer count in progress
- Generating an absolute timestamp
- Reprogramming the timer tick rate
- Simulating a vertical retrace interrupt for triple buffering
- Using the serial and parallel port interrupts
- Reading the joystick position (three methods)
- Generating tones and sound.
In addition to these timing techniques, this document covers the PC’s timing hardware, and covers interrupts and interrupt considerations in some detail.
Also included in this package is an archive containing executable versions of the sample programs, and an archive containing six illustrations in GIF format.
1.1.1 AUDIENCE
This document is not aimed at programmers who wear suits and write database query programs in Cobol. It is aimed at the ‘tinkerer’ programmer or low-level programmer, who wants complete control of the computer, wants to work closely with the hardware, and who is familiar with, and interested in, real time concepts. Previous programming experience in C and assembly language, and familiarity with DOS and BIOS design, would be an advantage.
1.2 CONTENTS
- 1 INTRODUCTION AND DOCUMENT INFORMATION
- 1.1 DOCUMENT OVERVIEW
- 1.1.1 AUDIENCE
- 1.2 CONTENTS
- 1.3 AUTHOR AND DISTRIBUTION
- 1.4 DISCLAIMER AND LEGAL STUFF
- 1.5 DOCUMENT CONVENTIONS
- 1.6 SAMPLE CODE CONVENTIONS
- 1.7 ACKNOWLEDGEMENTS
- 1.8 QUOTER PROGRAM
- 1.9 REVISION NOTES
- 1.10 GLOSSARY
- 2 OVERVIEW OF TIMING TECHNIQUES
- 2.1 THE BIG PICTURE
- 2.2 WHICH TECHNIQUE?
- 2.3 COMPARISON OF TECHNIQUES
- 2.4 OTHER SUBJECTS COVERED IN THIS DOCUMENT
- 3 DOS AND BIOS TIME-OF-DAY AND ALARM FUNCTIONS
- 3.1 READING THE DATE AND TIME FROM DOS
- 3.2 READING THE DATE AND TIME FROM THE BIOS
- 3.3 SAMPLE PROGRAM: DOS DEVICE DRIVER FOR THE AT CLOCK
- 3.4 OTHER BIOS TIME AND ALARM FUNCTIONS
- 3.5 OTHER OTHER BIOS TIME FUNCTIONS
- 3.6 THE TIMES THEY ARE A-CHANGIN’
- 4 USING THE BIOS TICK COUNT VARIABLE
- 4.1 THE BIOS TICK COUNT VARIABLE
- 4.2 CHANGE OF DAY
- 4.3 READING AND SETTING THE TICK COUNT
- 4.4 SPECIAL REQUIREMENTS - NONE
- 4.5 SAMPLE PROGRAM: READING THE TICK COUNT
- 4.6 SAMPLE CODE: OPTIMISED FUNCTION TO READ THE TICK COUNT
- 4.7 SAMPLE PROGRAM: USING THE TICK COUNT FOR TIMEOUT CHECKING
- 4.8 SIMPLE DELAYS USING THE BIOS TICK COUNT
- 5 SPECIAL SOFTWARE PRECAUTIONS
- 5.1 THE CTRL-C AND CTRL-BREAK INTERRUPTS
- 5.2 HANDLING THE CTRL-C INTERRUPT
- 5.3 THE CRITICAL ERROR INTERRUPT
- 5.4 CRITICAL ERROR HANDLER PARAMETERS
- 5.5 CRITICAL ERROR HANDLER OPERATION
- 5.6 THE DIVIDE OVERFLOW INTERRUPT
- 5.7 ERROR HANDLING SYSTEM
- 5.8 SAMPLE CODE MODULE: CRITICAL ERROR HANDLER MODULE
- 6 INTERRUPTS
- 6.1 THE TIMER TICK INTERRUPTS
- 6.2 INTERRUPT VECTOR TABLE
- 6.3 INTERCEPTING AN INTERRUPT
- 6.4 INTERRUPT HARDWARE
- 6.5 IRQ TO INTERRUPT MAPPING
- 6.6 INTERRUPT FLAG, INTERRUPT ACCEPTANCE, INTERRUPT NESTING
- 6.7 EMM386 INTERRUPT INTERCEPTION
- 6.8 AVOIDING EMM386 OVERHEAD
- 6.9 LONG TIMER TICK INTERRUPT HANDLERS
- 6.9.1 DANGER OF LONG TIMER TICK INTERRUPT HANDLERS
- 6.10 INTERRUPT MASK REGISTER
- 6.11 ENABLING AND DISABLING THE TIMER TICK INTERRUPT
- 6.12 READING THE INTERRUPT REQUEST REGISTER
- 6.13 READING THE INTERRUPT IN SERVICE REGISTER
- 6.14 WHEN YOU SHOULD DISABLE INTERRUPTS
- 6.15 WHEN YOU SHOULDN’T DISABLE INTERRUPTS
- 6.16 CAUSES OF INTERRUPT DELIVERY JITTER AND FAST TICK LOSS
- 6.16.1 INTERRUPT DELIVERY JITTER DUE TO REAL INTERRUPTS
- 6.16.2 INTERRUPT DELIVERY JITTER DUE TO SOFTWARE INTERRUPTS
- 6.16.3 INTERRUPT DELIVERY JITTER DUE TO HARDWARE ACCESSES
- 6.16.4 AVOIDING INTERRUPT DELIVERY JITTER
- 6.17 DETECTING INTERRUPT DELIVERY JITTER AND MISSED FAST TICK INTERRUPTS
- 6.18 DISABLING INTERRUPTS FOR LONGER THAN ONE TIMER TICK
- 6.19 DISABLING INTERRUPTS FOR LONG PERIODS OF TIME
- 6.20 OVERHEAD OF AN INTERRUPT
- 6.21 EFFECT OF BACKGROUND INTERRUPTS
- 6.22 SAFE CONTROL OF INTERRUPTS
- 6.23 TIMER TICK INTERRUPT HANDLER GUIDELINES
- 6.24 ACCESSING HARDWARE DEVICES IN AN INTERRUPT HANDLER
- 6.25 CALLING DOS AND BIOS IN AN INTERRUPT HANDLER
- 6.26 CALLING C LIBRARY FUNCTIONS IN AN INTERRUPT HANDLER
- 6.27 RE-ENTRY OF INTERRUPT HANDLERS
- 6.28 THE ‘END OF INTERRUPT’ SIGNAL
- 6.28.1 LEVEL TRIGGERED INTERRUPT RESET
- 6.29 ENABLING AND DISABLING INTERRUPTS IN AN INTERRUPT HANDLER
- 6.30 STACK USAGE AND STACK CHECKING IN AN INTERRUPT HANDLER
- 6.31 CHAINING TO THE OLD INTERRUPT HANDLER
- 6.32 WRITING INTERRUPT HANDLERS IN ASSEMBLY LANGUAGE
- 6.32.1 ASSEMBLY LANGUAGE INTERRUPT HANDLERS: ACCESSING VARIABLES
- 6.32.2 ASSEMBLY LANGUAGE INTERRUPT HANDLERS: STARTING CONDITION
- 6.32.3 ASSEMBLY LANGUAGE INTERRUPT HANDLERS: PRESERVE THE REGISTERS
- 6.33 USING INTERRUPT EIGHT IN A TSR
- 6.34 USING INT 8 WITHOUT CHAINING
- 6.35 USING INT 1C HEX INSTEAD OF INT 8
- 6.36 SAMPLE PROGRAM: USING INT 1CH WITH CRITICAL ERROR AND CTRL-C HANDLING
- 6.37 DEBUGGING INTERRUPT HANDLERS
- 7 HARDWARE INFORMATION AND PROGRAMMING
- 7.1 THE 14.31818 MHZ CLOCK
- 7.2 CLOCK FREQUENCY ACCURACY
- 7.3 THE COUNTER/TIMER CHIP (CTC)
- 7.4 CTC CHANNELS
- 7.4.1 CTC CHANNEL ZERO
- 7.4.2 CTC CHANNEL ZERO DEFAULT OPERATING MODE
- 7.4.3 CTC CHANNEL ONE
- 7.4.4 CTC CHANNEL TWO
- 7.5 SPEAKER INTERFACE
- 7.6 CTC INTERNAL REGISTERS
- 7.7 ACCESS MODES
- 7.8 CTC OPERATING MODES
- 7.8.1 OPERATING MODES: BEHAVIOUR COMMON TO ALL MODES
- 7.8.2 OPERATING MODE ZERO: INTERRUPT ON TERMINAL COUNT
- 7.8.3 OPERATING MODE ONE: HARDWARE-RETRIGGERABLE ONE-SHOT
- 7.8.4 OPERATING MODE TWO: RATE GENERATOR
- 7.8.5 OPERATING MODE THREE: SQUARE WAVE GENERATOR
- 7.8.6 OPERATING MODE FOUR: SOFTWARE-TRIGGERED STROBE
- 7.8.7 OPERATING MODE FIVE: HARDWARE-TRIGGERED STROBE
- 7.9 THE 8254/8253 REGISTERS
- 7.9.1 THE MODE/COMMAND REGISTER
- 7.9.2 THE DATA PORTS
- 7.9.3 ACCESSING THE REGISTERS
- 7.9.4 I/O RECOVERY DELAYS
- 7.10 PROGRAMMING THE MODE AND RELOAD REGISTER
- 7.11 EFFECT OF REPROGRAMMING CHANNEL ZERO ON THE TIMER TICK INTERRUPT
- 7.12 SAMPLE PROGRAM: PROGRAMMING THE MODE AND RELOAD VALUE
- 7.13 READING THE RELOAD REGISTER
- 7.14 READING THE COUNTING REGISTER
- 7.15 THE LATCH COMMAND
- 7.15.1 MEANING OF COUNT VALUE IN MODE TWO
- 7.15.2 MEANING OF COUNT VALUE IN MODE THREE
- 7.16 SAMPLE CODE: READING THE COUNT IN MODE TWO
- 7.17 THE LOBYTE/HIBYTE FLAG
- 7.18 THE READ-BACK COMMAND
- 7.19 SAMPLE CODE: READ-BACK
- 7.20 READING THE COUNT IN MODE THREE (8254 ONLY)
- 7.21 SAMPLE CODE: READING THE COUNT IN MODE THREE
- 7.22 SAMPLE CODE: OPTIMISED MODE THREE COUNT READING FUNCTION
- 7.23 SAMPLE PROGRAM: MANIPULATE THE CTC AND PORT B
- 7.24 HARDWARE PROBLEMS AND DIFFERENCES
- 7.24.1 DIFFERENCES BETWEEN THE INTEL 8253 AND 8254
- 7.24.2 CHIPSET IMPLEMENTATIONS
- 7.24.3 INTEL 8253/8254/82C54 CLOCK SYNCHRONISATION PROBLEMS
- 7.25 IS THE CTC AN 8253 OR AN 8254?
- 7.26 DETERMINING THE EXACT STATE OF THE CTC
- 7.27 SAMPLE PROGRAM: REPORT CHANNEL STATES
- 7.28 CTC ACCESS UNDER OS/2
- 7.28.1 OS/2 VTIMER.SYS: CTC CHANNEL ZERO
- 7.28.2 OS/2 VTIMER.SYS: CTC CHANNEL ONE
- 7.28.3 OS/2 VTIMER.SYS: CTC CHANNEL TWO
- 7.29 GENERATING AUDIO TONES ON THE SPEAKER
- 7.30 SAMPLE PROGRAM: GENERATING A TONE USING CTC CHANNEL TWO
- 7.31 TIMING SHORT PERIODS USING CTC CHANNEL TWO
- 7.32 TIMING SHORT PERIODS USING MODE THREE
- 7.33 VERTICAL RETRACE
- 7.34 SAMPLE PROGRAM: TIMING SHORT PERIODS USING MODE THREE
- 7.35 THE REAL TIME CLOCK (RTC)
- 7.35.1 READING AND WRITING RTC REGISTERS
- 7.35.2 ALLOCATION OF THE RTC REGISTERS
- 7.35.3 RTC REGISTER A
- 7.35.4 RTC REGISTER B
- 7.35.5 RTC REGISTER C
- 7.35.6 RTC REGISTER D
- 7.35.7 READING THE RTC
- 7.35.8 SAMPLE PROGRAM: A TSR CLOCK USING INT 8 AND THE RTC
- 7.36 THE RTC INTERRUPT AND RELATED BIOS FUNCTIONS
- 7.36.1 THE BIOS EVENT WAIT AND DELAY FUNCTIONS
- 7.36.2 THE BIOS RTC INTERRUPT HANDLER
- 7.36.3 USING THE RTC INTERRUPT
- 7.36.4 SAMPLE PROGRAM: USING THE RTC INTERRUPT
- 7.37 USING CTC CHANNEL ONE AND REFRESH DETECT
- 7.37.1 SAMPLE PROGRAM: TIMING THE REFRESH DETECT SIGNAL
- 7.37.2 SAMPLE CODE: DELAY(MILLISECONDS) FUNCTION USING REFRESH DETECT
- 8 SPEEDING UP THE TIMER TICK
- 8.1 THE FAST TICK INT 8 HANDLER
- 8.2 THE INTERFACE WITH THE MAINLINE
- 8.3 WRITING A FAST TICK HANDLER
- 8.4 COMMENTS ON FAST TIMER TICK INTERRUPTS
- 8.5 SAMPLE PROGRAM: MORSE PLAYER USING FAST TIMER TICK
- 8.6 DYNAMIC FAST TICK PERIODS
- 8.7 SAMPLE PROGRAM: DYNAMIC FAST TICK INTERRUPT HANDLER
- 9 READING AN ABSOLUTE TIMESTAMP
- 9.1 SAMPLE PROGRAM: ABSOLUTE TIME REFERENCE (TIMESTAMP) IN MODE TWO
- 9.2 SAMPLE PROGRAM: ABSOLUTE TIMESTAMP IN MODE TWO - ASSEMBLER
- 9.3 HANDLING THE MIDNIGHT BOUNDARY
- 10 OTHER TOPICS
- 10.1 THE 586 TIME STAMP COUNTER
- 10.2 SERIAL PORT REGULAR INTERRUPT
- 10.2.1 SERIAL PORT (UART) DOCUMENTATION
- 10.2.2 SAMPLE PROGRAM: REGULAR INTERRUPT USING THE SERIAL PORT
- 10.2.3 INSERTING DELAYS INTO SERIAL PORT TRANSMITTED DATA
- 10.3 EXTERNAL INTERRUPT SOURCES
- 10.3.1 EXTERNAL INTERRUPT THROUGH PARALLEL PORT
- 10.3.2 EXTERNAL INTERRUPT THROUGH SERIAL PORT
- 10.3.3 EXTERNAL INTERRUPT THROUGH SOUND CARD
- 10.3.4 EXTERNAL INTERRUPT THROUGH CUSTOM I/O CARD
- 10.4 THE JOYSTICK PORT
- 10.4.1 JOYSTICK PORT HARDWARE
- 10.4.2 READING THE JOYSTICK BUTTONS AND POSITION
- 10.4.3 NOTES FROM THE PC-GPE ARTICLE
- 10.4.4 SAMPLE PROGRAM: READING THE JOYSTICK POSITION
- 10.4.5 USING THE JOYSTICK PORT FOR GENERAL PURPOSE INPUT
- 10.4.6 JOYSTICK LEFT/RIGHT AND UP/DOWN DETECTION
- 10.5 THE MOUSE AND MOUSE DRIVER [NOT WRITTEN]
- 10.6 NETWORKS
- 10.7 SOUND GENERATION
- 10.7.1 PULSE WIDTH MODULATION (PWM) PRINCIPLE
- 10.7.2 PWM AUDIO GENERATION IMPLEMENTATION
- 10.7.3 SAMPLE PROGRAM: DTMF GENERATION USING PWM
- 10.7.3.1 SAMPLE PROGRAM EXPLANATION
- 10.7.3.2 OTHER METHODS OF SOUND GENERATION
- 10.7.4 PETER MOYLAN’S MUSIC PACKAGE
- 10.8 RELATED SOFTWARE PACKAGES
- 10.8.1 THE ATIM PACKAGE
- 10.8.2 THE MSCHRT AND TCHRT PACKAGES
- 10.8.3 THE TCTIMER PACKAGE
- 10.8.4 THE MILLISEC PACKAGE
- 10.8.5 THE MSEC_12 PACKAGE
- 10.8.6 THE ERTIMER PACKAGE
- 10.8.7 THE FASTCLOK PACKAGE
- 10.9 BENCHMARKING CONSIDERATIONS
- 10.10 GRANULARITY AND UNCERTAINTY
- 10.11 CONVERTING BETWEEN MICROSECONDS AND CTC CLOCKS
- 10.12 MAINTAINING A MILLISECOND OR MICROSECOND COUNT
- 10.12.1 SAMPLE PROGRAM: MILLISECOND COUNT USING INT 1CH
- 10.13 NOTES ON MICROSOFT WINDOWS
- 10.14 DOS FILE DATE AND TIME STAMPS
- 10.15 DOS AND THE DATE AND TIME
- 10.15.1 DOS DATE ROLLOVER BUGS
- 10.16 SIMULATING A VERTICAL RETRACE INTERRUPT
- 10.16.1 VERTICAL RETRACE INTERRUPT SIMULATION DESCRIPTION
- 10.16.1.1 MEASURING THE FIELD TIME
- 10.16.1.2 CONTROLLING THE CTC INTERRUPT
- 10.16.1.3 SIGNIFICANCE OF THE SAFEMARGIN VALUE
- 10.16.1.4 OVERHEAD DUE TO LARGE SAFEMARGIN AND SCREEN UPDATE
- 10.16.1.5 ENHANCED HANDLING OF MISSED RETRACE START
- 10.16.1.6 OTHER NOTES
- 10.16.2 SAMPLE PROGRAM: SIMULATING A VERTICAL RETRACE INTERRUPT
- 10.16.3 DOUBLE AND TRIPLE BUFFERING
- 11 QUESTIONS AND ANSWERS
- 11.1 TIMING ACCURACY
- 11.2 TIMER INTERRUPTS (INT 8, INT 1CH, RTC INTERRUPT)
- 11.3 INTERRUPT PRIORITIES AND NESTING
- 11.4 INTERRUPT HANDLER RESTRICTIONS
- 11.5 HIGH SPEED TIMER TICK
- 11.6 DOS DATE AND TIME
- 11.7 ACCESSING HARDWARE
- 11.8 MISCELLANEOUS
-
12 REFERENCES
1.3 AUTHOR AND DISTRIBUTION
This document (including sample code and programs) is Copyright (c) 1994-1996 by K. Heidenstrom. Please send corrections/additions/comments/suggestions to:
Email: [email protected] Snail mail: K. Heidenstrom, c/- P.O. Box 27-103, Wellington, New Zealand.
If you send me comments, corrections etc via email or on a disk, you may find the quoter program described in section 1.8 helpful. It will generate a quoted copy of this file, to help you with marking up the document with your comments.
The archive may be freely distributed via any electronic medium provided that it is not modified in any way, and that no charge (other than the normal charge to cover the disk, CD, etc) is made.
The sample code and sample programs may be freely used in any commercial or non-commercial software.
If you find this document useful, I would appreciate a postcard, or an email message, especially if you tell me a bit about your project.
I’m pretty sure of this stuff, and I’ve done a bit of research (not as much as I should have done :-), but don’t take it all as gospel. I have had to work some things out by myself and I may have got something wrong. If you know better about anything in here, please please drop me a message, so that other readers of this document can benefit from your experience. Thanks!
FILE_ID.DIZ contents and SimTel information: pctim003.zip FAQ / App notes: Timing on the PC under DOS
This archive contains a technical document useful to PC programmers, with many sample programs. The document covers timing and related subjects on the IBM PC family under DOS. Subjects include BIOS and DOS functions, the BIOS tick count, hardware interrupts, timer tick interrupts, Port B, the 8253/8254 timer, speeding up the timer tick, dynamic tick periods, simulated vertical retrace interrupt, double and triple buffering, absolute timestamping, the RTC, other timing methods, reading the joystick, PWM sound generation. Freeware. 13400 lines, PC ASCII, 340K ZIP file. Release 3, February 1996. Author: Kris Heidenstrom, [email protected].
Simtel directory: SimTel/msdos/info/
Keywords:
145818 8253 8254 8255 8259 AT B CTC BIOS Delay DOS I/O IBM Interrupt Joystick MS-DOS PC PIC PIT PWM Port RTC Tick Timestamping Timing
This document should be named PCTIMxxx.TXT where xxx is the release number shown at the top of the file. The latest version will always be available on SimTel (ftp.coast.net), or mirrors (such as Oakland). The file’s URL at SimTel is ftp://ftp.coast.net/SimTel/msdos/info/pctim*.zip.
Your browser may not accept a wildcard specification (i.e. the asterisk), and may say that the file does not exist. If so, view a listing of the SimTel/ msdos/info directory, find the file name, and modify the URL accordingly.
1.4 DISCLAIMER AND LEGAL STUFF
I make no warranty of any kind with regard to this information and sample code. In no event shall I be liable for any damages whatsoever for any loss involving the use of this information or sample code, or due to any errors or omissions.
Trademarks and service marks mentioned in this document are the property of their respective owners. Most of them probably know who they are :-)
1.5 DOCUMENT CONVENTIONS
This file is formatted for viewing on an IBM or compatible (American ASCII with high-ASCII box characters, i.e. codepage 437) with an 80-column monospaced (i.e. text-mode) display, using tab stops every 8 columns. I have designed the document to work with DOS file viewers such as Vern Buerg’s famous LIST program. Sections are hierarchically numbered. The contents is near the start of the file, and each section or subsection is announced by two ‘#’ characters, a space, and the section number, to facilitate searching. I have mostly used British spelling.
There are six illustrations in GIF format, which are enclosed in the FIGURES archive. Since they are line drawings, they do not look good if rescaled, so try to view them at their original resolutions if possible.
Currently only the plain ASCII text version, in English, exists. There does not seem to be a good widely-used alternative at the moment. I would try Tex but I don’t have a spare hard drive and six spare months to figure out how to use it! Let me know if you would like a Word Perfect 6.0 (DOS) or Word Perfect for Windows version and if there is enough interest I may create one. Also if you want to create an HTML version of this document, please get in touch!
Numbers are decimal unless indicated. Hex is indicated by ‘0x’ prefix or ‘h’ suffix, e.g. 0x55AA, 1Ch.
Throughout this document, I refer to the 8253/8254 timer chip as the ‘CTC’ (counter/timer chip, or counter/timer circuit). This term is not normally used for this particular chip. Intel calls it the PIT (programmable interval timer). I mention this because you may get corrected if you publically call it the CTC.
I have had a great deal of trouble maintaining a logical organisation in this document. I welcome any suggestions for improving its readability and understandability :-)
Some subjects are outside my experience and I have marked these with (*). If you can fill in any of these gaps, this would be much appreciated.
1.6 SAMPLE CODE CONVENTIONS
The sample code is in C and assembler, but you could convert it to Pascal or convert the C code to assembler. In most cases, I have aimed to be instructive rather than highly optimal. The sample programs are starting points - they are complete stand-alone programs, but are not necessarily very useful. They have been briefly tested with Borland C++ 2.0, Borland TASM 3.1, and Borland TLINK version 4.0. Short sample functions are untested. Let me know if you have any trouble with them.
I have used small model for the C programs, so code and data are near, but this could be changed easily. The assembly language programs are in tiny model and should assemble with either MASM or TASM; I have had to forgo TASM’s Ideal Mode and all of my nice macros. :-(
I have listed #defines in each sample program as required. When I have re-used already-documented functions I have kept the name and coding the same, but have removed the comments from all but the first occurrence of the function.
MS-DOS (version 2.0 or later) or a compatible operating system is assumed.
1.7 ACKNOWLEDGEMENTS
My thanks for suggestions, information, criticism, and/or encouragement, to:
Michael Bishop [email protected]
Gordon Burditt [email protected]
Jan-Pieter Cornet [email protected]
Saul Cozens [email protected]
David Empson [email protected]
Klaus Hartnegg [email protected]
Gian Uberto Lauri [email protected]
William Luitje [email protected]
Terje Mathisen [email protected]
Michael Mauch [email protected]
John Mertus [email protected] {JAM}
Peter Moylan [email protected]
Anders Roar Nielsen [email protected]
Philip O’Carroll [email protected] {POC}
James Ralph [email protected]
Paul Ross [email protected]
Tor Sjowall [email protected] {TOR}
Bob Smith [email protected]
John Stockton [email protected]
Louis Warshaw [email protected]
Please tell me if your name should be on this list!
To give credit where it is due, throughout the text I have flagged specific contributions with the names shown in squiggly brackets.
In particular, I have used (with permission) information about sampled audio generation on the PC speaker from a PC speaker music package written by Peter Moylan with help from Tim Channon. The technique mentioned here was also described by Mark Feldman (the PC-GPE guru). See section 10.7.
I have also used many invaluable pieces of information (again with permission) from a collection of papers by Prof. John Mertus. Prof. Mertus’s papers deal with subject testing (e.g. reaction timing), timer accuracy, and statistical analysis techniques for validating correct and reliable performance on various machines in various configurations (e.g. in protected mode, or on networked machines) which I have not covered in this document. They are thorough, and very interesting. You can FTP his files, in PostScript and LaTeX formats, from: ftp://jam.cog.brown.edu/pub/timing/ (various files).
I have paraphrased his comments to maintain continuity in my document, and used the marker {JAM} so that credit goes where it is due. Any mistakes in the interpretation are mine, however. Prof. John Mertus owns the copyright on the above mentioned documents, please respect the considerable amount of work which has gone into them, by giving him credit if you use them.
1.8 QUOTER PROGRAM
To generate a quoted version of this file so you can report problems to me, I
have included in the SAMPLES archive a small program called QUOTE.COM, which
operates as a quoting filter. Entering “C:> QUOTE
1.9 REVISION NOTES
Release 1 19950417
Release 2 19950816
Release 3 19960201
This is the third release of this document. At this point, I have at last covered all the important timing-related subjects that I know about. If you would like to see any other subjects covered, or would like to submit documentation or code on other relevant subjects, please get in touch. Otherwise the only intended future changes will be for correctness and to resolve the items indicated with (*) if possible.
Changes from release 2 to release 3:
- Added information and sample program for vertical retrace interrupt simulation
- Tidying up
- Improved comparison of techniques
- Various improvements suggested by Dr. John Stockton
- Important note relating to long timer tick interrupt handlers added, see section 6.9.1.
- Added questions and answers section
- Added six illustrations in GIF format (hoping CI$ don’t sue me :-)
- Added discussion on int 8 versus int 1Ch
- Added info on the triple buffering technique that can be used in conjunction with vertical retrace interrupt simulation
- Brief mentions of Microchannel int 8 reset
- Brief description of joystick left/right and up/down under interrupt
- Several notes from Michael Mauch ([email protected]) included
- Much expanded explanation of I/O access and recovery delays (section 7.9.4)
- Version 1.1.0 of quoter program, proper tab handling
Changes from release 1 to release 2:
- Added sample program to read and write CTC registers and Port B with a command-oriented interface
- Added information on timing-related software packages
- Added brief notes on benchmarking considerations
- Modified sample code for short period timing using channel 2 to generate a strobe pulse on the parallel port with a duration of 5 us plus overhead
- Added code for converting between microseconds and CTC clocks
- Corekkted twleve typoes
- Fixed various minor clumsy explanations and stupid mistakes
- Added notes on Windows considerations from {TOR}
- Added description and sample function for handling midnight boundary when calculating elapsed time from absolute timestamp values
- Added timing using Refresh Detect signal on Port B (thanks to William Luitje)
- Added sample code to determine keyboard interface type (PC/XT or AT and later)
- Documentation on resolution and uncertainty
- Documentation and sample program for millisecond count variable
- Added delay(milliseconds) function using Refresh Detect
- Added Refresh Detect method of reading the joystick position
- Added notes on generating delays in serially transmitted data
- Added sample program to generate DTMF using PWM audio techniques
- Added information on DOS internal handling of date and time
- Include sample programs in executable form in the distribution file
1.10 GLOSSARY
ASIC
Application Specific Integrated Circuit, a high density custom chip.
BCD
Binary Coded Decimal, an encoding scheme where each digit of a decimal number is represented by four adjacent bits in a register. For example in BCD the number ninety-seven would be represented by 10010111 binary. The binary representation of 97 is 01100001.
BIOS
Basic Input/Output System, software in ROM chips on the motherboard.
Bit
If you don’t know what a bit is, you are reading the wrong document :-)
Channel
One of three independent counting or timing circuits in the CTC. Also referred to as a ‘timer’.
Clock
[n] An electrical signal at a fixed frequency [in this context]. [v] To trigger to perform a certain action. For an electrical clock, the action is performed at the instant of the rising or falling edge of the clock signal.
Count
[n] The value in a counter at a given moment in time. [v] What it usually means :-)
Counter
A register which increments or decrements when clocked.
Counting register
The counter in a CTC channel. It decrements when clocked, and can be reloaded from the Reload register. See section 7.3
CTC
Counter/Timer Chip (or Circuit), the 8253 (PC, XT) or 8254 (AT and later) chip or functional equivalent. I prefer the term ‘CTC’ and use it in this document, but the CTC is more commonly known as the ‘Timer’, the ‘Counter’, and the ‘PIT’ (Programmable Interval Timer), which is Intel’s name for the chip.
CTC clock
The clock input frequency to the CTC, 1.193181666666… MHz.
Decrement
Count down (usually by 1).
Divide (frequency)
To generate a lower frequency from a higher frequency by counting pulses and producing an output pulse when a certain number of input pulses have occurred.
Divisor register
Another name for the Reload register when modes 2 or 3 are used. See section 7.3.
DMA
Direct Memory Access, a technique where hardware (e.g. a floppy disk drive adapter or sound card) transfers data directly to or from memory, without processor intervention.
EISA
Enhanced Industry Standard Architecture, the bus structure used in some more modern PCs. It is an extension of the ISA architecture.
EOI
End of Interrupt, a command to the PIC to indicate that an interrupt handler has completed, see section 6.28.
Flag
A single bit indicating yes/no, true/false, on/off, enabled/disabled, or any condition which has two possible (and usually opposite) states.
Frequency
How often something occurs, per second. 18.2065 Hz (hertz) means 18.2065 times per second.
Hz
Hertz, the unit of frequency.
IMR
Interrupt Mask Register in the PIC.
Increment
Count up (usually by 1).
Interrupt
[n] A hardware- or software-generated interruption to the processor. [v] To suspend processing and cause the processor to execute a special section of code (the interrupt handler).
Interrupt Controller
See PIC.
Interrupt Handler
See Interrupt Service Routine.
Interrupt Service Routine
A section of code which is executed in response to an interrupt which ‘services’ (attends to) the hardware device or software invocation which generated the interrupt.
Interrupt Vector
See Vector.
IRQ
Interrupt request, a hardware interrupt source, handled by the PIC(s). IRR
Interrupt Request Register, part of the 8259 PIC, see section 6.12.
ISA
Industry Standard Architecture (Also Irritatingly Slow Architecture), the bus structure of the PC, XT, and AT. Contrast to EISA, MCA and PCI architectures. Despite its limitations, it is still the most common bus structure. Many of these limitations are avoided with the VESA Local Bus extension.
ISR
Interrupt Service Routine. Also In Service Register, section 6.13.
IVT
Interrupt Vector Table, a table of 256 interrupt vectors occupying the first 1024 bytes of physical memory (in real and 8086 emulation modes).
{JAM}
See section 1.7.
Jitter
Unevenness, inconsistency, fluctuation, variation, or irregularity.
LSI
Large Scale Integration, a high density chip, see ASIC
MCA
Microchannel Architecture, the bus structure used in most IBM PS/2 machines. Sort of a dead duck as far as architectures are concerned.
MHz
Megahertz, one million hertz.
Mode
Of a CTC channel, the operational algorithm, or definition of behaviour, which has been selected (programmed) for that channel.
Monostable
A circuit which has one stable state (in which it will remain until triggered externally) and one unstable state (in which it will remain for a given period of time). Also called a one-shot. When triggered, it switches to its unstable state, and after a period of time, it returns to its stable state until triggered again.
ms
Millisecond(s), one thousandth of a second.
NMI
Non-Maskable Interrupt, an emergency interrupt source that cannot be masked (cannot be disabled under software control).
PIC
Programmable Interrupt Controller, an Intel 8259 chip or functional equivalent, which arbitrates IRQs and issues hardware interrupt requests to the processor. The PC and XT have one PIC, the AT has two. See section 6.4.
{POC}
See section 1.7.
Port
A link between software and hardware. Allows software to ‘talk’ to hardware devices. Also a connector on the back of the PC (e.g. serial or parallel port).
POST
Power-On Self-Test, the initialisation and test functions of the BIOS.
PPI
Programmable Peripheral Interface, an Intel 8255, used on the PC and XT, replaced by the keyboard controller on the AT and later machines.
ppm
Parts Per Million. 10000 ppm is one percent. 1 ppm is 0.0001 percent. 1 ppm corresponds to 0.0864 seconds per day; 11.5741 ppm is one second per day.
Prefetch queue
A look-ahead buffer in the processor which ‘pre-fetches’ instructions ahead of the current execution point during gaps when memory is not being accessed (i.e. while instructions are being internally processed by the processor) so that the instructions are ready before they are needed. This method is based on the assumption that instructions are executed in sequence. A jump, call, return, interrupt, or conditional branch instruction (if the branch is taken) disrupt this sequence and cause the prefetch queue to be flushed, slowing execution.
Processor
The Intel 80x86 central processing unit or functional equivalent.
Reload register
Register which contains the value which is reloaded into the Counting register under certain circumstances (depending on the mode), see section 7.3.
Register
A group of bits, can be used to store and manipulate numbers.
ROM
Read-Only Memory, a chip containing factory programmed software.
RTC
Real Time Clock, also called RTC/RAM or CMOS. A Motorola MC146818 or workalike, containing real-time date and time registers and battery-backed-up storage for BIOS parameters (CMOS).
Tick
The timer interrupt which normally occurs 18.2065 times per second.
Timer
See ‘Channel’ and ‘CTC’.
TLA
Itself
{TOR}
See section 1.7.
TSR
Terminate and Stay Resident, a memory-resident pop-up utility program.
UART
Universal Asynchronous Receiver/Transmitter; a chip which transmits and receives asynchronous serial data (e.g. to a modem). The UART used in the PC is the 8250 or one of its descendants.
us
Microsecond(s), one millionth of a second.
Vector
[n] A pointer to a section of code, often an interrupt service routine. [v] To execute the code pointed to by a vector.
VGA
A video adapter standard. It is the basic standard for most current video hardware. The name comes from Video Graphics Array, the ASIC that implements the video hardware in the PS/2.
-WR
An active low write signal. The ‘-‘ prefix means active low. When this line goes low, the processor is writing data into a peripheral.
2 OVERVIEW OF TIMING TECHNIQUES
This section gives you the big picture, then presents the timing techniques that will be described in detail in later sections, so you can choose the technique that interests you.
2.1 THE BIG PICTURE
Figure 1 gives a general overview of the two main timing subsystems in the PC, and their interfaces to the processor.
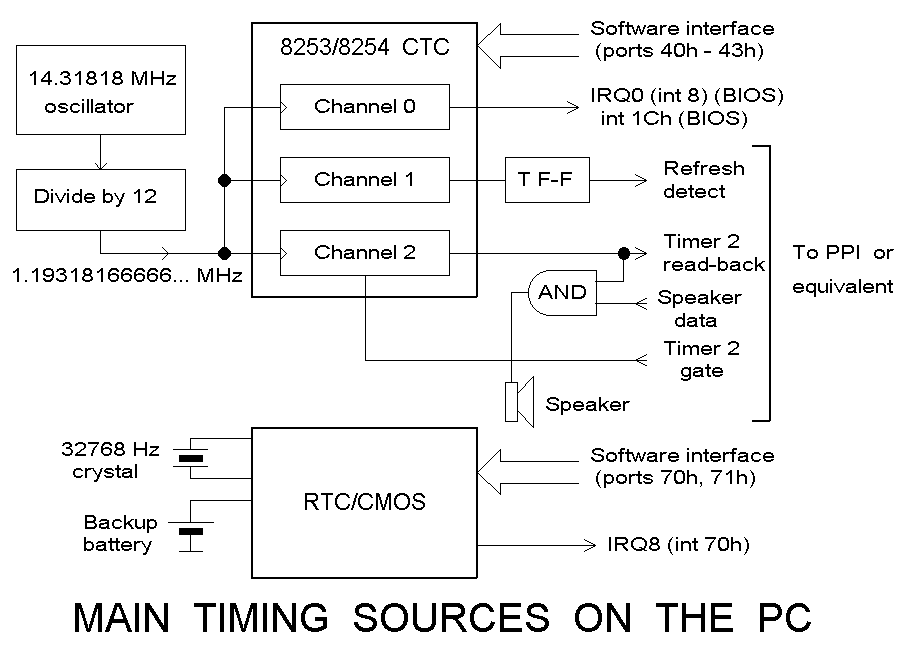 Figure 1
The 14.31818 MHz system clock is divided by 12 to give a 1.193182 MHz clock (period is 0.8381 microseconds) which clocks the three channels of the 8253/8254 counter/timer chip (CTC). The CTC divides this frequency to lower frequencies using programmable divisors, and produces three output signals.
CTC channel zero’s output is connected directly to IRQ0 on the primary PIC (8259 interrupt controller chip), and generates int 8, the timer tick interrupt, about 18.2065 times per second, or once every 54.9254 milliseconds. The timer tick is a regular interrupt which allows certain actions (such as updating the system time-of-day) to be executed periodically.
Interrupt 8 is serviced by the ROM-BIOS. The BIOS’s int 8 handler increments the BIOS tick count variable (a 32-bit variable used for timekeeping) and turns off the floppy disk drive motors two seconds after they were last accessed. It also issues int 1C hex, which may be used as a regular interrupt source by user programs.
The BIOS tick count is a 32-bit counter at low memory address 0040:006C, which contains the number of timer ticks (units of 54.9254 ms) since midnight and is used by DOS to calculate the time of day.
CTC channels 1 and 2 can also be used for timing, via the Refresh Detect and Timer 2 readback signals on Port B. Channel 2 also generates audio for the PC speaker, and can be used in conjunction with channel 0 for PWM audio generation.
The CTC divides its 1.193182 MHz clock down to 18.2065 Hz using a 16-bit counter. It is possible to read the actual count in progress in the CTC. In combination with the tick count variable, this can give an absolute time value, in units of 0.8381 us, for timestamping, elapsed time calculation, etc.
In some applications, a timer tick rate faster than 18.2065 times per second is required. This can be achieved by reprogramming the CTC. The CTC is told to generate the timer tick at a faster rate, and the program intercepts the timer tick interrupt (int 8). The int 8 handler does its thing, and calls the old int 8 handler at the correct rate (18.2065 times per second) to maintain the correct system time.
The Real Time Clock (RTC) was introduced with the AT, and all hardware- compatible ATs and later machines have one. The RTC is completely independent of the CTC. It uses a 32.768 kHz watch crystal for timekeeping and is battery backed up (i.e. continues to keep time while the computer is powered off). It can be used to generate a periodic interrupt, usually at 1024 Hz (1024 interrupts per second).
2.2 WHICH TECHNIQUE?
There are three basic approaches to timing. Often two approaches can be used together. The techniques are summarised and compared in section 2.3.
-
ABSOLUTE TIME REFERENCE You can write a function for use by your program that returns a value representing the absolute time, with units and resolution of one tick (54.9254 ms), or 977 us (the RTC regular interrupt rate), or one CTC clock (0.8381 us).
-
RELATIVE TIME REFERENCE Your program can use the CTC to measure short time durations, for example to generate a short pulse on an I/O port pin or measure an external signal.
-
REGULAR INTERRUPT An interrupt handler is called at regular (or sometimes, irregular) intervals, e.g. the default rate of once every 54.9254 ms, or 1024 times per second using the RTC, or at a user-selectable rate if you reprogram the CTC. The interrupt handler can perform operations in the background and/or maintain an absolute time variable.
2.3 COMPARISON OF TECHNIQUES
‘Special precautions’ in the following table refers to intercepting the DOS Ctrl-C, Critical Error, and Divide Overflow vectors so that interrupt vectors and/or hardware states can be restored safely when the program is terminated (see section 5 and subsections).
Technique: Call DOS to read time-of-day
Type: Absolute time reference
Resolution: 55 ms or one second
Special precautions: Not required
Use in TSRs: Not without special TSR techniques
Works under OS/2: Yes
Notes: Portable to all DOS and DOS compatible systems
Applications: Low resolution, absolute time value
Described in: Section 3.1
Technique: Call BIOS RTC functions to read time-of-day
Type: Absolute time reference
Resolution: One second
Special precautions: Not required
Use in TSRs: Usually safe
Works under OS/2: Yes
Applications: Low resolution, absolute time value
Described in: Section 3.2
Technique: Read RTC time of day directly
Type: Absolute time reference
Resolution: One second
Special precautions: Not required
Use in TSRs: Yes
Works under OS/2: Probably
Applications: Low resolution, absolute time value
Described in: Section 7.35 and subsections
Technique: Use the BIOS tick count variable
Type: Absolute time reference
Resolution: 55 ms
Special precautions: Not required
Use in TSRs: Yes
Works under OS/2: Yes
Notes: Can be read from within an interrupt routine
Applications: General absolute time value, low resolution
Described in: Section 4 and subsections
Technique: Use int 1C hex
Type: Regular interrupt
Resolution: 55 ms
Special precautions: Required
Use in TSRs: No (see section 6.35)
Works under OS/2: Yes
Applications: Low resolution regular interrupt
Described in: Section 6.1, section 6.35
Technique: Intercept int 8 (in TSRs)
Type: Regular interrupt
Resolution: 55 ms
Special precautions: Not required if used in a TSR
Use in TSRs: Yes
Works under OS/2: Yes
Applications: Regular interrupt for timing and/or popup by TSRs
Described in: Section 6.33
Technique: Read CTC channel 0 on-the-fly in mode two
Type: Absolute timestamp
Resolution: 0.8381 us
Special precautions: Not required
Use in TSRs: Yes
Works under OS/2: Only if HW_TIMER = ON
Notes: Can be read from within an interrupt routine
Applications: Absolute time value, high resolution
Described in: Section 7.16 and section 9 and subsections
Technique: Read CTC channel 0 on-the-fly in mode three
Type: Absolute timestamp
Resolution: 0.8381 us
Special precautions: Not required
Use in TSRs: Yes
Works under OS/2: Only if HW_TIMER = ON
Notes: Can be read from within an interrupt routine
Will not work on a PC, XT, or PS/2
No advantages over using mode two
Applications: Absolute time value, high resolution
Described in: Section 7.20, section 7.21, section 7.22
Technique: Use CTC channel 2 for timing short delays
Type: Relative time reference
Resolution: 0.8381 us
Special precautions: Not required
Use in TSRs: Yes
Works under OS/2: Only if HW_TIMER = ON
Notes: Can be used within an interrupt routine
Good for implementing short timeouts
Should only be used with interrupts locked out
Disrupts the system beep if used under interrupt
Applications: Short delays, useful in dedicated hardware control
Described in: Section 7.31, section 10.4.4
Technique: Read CTC channel 0 in mode three for short delays
Type: Relative time reference
Resolution: 0.8381 us
Special precautions: Not required
Use in TSRs: Yes
Works under OS/2: Only if HW_TIMER = ON
Notes: No advantages over using mode two
Applications: Short delays, useful in dedicated hardware control
Described in: Section 7.32
Technique: Vertical Retrace (polled)
Type: Relative time reference
Resolution: Medium (1/60 or 1/72 of a second)
Special precautions: Not required
Use in TSRs: Yes
Works under OS/2: Probably not
Notes: Useful for synchronising to screen scan
Applications: Screen scan synchronisation in games, graphics apps
Described in: Section 7.33
Technique: RTC Periodic Interrupt
Type: Regular interrupt
Resolution: 976.5625 us
Special precautions: Required
Use in TSRs: Not really safe
Works under OS/2: Probably not
Notes: Doesn’t interfere with the CTC
Convenient resolution
Won’t work on PCs and XTs
Described in: Section 7.36 and subsections
Technique: BIOS Delay and Event Wait functions
Type: Relative delay
Resolution: 976.5625 us
Special precautions: May be required
Use in TSRs: Not safe
Works under OS/2: Probably not
Notes: Doesn’t interfere with the CTC
Won’t work on PCs and XTs
Applications: General delays or timeouts with about 1ms resolution
Described in: Section 7.36.1
Technique: Refresh Detect (CTC channel 1 read-back)
Type: Relative time reference
Resolution: 15.0857 us
Special precautions: Not required
Use in TSRs: Yes
Works under OS/2: No
Notes: High resolution
Very tidy way to generate short delays
Can be used to generate delays of ‘at least x’ with
interrupts enabled
Can be used within an interrupt routine
Interrupts, if enabled, will lengthen the delay
Won’t work if the RAM refresh rate has been changed
Won’t work on old PCs and XTs
Applications: Short delays, timeouts, timing input signals
Described in: Section 7.37
Technique: Speed up CTC channel 0 (timer tick) rate
Type: Regular or irregular interrupt
Resolution: Settable
Special precautions: Required
Use in TSRs: No
Works under OS/2: Only if HW_TIMER = ON
Notes: Can generate exact interrupt rate (e.g. 500us, 1ms)
May affect other DOS sessions under OS/2 with HW_TIMER
Applications: Fast regular interrupt source - used for games, etc
Described in: Section 8 and subsections
Technique: Intel 586 Time Stamp Counter
Type: Absolute or relative time reference
Resolution: Extremely high
Special precautions: Not required
Use in TSRs: Yes
Works under OS/2: Probably
Notes: Ridiculously high resolution
Disadvantages: Doesn’t work on 486 or lower
Not guaranteed to work on future processors
Timing unit depends on processor clock speed
Applications: High resolution timestamping for usage billing
Described in: Section 10.1 and subsections
Technique: Regular interrupt from serial port
Type: Regular interrupt
Resolution: Selectable
Special precautions: Required
Use in TSRs: Not reliably
Works under OS/2: No
Notes: User-selectable interrupt rate
Doesn’t affect the CTC or the RTC
Requires a spare serial port
Applications: Slow or fast regular interrupt
Described in: Section 10.2 and subsections
Technique: External regular or irregular interrupt source
Type: Regular or irregular interrupt
Resolution: Depends on external hardware
Special precautions: Required
Use in TSRs: May not be reliable
Works under OS/2: Probably not
Notes: Can be very versatile
Requires special hardware
Applications: Slow or fast interrupt using special hardware
Described in: Section 10.3 and subsections
2.4 OTHER SUBJECTS COVERED IN THIS DOCUMENT
I’ve included, in addition to timing related documentation, info on handling the DOS Ctrl-C, critical error, and divide overflow interrupts (required if you are going to intercept any other interrupts), see section 5 and subsections, lots of general information about interrupts, information on various relevant hardware devices, information on the joystick hardware, information on sound and music generation using a technique called PWM (see section 10.7), and information on vertical retrace interrupt emulation (section 10.16).
3 DOS AND BIOS TIME-OF-DAY AND ALARM FUNCTIONS
In high level languages, library functions are available to get the time of day and should be used for portability. Internally they use the DOS time of day functions. Assembly language programmers can use the DOS and BIOS functions directly.
3.1 READING THE DATE AND TIME FROM DOS
DOS functions 2A, 2B, 2C, and 2D hex relate to time of day. To use them, set AH to the function number, and set other registers as applicable, and issue int 21 hex. All values are accepted and returned in binary form (i.e. not BCD).
Get Date : DOS functions (int 21h)
    Call with:  AH = 2A hex
    Returns:    AL = Day of week (0 to 6 correspond to Sun to Sat)
                CX = Year in full (1980 to 2099, 7BCh to 833h)
                DL = Day of month (1 to 31)
                DH = Month of year (1 to 12 correspond to Jan to Dec)

Get Time : DOS functions (int 21h)
    Call with:  AH = 2C hex
    Returns:    CH = Hours (0 to 23, using 24-hour clock format)
                CL = Minutes (0 to 59)
                DH = Seconds (0 to 59)
                DL = Hundredths of seconds (0 to 99) (see note below)

Set Date : DOS functions (int 21h)
    Call with:  AH = 2B hex
                CX = Year in full (must be 1980 to 2099)
                DL = Day of month (1 to 31, depending on month)
                DH = Month of year (1 to 12)
    Returns:    AL = Success/failure: 0 = OK, 0FFh = Bad date specified

Set Time : DOS functions (int 21h)
    Call with:  AH = 2D hex
                CH = Hours (0 to 23, 24-hour clock format)
                CL = Minutes (0 to 59)
                DH = Seconds (0 to 59)
                DL = Hundredths of seconds (0 to 99) (see note below)
    Returns:    AL = Success/failure: 0 = OK, 0FFh = Bad time specified
The time of day is calculated from the BIOS tick count variable. The hundredths of seconds value is approximated using an internal algorithm which apparently produces an even distribution of values, but its resolution is only as good as the tick counter, i.e. 54.9254 ms. See section 10.15 for more information.
3.2 READING THE DATE AND TIME FROM THE BIOS
BIOS functions provide access to the tick count and the RTC (Real-Time Clock), accessed by issuing int 1A hex. (The BIOS tick count functions are also part of this interrupt, but should not be used - see section 4.3 for details). The RTC functions accept and return values in BCD form.
The RTC functions are present on the AT and all later machines, but not on the original PC or XT (there may be some hybrid machines that do support them, but I don’t know of any).
Get RTC Date : int 1Ah
    Call with:  AH = 04 hex
    Returns:    CH = Hundreds of years (19h or 20h, BCD format)
                CL = Year (00h to 99h, BCD format)
                DH = Month (01h to 12h, BCD format)
                DL = Day of month (01h to 31h, BCD format)
                CF = Error status, carry is set if clock is not running

Get RTC Time : int 1Ah
    Call with:  AH = 02 hex
    Returns:    CH = Hours (00h to 23h, BCD format)
                CL = Minutes (00h to 59h, BCD format)
                DH = Seconds (00h to 59h, BCD format)
                CF = Error status, carry is set if clock is not running

Set RTC Date : int 1Ah
    Call with: AH = 05 hex
                CH = Hundreds of years (19h or 20h, BCD format)
                CL = Year (00h to 99h, BCD format)
                DH = Month (01h to 12h, BCD format)
                DL = Day of month (01h to 31h, BCD format)
    Returns:    Nothing

Set RTC Time : int 1Ah
    Call with:  AH = 03 hex
                CH = Hours (00h to 23h, BCD format)
                CL = Minutes (00h to 59h, BCD format)
                DH = Seconds (00h to 59h, BCD format)
                DL = Daylight saving flag:
                00 = Standard time
                01 = Daylight saving time
    Returns:    Nothing
3.3 SAMPLE PROGRAM: DOS DEVICE DRIVER FOR THE AT CLOCK
The following program implements an installable DOS device driver for the AT clock, using the BIOS RTC functions. Save the following code section as ATRTC.ASM and assemble according to the instructions in the comment block.
; Sample program #1
; DOS Device Driver for the AT Real Time Clock
; Part of the PC Timing FAQ / Application notes
; By K. Heidenstrom ([email protected])
;
; This program assembles into ATRTC.SYS, an installable DOS device driver that
; removes DOS's dependence on the BIOS timer tick count variable, using the AT
; BIOS's Real Time Clock functions to get and set the current date and time.
; This program does not support the daylight saving feature of the RTC.
; At installation, it checks that the machine is an AT, and that the RTC is
; functional.  If either check fails, it installs but remains inactive.
;
; Save this file to ATRTC.ASM and assemble with:
;    masm atrtc;
;    link atrtc;
;    exe2bin atrtc.exe atrtc.sys
; or
;    tasm atrtc;
;    tlink atrtc;
;    exe2bin atrtc.exe atrtc.sys
;
; Then place ATRTC.SYS in your root directory, DOS directory, or utilities
; directory, and add the line DEVICE=<path>\ATRTC.SYS to your CONFIG.SYS
; file, where <path> specifies the directory path to ATRTC.SYS.  If you want
; to load ATRTC.SYS high, use DEVICEHIGH= or HIDEVICE= instead of DEVICE= to
; load the driver.

BinFile        SEGMENT
        ASSUME    cs:BinFile,ds:nothing,es:nothing,ss:nothing

        ORG    0
Origin:

; Device driver header

Header        DD    -1        ; Link to next device
Attrib        DW    8008h        ; Attribute word
        DW    Strategy    ; Strategy entry point
        DW    Interrupt    ; Interrupt entry point
        DB    "CLOCK$  "    ; Device name

; When a request is made for this device, DOS calls the "Strategy" routine,
; passing a pointer to the request header in ES:BX.  The strategy routine saves
; this pointer in ReqHdr and returns to DOS.  DOS then calls the "Interrupt"
; routine, which executes the request specified by the request header.

ReqHdr        DD    0        ; Far pointer to request header

InitPtr        DW    Init        ; Address of init function

MonthTbl1    DW    0,31,59,90,120,151,181,212,243,273,304,334,365 ; Normal
MonthTbl2    DW    0,31,60,91,121,152,182,213,244,274,305,335,366 ; Leap yr

Strategy    PROC    far        ; Save address of Request Header
        mov    WORD PTR ReqHdr+0,bx
        mov    WORD PTR ReqHdr+2,es
        retf            ; Back to DOS
Strategy    ENDP

Interrupt    PROC    far
        push    ds
        push    si
        push    dx
        push    cx
        push    bx
        push    ax        ; Preserve registers
        lds    bx,ReqHdr    ; Point DS:BX to Request Header
        mov    WORD PTR ds:[bx+3],100h ; No errors, completed
        mov    al,ds:[bx+2]    ; Get command number from Request Header
        mov    cx,OFFSET Read    ; Prepare for Read command
        cmp    al,4        ; Check for Read command
        je    GotAdr        ; If so
        mov    cx,OFFSET Write    ; Prepare for Write command
        cmp    al,8        ; Check for Write command
        je    GotAdr        ; If so
        cmp    al,9        ; Check for Write with Verify
        je    GotAdr        ; If so
        mov    cx,InitPtr    ; Prepare for Init command
        cmp    al,0        ; Check for init command
        je    GotAdr        ; If so
        mov    cx,OFFSET Null    ; If none of above, use Null routine
GotAdr:        call    cx        ; Dispatch to appropriate handler
        pop    ax
        pop    bx
        pop    cx
        pop    dx
        pop    si
        pop    ds        ; Restore all regs
        retf
Interrupt    ENDP

; These command code subroutines called by "Interrupt" Routine.  They are called
; with DS:BX pointing to the request header.  They do not return an error code.

Read        PROC    near        ; Function 4 = Read
        lds    bx,ds:[bx+14]    ; Point DS:BX to buffer area
        push    bx        ; Keep offset

; Get date, check clock is working

                mov    ah,4
                int    1Ah              ; Read RTC date
                jnc    NoRTCErr1        ; If alright, continue
                xor    cx,cx            ; Assume 1980
                jmp    SHORT StoreYear  ; Don't do calculations

; Calculate year (1980 - 2099) in binary form
; Note - the above check for a date less than 1980 was suggested by Michael
; Mauch ([email protected]).  He reports that his BIOS (AMI, 06/06/92)
; has a bug which causes years 20xx to be reported as 19xx.  The following
; workaround handles this bug.

NoRTCErr1:    cmp    cx,1980h    ; Check for BIOS returning year
        jae    YearValid    ;   19xx when it should be 20xx
        mov    ch,20h        ; If so, fix it
YearValid:    mov    al,cl        ; Get years (00-99)
        call    BCDToBinary    ; Convert to binary
        cbw            ; Zero AH
        push    ax        ; Keep it
        mov    al,ch        ; Get hundreds of years
        call    BCDToBinary    ; Convert to binary
        mov    ah,100        ; Factor
        mul    ah        ; Get centuries x 100
        pop    cx        ; Restore year 0-99
        add    ax,cx        ; Now have absolute year in AX.

        xor    cx,cx        ; Zero day counter
        mov    bx,1980        ; Starting year

; Year calculation stuff - AX is current year (1980 to 2099) read from RTC,
; BX is year being evaluated, CX is count of days so far.  SI points to the
; appropriate month table for this year.
; Leap year algorithm: If the year is a multiple of four, it is a leap year,
; unless it's also a century, in which case it is not a leap year, except
; centuries that are a multiple of 400 years (e.g. 2000), in which case it
; is a leap year.  In this case, the only century involved is 2000, thus just
; checking for a multiple of four is enough.  If it's a multiple of four, it
; is a leap year, i.e. 366 days instead of 365.
;
; Note - There is a way to do this without looping and accumulating, using a
; clever little formula, but I will use this method, because I don't want to
; waste the time I spent getting this method to work :-)

FindYearLp:    mov    si,OFFSET MonthTbl1 ; Prepare for not leap year
        test    bl,3        ; Leap year?
        jnz    NotLeap1    ; If not
        mov    si,OFFSET MonthTbl2 ; If leap year, use leap year table
NotLeap1:    cmp    bx,ax        ; Got to this year yet?
        jae    GotYear1    ; If so
        add    cx,cs:[si+24]    ; Add number of days in this year
        inc    bx        ; Increment year number
        jmp    SHORT FindYearLp ; Loop to find year

; Now have BX containing number of days since 1st of January 1980 for the start
; of the current year - now incorporate the month and the day-of-month.

GotYear1:    mov    al,dh        ; Get month, 1-12, BCD
        call    BCDToBinary    ; Convert to binary
        cbw            ; Zero AH
        shl    ax,1        ; Double for word sized table
        mov    bx,ax        ; Month (1-12) to BX
        add    cx,cs:[si+bx-2]    ; Get month start, adjusted for 1-12

        mov    al,dl        ; Get day of month in BCD, 1-31
        call    BCDToBinary    ; Convert to binary
        dec    ax        ; Convert to zero-up
        cbw            ; Zero hibyte
        add    cx,ax        ; Add in too.

StoreYear:    pop    bx        ; Restore offset of data structure
        mov    ds:[bx+0],cx    ; Store days since 1980 in structure

        mov    ah,2
        int    1Ah        ; Read RTC time

        jnc    NoRTCErr2    ; If alright
        xor    cx,cx        ; If bad, zero values
        xor    dx,dx

NoRTCErr2:    mov    al,ch        ; Hours
        call    BCDToBinary    ; To binary
        mov    ds:[bx+3],al    ; Store in DOS's data structure
        mov    al,cl        ; Minutes
        call    BCDToBinary    ; To binary
        mov    ds:[bx+2],al    ; Store
        mov    al,dh        ; Seconds
        call    BCDToBinary    ; To binary
        mov    ds:[bx+5],al    ; Store seconds
        mov    BYTE PTR ds:[bx+4],0 ; Hundredths of seconds are zero
Null:        ret            ; Return to handler dispatcher
Read        ENDP

BCDToBinary    PROC    near        ; Convert AL BCD to binary
        push    cx
        mov    ch,al        ; Copy value to CH
        mov    cl,4
        shr    al,cl        ; Shift top nibble down
        mov    cl,10
        mul    cl        ; Get ten times the high digit
        and    ch,0Fh        ; Low digit only in CH
        add    al,ch        ; Add low digit
        pop    cx
        ret            ; Destroys AX and flags only
BCDToBinary    ENDP

Write        PROC    near        ; Functions 8 and 9 = Write
        lds    bx,ds:[bx+14]    ; Point DS:BX to buffer area
        push    bx        ; Keep for later
        mov    dx,ds:[bx+0]    ; Get number of days since 1980

; Determine the year, by successively accumulating days starting at 1980 until
; we exceed the number of days since 1980 that was provided by DOS.  Once we
; pass the right year, adjust the number of days back again.  We then have the
; year and the number of days within that year.

        mov    ax,1980        ; Start at year 1980
        xor    cx,cx        ; Clear day accumulator
DayAddLp2:    mov    bx,365        ; Assume for 365 days this year
        test    al,3        ; Is current year a leap year?
        jnz    NotLeap2    ; If not, keep the 365
        inc    bx        ; If so, use 366
NotLeap2:    add    cx,bx        ; Add number of days in this year
        cmp    cx,dx        ; Have we gone past the year we want?
        ja    GotYear2    ; If so, have current year in BX
        inc    ax        ; If not, increment the year
        jmp    SHORT DayAddLp2    ; Loop
GotYear2:    sub    cx,bx        ; Get number of days up to start of year
        sub    dx,cx        ; Get remainder (Months and Days)

        mov    si,OFFSET MonthTbl1 ; Prepare for not leap year
        test    al,3        ; Leap year?
        jnz    NotLeap3    ; If not
        mov    si,OFFSET MonthTbl2 ; If leap year, use leap year table

; Here, AX contains the absolute year in binary, DX contains the number of
; days offset into that year, in the range 0 - 364 (or 0 - 365 for leap years)
; and SI points to the appropriate month table for the year being set.

NotLeap3:    mov    bl,100        ; Divisor
        div    bl        ; Get AL = century (19 or 20), AH = year
        mov    bx,ax
        call    BinaryToBCD    ; Convert century to BCD
        xchg    al,bh        ; To BH, get year within century
        call    BinaryToBCD    ; To BCD
        xchg    al,bl        ; To BL, and get year in binary to AL
        push    bx        ; Keep value for CX for Set RTC Date

; Now calculate month and day of month from number of days offset into year (DX)

        xor    bx,bx        ; Point to start of table
CompareMonth:    inc    bx
        inc    bx        ; Move to next month entry
        cmp    dx,cs:[si+bx]    ; Compare to start of next month
        jae    CompareMonth    ; If DX is not less than table entry
        sub    dx,cs:[si+bx-2]    ; Subtract number of days in months

; Now have DL = day of month (zero-up), and BL = month of year (1-12) x 2.

        xchg    ax,dx        ; Get day of month (0-30) to AL
        inc    ax        ; Convert to 1-31
        call    BinaryToBCD    ; Convert to BCD
        xchg    ax,dx        ; To DL
        xchg    ax,bx        ; Get month x 2 from BL
        shr    al,1        ; Get month number, 1-12
        call    BinaryToBCD    ; Convert to BCD
        mov    dh,al        ; To DH
        pop    cx        ; Restore years and hundreds of years

        mov    ah,5
        int    1Ah        ; Set RTC date

; Now set the time

        pop    bx        ; Restore pointer to DOS's data buffer
        mov    al,ds:[bx+5]    ; Read seconds from DOS
        call    BinaryToBCD    ; Convert to BCD
        mov    dh,al        ; To DH
        xor    dl,dl        ; No daylight saving flag
        mov    al,ds:[bx+3]    ; Read hours
        call    BinaryToBCD    ; Convert to BCD
        mov    ch,al        ; To CH
        mov    al,ds:[bx+2]    ; Read minutes
        call    BinaryToBCD    ; Convert to BCD
        mov    cl,al        ; To CL

        mov    ah,3
        int    1Ah        ; Set RTC time
        ret            ; Return to handler dispatcher
Write        ENDP

BinaryToBCD    PROC    near        ; Convert AL binary to BCD
        xor    ah,ah        ; Zero hibyte
        mov    cl,10
        div    cl        ; Div 10 - quotient AL, remainder AH
        mov    cl,4
        shl    al,cl        ; Shift quotient to top nibble
        or    al,ah        ; Combine two nibbles into AL
        ret            ; Destroys AX, CL and flags
BinaryToBCD    ENDP

Discard:                ; End of resident portion of driver

SignOnMsg    DB    13,10,"ATRTC - DOS Device Driver for the AT Real Time Clock"
        DB    13,10,9,"Part of the PC Timing FAQ / Application notes"
        DB    13,10,9,"By K. Heidenstrom ([email protected])"
        DB    13,10,"$"

InstalledMsg    DB    9,"Installed",13,10,"$"
NoClockMsg    DB    9,"Error - RTC not active",13,10,7,"$"

Init        PROC    near        ; Function 0 = Initialise Driver
        mov    WORD PTR ds:[bx+14],OFFSET Discard ; Tell DOS where
        mov    ds:[bx+16],cs    ;        free memory starts

        mov    ax,0F000h    ; BIOS code segment
        mov    ds,ax
        cmp    BYTE PTR ds:[0FFFEh],0FDh ; Check for AT
        pushf            ; Preserve result

        push    cs
        pop    ds        ; Point DS to our segment address
        ASSUME    ds:BinFile
        mov    WORD PTR InitPtr,OFFSET Null ; Point INIT at Null proc

        mov    dx,OFFSET SignOnMsg
        mov    ah,9
        int    21h        ; Display signon message

        popf            ; Are we running on an AT?
        jae    RTCError    ; If not, error!
        mov    ah,4
        int    1Ah        ; Read date
        mov    dx,OFFSET InstalledMsg ; Point to 'installed' message
        jnc    NoRTCError    ; If RTC is working, skip error stuff

RTCError:    mov    BYTE PTR Attrib,0 ; Error - clear CLOCK attribute bit
        mov    dx,OFFSET NoClockMsg
NoRTCError:    mov    ah,9
        int    21h        ; Display error or installation message
        ret
Init        ENDP

BinFile        ENDS
        END    Origin
{TOR} points out that using this driver will result in increased overhead, because: “the CLOCK$ device is read VERY often by DOS. I did look at this once, and as_far_as_I_remember, CLOCK$ is read on every file access”.
Though I don’t believe this is a problem, the efficiency of this driver in cases where frequent file accesses are made could be improved by caching the date and time values and the BIOS tick count variable each time the date and time are requested, and only re-reading the RTC if the tick count has changed. You would use the following logic when the date and time are requested:
Read the current BIOS tick count variable and compare to the stored value. If same, copy the cached date and time values into the data area and return. If different, copy the current BIOS tick count variable to the stored value, read the RTC and recalculate the date and time values, store the new values to the variables and copy them to the data area and return.
This method would ensure that the RTC is actually accessed no more often than 18.2065 times per second. If frequent file accesses are made, the overhead of reading the RTC is avoided for most of them.
Michael Bishop ([email protected]) reports that DOS loses time noticeably on his machine which is: “an IBM PS/Note laptop 25MHz 386, essentially a PS/2 Model 70/80”. While the machine is running, time runs slow. After a reboot, the time is restored correctly. This symptom indicates that the machine is missing timer ticks (see sections 4.1, 6.1, and 10.15 for details). Michael was unable to find the IBM driver ‘CMOSCLK.SYS’ to fix this, but reports that ATRTC fixed the problem.
3.4 OTHER BIOS TIME AND ALARM FUNCTIONS
The RTC can generate an alarm at a specific time of day (i.e. every 24 hours) until disabled by software. The hardware is more flexible than this (see section 7.35) but the BIOS function only supports one alarm per day. The alarm is signalled via int 4A hex, which is invoked by the BIOS when the alarm triggers. Normally int 4Ah points to an IRET. Int 4Ah is invoked under interrupt, so the normal considerations for hardware interrupt handlers apply (see section 6.23 through 6.26).
Int 4Ah will normally be called with interrupts disabled, but don’t count on it. Disable interrupts explicitly if required. The int 4Ah handler must not destroy any working registers.
The related BIOS functions are as follows. Note that these functions are only supported on the AT and later machines - the PC and XT do not support them.
Set 24-Hour Alarm Time of Day : int 1Ah
    Call with:  AH = 06 hex
                CH = Hours (00h to 23h, BCD format)
                CL = Minutes (00h to 59h, BCD format)
                DH = Seconds (00h to 59h, BCD format)
    Returns:    Nothing
    Note:       When alarm occurs, int 4Ah is invoked

Disable 24-Hour Alarm : int 1Ah
    Call with:    AH = 07 hex
    Returns:      Nothing
Functions 8, 9, 0Ah, and 0Bh are supported on some IBM models. See Ralf Brown’s Interrupt List (see section 12) for more information.
3.5 OTHER OTHER BIOS TIME FUNCTIONS
The BIOS on the AT and later provides int 15h functions 83h and 86h which use the RTC interrupt (1024 interrupts per second on IRQ8, int 70h). See section 7.35 for more information about the RTC chip, section 7.36 for details of the RTC interrupt and how to use it, and section 7.36.1 for information on these BIOS functions.
3.6 THE TIMES THEY ARE A-CHANGIN’
Any technique that makes use of a time taken from the RTC or derived from the tick count should take into account the fact that the time can be changed by the user, or even by other software. This can cause the time to go forwards or backwards slightly, or even jump to a totally different time.
Under real DOS, normally this will only happen to a TSR or a program that shells to DOS, where the user may change the time via the TIME command, or a program that allows the user to change the time. A networked computer may automatically update its time from the server, via the resident network software.
On a machine running a multitasking operating system such as OS/2, Linux, Win95, and even Windoze, changing the system date and time in one session will change the time in all sessions.
4 USING THE BIOS TICK COUNT VARIABLE
The BIOS tick count variable gives an absolute time reference with a resolution of 54.9254 milliseconds.
4.1 THE BIOS TICK COUNT VARIABLE
The BIOS tick count variable is a 32-bit unsigned longword or DWORD, stored at low memory address 0040:006C (can also be addressed as 0000:046C), maintained by the BIOS’s int 8 handler. It contains the number of timer ticks (units of 54.9254 ms) since midnight, in the current day. The maximum value in this variable is 1800AF hex, so only the bottom 21 bits can ever be nonzero.
The PC and XT have no special real-time clock support in the BIOS, so the tick counter is initialised to zero on every reboot. In ATs and later machines, the BIOS’s power-on initialisation code reads the real-time clock and sets the tick count variable to the equivalent number of ticks. See section 10.15.
There are approximately 65536 ticks in an hour (65543.4265 to be exact), so the high word of the tick count corresponds approximately to the hour of the day.
4.2 CHANGE OF DAY
There are 1,573,042.24 ticks in a day, but the BIOS writers approximated the CTC clock to 1.193180 MHz, so the BIOS uses 1,573,040 (001800B0 hex) ticks per day. This gives a 1.42166 ppm error (0.123 seconds per day), which is fairly insignificant compared to the clock frequency inaccuracy (see section 7.2).
The tick count increments up to 001800AF hex, then ‘rolls over’ to zero at midnight. When midnight passes, the BIOS sets the one-byte ‘midnight’ flag at 0040:0070, to 1, indicating that a midnight has passed. Note - some BIOSes may indicate change of day by incrementing the midnight flag byte, so that if two midnights pass without DOS reading the time, the date could still be updated correctly. See section 10.15 for details.
4.3 READING AND SETTING THE TICK COUNT
You can read the tick count directly, or request it from the BIOS via int 1Ah.
Get Tick Count : int 1Ah
    Call with:    AH = 00 hex
    Returns:    CX = High word of tick count
            DX = Low word of tick count
            AL = Midnight-passed flag
    Notes:        This call clears the midnight flag byte.
    Notes:        Do not use this call in an application - see below

Set Tick Count : int 1Ah
    Call with:    AH = 01 hex
            CX = High word of tick count
            DX = Low word of tick count
    Notes:        This call clears the midnight flag byte.
The DOS CLOCK$ device driver uses the Get Tick Count function, int 1Ah, function 0, and relies on the midnight flag returned by this function to detect a change of day. User programs should not use these two BIOS functions, because if the program calls the function just after midnight, it will see the midnight flag, and the midnight flag will be cleared, so DOS will miss out on seeing the change of day, and will not increment the date. See sections 10.15 and 10.16. This problem would be solved if DOS used the real-time clock for timekeeping (see section 3.3 for a DOS device driver that uses the real-time clock).
It is safer and more efficient to read (and write) the count directly at its location in low memory. The tick count is ‘volatile’, and must be accessed with an indivisible operation (using a 32-bit register such as EAX), or with interrupts disabled. If you access the loword and hiword separately without disabling interrupts around the two accesses, a tick interrupt could come along and modify the tick count variable between the two reads or writes. See section 4.5 for details.
4.4 SPECIAL REQUIREMENTS - NONE
The great advantage of timing using the BIOS tick count, is that it makes no changes to the system, i.e. it doesn’t change the hardware setup, or modify any interrupt vectors. This simplifies the code, and means that if the program is terminated (by Ctrl-Break, or a Divide Overflow, or by the user replying ‘A’ to the Abort, Retry, Ignore prompt), no special clean-up is required.
4.5 SAMPLE PROGRAM: READING THE TICK COUNT
The function read_bios_tick_count() reads and returns the BIOS tick count. The function has_tick_occurred() detects whether the tick count has changed since the last time that function was called. It returns TRUE on the initial call. It does not report how_many timer ticks occurred between calls.
Notice that read_bios_tick_count() explicitly disables interrupts around the read of the 32-bit tick count value. Even though the tick count variable is declared as volatile, the compiler (Borland C++ 2.0) generates two 16-bit MOV instructions without disabling interrupts. If an interrupt occurred between the two MOV instructions, an incorrect value will be read. Apparently this is not a bug, it is because the compiler doesn’t know how to safely read ‘volatile’ variables. Hmm. I’d say if it’s not a bug, it’s definitely a mis-feature.
If the compiler can use the 32-bit registers (compiling for protected mode, or compiling with 32-bit code under DOS, this problem does not (or should not!) occur. Michael Mauch ([email protected]) found that Borland C++ 4.0 does use a 32-bit MOV instruction if 32-bit code generation is enabled via #pragma option -3 or #pragma option -4.
Dr. John Stockton (see section 1.7) reports that this problem also exists in Borland Pascal 7 when a signed long variable (BP7 doesn’t have unsigned longs) is loaded from the tick count variable, as the tick count is read non-atomically with two 16-bit accesses. Disabling interrupts around the load prevents the problem described above.
See section 6.22 for the explanation of the pushf/cli/popf technique.
/*
Sample program #2
Demonstrates reading the BIOS tick count
Part of the PC Timing FAQ / Application notes
By K. Heidenstrom ([email protected])

Save this file to SAMPLE2.C and compile with:
    bcc -I<inc_path> -L<lib_path> -ms sample2.c
Where inc_path is the path to your C header files and your startup modules
C0x.OBJ, and lib_path is the path to your C libraries Cx.LIB.
*/

#pragma inline;        /* Required for asm pushf, popf, and cli */

#include <stdio.h>    /* Pass go, add printf(), program is 8K already :-) */
#include <stdlib.h>    /* Needed for exit() */

#define FALSE 0
#define TRUE 1

#define BIOS_TICK_COUNT_P ((volatile unsigned long far *) 0x0040006CL)

unsigned long read_bios_tick_count(void) {
    unsigned long ct;
    asm pushf;        /* Preserve interrupt flag */
    asm cli;        /* Needed even though tick count is volatile */
    ct = * BIOS_TICK_COUNT_P;
    asm popf;        /* Restore interrupt flag */
    return ct;
    }

int has_tick_occurred(void) {
    static unsigned long old_tick_count = 0xFFFFFFFFL;    /* Invalid */
    if (read_bios_tick_count() != old_tick_count) {        /* Changed? */
        old_tick_count = read_bios_tick_count();
        return TRUE;
        }
    return FALSE;                        /* No change */
    }

void main(void) {
    unsigned int n = 0;

    printf("Sample program #2 - Demonstrates reading the BIOS tick count variable\n");
    printf("Part of the PC Timing FAQ / Application notes\n");
    printf("By K. Heidenstrom ([email protected])\n\n");

    while (n < 18)            /* Stop after one second */
        if (has_tick_occurred())
            printf("Tick %d: BIOS tick count variable = %ld\n",
                ++n, read_bios_tick_count());
    exit(0);
    }
4.6 SAMPLE CODE: OPTIMISED FUNCTION TO READ THE TICK COUNT
This is a more optimal coding of read_bios_tick_count() in assembler. I chose to disable interrupts and read the loword and hiword separately, rather than using LES or LDS (indivisible operations) because it is not good practice to load a segment register with a value which is not a real segment-paragraph.
Of course if your code requires a 386 or higher, you can just load an extended (32-bit) register (e.g. EAX) in one single indivisible operation.
; Function to read the BIOS tick count (C-callable)
; Part of the PC Timing FAQ / Application notes
; By K. Heidenstrom ([email protected])
;
_read_bios_tick_count PROC near    ; or FAR for far code model
    ; unsigned long read_bios_tick_count(void);
    push    ds        ; Preserve data segment
    pushf            ; Keep interrupt flag
    xor    ax,ax        ; Zero
    mov    ds,ax        ; Address BIOS data area
    cli            ; Don't want a tick to interrupt us
    mov    ax,ds:[46Ch]    ; Get loword of count
    mov    dx,ds:[46Eh]    ; Get hiword of count
    popf            ; Restore interrupt flag as provided
    pop    ds        ; Restore data segment
    ret            ; Return tick count in DX|AX
_read_bios_tick_count ENDP
4.7 SAMPLE PROGRAM: USING THE TICK COUNT FOR TIMEOUT CHECKING
This example demonstrates two independent timeout counters using the BIOS tick count variable. The timeout counter record consists of the starting tick count, the number of ticks in the timeout period, and a flag which can be used to report the transition to the timed-out state.
set_timeout() sets up a timeout counter. The state of the timeout can then be requested using is_timedout() and just_timedout(). is_timedout() returns TRUE if the current time is outside the timeout period specified by the counter. just_timedout() returns TRUE the first time it is called after the timeout expires, and from then on, returns FALSE until a new timeout is configured.
The timeout may occur up to one tick earlier than expected, depending on the synchronisation between setting the timeout, and the actual timer tick. A one tick timeout will time out on the next tick that occurs after the timeout was set up, so if the timeout is set just after a tick has occurred, the timeout will occur nearly 54.9254 ms later, but if the timeout is set just before a tick, the timeout will occur almost immediately. See section 10.10 for more details.
Because the tick count restarts at midnight, leaving a timeout active for a whole day will cause the timeout state to change. For example a ten minute timeout will expire after ten minutes, but every day thereafter, from the time that the timeout started, the timeout function will report not timed out for ten minutes.
This demo program uses two timeout counters, and waits for ten keypresses. One timeout counter is used as a global timeout for the whole program, set to 20 seconds. The other timeout is used as a timeout for each individual keypress. To avoid both timeouts, you must press any key ten times within a total of 20 seconds, with no more than four seconds elapsing between the keys. So, it’s a demo! I didn’t say it would be useful. Call it a game of skill :-)
/*
Sample program #3
Demonstrates multiple timeouts using the BIOS tick count
Part of the PC Timing FAQ / Application notes
By K. Heidenstrom ([email protected])

Save this file to SAMPLE3.C and compile with:
    bcc -I<inc_path> -L<lib_path> -ms sample3.c
Where inc_path is the path to your C header files and your startup modules
C0x.OBJ, and lib_path is the path to your C libraries Cx.LIB.
*/

#pragma inline;        /* Required for asm pushf, popf, and cli */

#include <stdio.h>    /* Needed for printf() */
#include <stdlib.h>    /* Needed for exit() */

#define NTIMEOUTS 2        /* Set this to however many timeouts you need */

#define GLOBAL_TIMEOUT 0    /* Counter number to use for global timeout */
#define CHAR_TIMEOUT 1        /* Counter to use for per-character timeout */

#define FALSE 0
#define TRUE 1

unsigned long timeoutstart[NTIMEOUTS];    /* Starting tick value per timeout */
unsigned int timeoutlength[NTIMEOUTS];    /* Timeout period (ticks) per timeout */
unsigned int timeoutflag[NTIMEOUTS];    /* Flags for timeout state */

#define BIOS_TICK_COUNT_P ((volatile unsigned long far *) 0x0040006CL)

#define TICK_WRAP 0x001800B0L        /* Past last value of tick count */

unsigned long read_bios_tick_count(void) {
    unsigned long ct;
    asm pushf;
    asm cli;
    ct = * BIOS_TICK_COUNT_P;
    asm popf;
    return ct;
    }

/* tick_diff(), returns the difference between two timer tick counts.  This
   is just new value minus old value, except if the period crosses midnight. */

unsigned long tick_diff(unsigned long start_tick, unsigned long now_tick) {
    signed long diff;
    if (start_tick >= TICK_WRAP || now_tick >= TICK_WRAP)
        return 0xFFFFFFFFL;        /* Invalid */
    diff = now_tick - start_tick;
    if (diff < 0)
        diff += TICK_WRAP;
    return (unsigned long) diff;
    }

/* Set a timeout counter for timeout after a specific number of ticks */

void set_timeout(unsigned int timeoutnum, unsigned int timeoutticks) {
    if (timeoutnum >= NTIMEOUTS)
        return;
    timeoutstart[timeoutnum] = read_bios_tick_count();    /* Start time */
    timeoutlength[timeoutnum] = timeoutticks;        /* Duration */
    timeoutflag[timeoutnum] = FALSE;
    return;
    }

/* Returns whether the nominated counter is in the timed-out state.  After the
   timeout has expired, this function will return TRUE, until a new timeout
   period is set.  Do not leave timeouts active for periods approaching one
   day, as this will cause the timeout state to be incorrectly reported as
   FALSE for the same period of each day. */

int has_timedout(unsigned int timeoutnum) {
    if (timeoutflag[timeoutnum])
        return TRUE;        /* Latch the timed-out state */
    return (tick_diff(timeoutstart[timeoutnum], read_bios_tick_count()) >= timeoutlength[timeoutnum]);
    }

/* Test whether a counter has just timed out.  Returns TRUE only the
   first time it is called after the timeout occurs. */

int just_timedout(unsigned int timeoutnum) {
    if (timeoutflag[timeoutnum] == TRUE)    /* Already reported timeout */
        return FALSE;
    if (has_timedout(timeoutnum)) {        /* Timeout has expired */
        timeoutflag[timeoutnum] = TRUE;
        return TRUE;
        }
    return FALSE;                /* Timeout has not expired yet */
    }

void main(void) {
    unsigned int n, key;

    printf("Sample program #3 - Demonstrates multiple timeouts using the BIOS tick count\n");
    printf("Part of the PC Timing FAQ / Application notes\n");
    printf("By K. Heidenstrom ([email protected])\n\n");
    printf("Press any key ten times\n");
    printf("The timeout on each character is four seconds\n");
    printf("The overall timeout on all ten characters is twenty seconds\n\n");

    set_timeout(GLOBAL_TIMEOUT, 364);        /* Global timeout 20 sec */
    for (n = 0; n < 10; ++n) {            /* Read ten characters */
        set_timeout(CHAR_TIMEOUT, 73);        /* Char timeout 4 sec */
        while (TRUE) {
            if (just_timedout(CHAR_TIMEOUT)) {
                printf("Timed out on single character\n");
                exit(1);
                }
            if (just_timedout(GLOBAL_TIMEOUT)) {
                printf("Global timeout expired\n");
                exit(2);
                }
            if (bioskey(1)) {
                key = bioskey(0);
                break;
                }
            }
        printf("Key pressed: %c\n", key);
        }
    printf("Neither timeout expired; normal program termination");
    exit(0);
    }
4.8 SIMPLE DELAYS USING THE BIOS TICK COUNT
A simple way to implement delays of about 0.1 seconds or longer with one tick resolution, or perform timeout checking, is to provide a function that waits for a tick to occur, such as the following function:
void wait_next_tick(void) {
    static unsigned int last_tick_loword;
    unsigned int now_tick_loword;
    do {
        now_tick_loword = * ((volatile unsigned int far *) 0x0040006CL);
        } while (now_tick_loword == last_tick_loword);
    last_tick_loword = now_tick_loword;
    return;
    }
This function can then be called in a loop, e.g.
    for (n = 0; n < 10; ++n)
        wait_next_tick();
to implement a delay of the desired number of ticks. A modified method can be used to implement timeout checking with regular polling of some input device such as a serial port buffer, or the keyboard.
There is no need to use the hiword of the BIOS tick count variable; just checking for a change in the loword is enough to detect that a tick has occurred.
5 SPECIAL SOFTWARE PRECAUTIONS
If your program intercepts any interrupt vectors (e.g. int 8 or int 1Ch), or reprograms the RTC or other hardware into a strange mode, it must restore hardware states and interrupt vectors (i.e. clean up) if terminated by DOS, or risk having its interrupt handlers overwritten by another program and causing a system crash or causing incorrect operation due to the hardware being in the wrong state.
You should handle the following interrupts:
- DOS Ctrl-C interrupt
- DOS Critical Error interrupts
- Divide Overflow interrupt (optional)
Here are the gory details. For more details try DOS technical books such as the MS-DOS Encyclopedia or Ralf Brown’s venerated Interrupt List (see section 12 for details of both of these references).
5.1 THE CTRL-C AND CTRL-BREAK INTERRUPTS
Int 23h is the DOS Ctrl-C interrupt. It is invoked by DOS whenever a Ctrl-C character (ASCII code 3) is detected in the keyboard input stream. When the Ctrl-Break combination is pressed, the BIOS issues int 1Bh (the Ctrl-Break interrupt), and DOS’s int 1Bh handler sets an internal flag in DOS that causes a faked Ctrl-C to appear in the input.
Thus, by trapping Ctrl-C, you are trapping Ctrl-Break too, except that Ctrl-C will only be registered when DOS input is read, while Ctrl-Break is generated as soon as the keystroke is accepted. Also, if input redirection is used, the Ctrl-C interrupt may not be registered properly, depending on the ‘BREAK=’ setting in CONFIG.SYS.
5.2 HANDLING THE CTRL-C INTERRUPT
You can just replace the default int 23h handler using setvect() (DOS function 25h), there’s no need to save the previous vector contents because DOS will restore the vector for you when the program exits or is terminated. However, if you intercept int 1Bh as well as int 23h, DOS will not restore int 1Bh when your program terminates, so your program will have to do this itself.
Typical actions for a Ctrl-C interrupt handler include:
- Do nothing and rely on the Ctrl-C appearing in the keyboard input stream to the program (this will only happen if the program reads its keyboard input via DOS, not via the BIOS),
- Set a flag which will be checked by the program’s mainline and will cause the mainline to take some appropriate action (e.g. clean up and terminate the program),
- Call a general ‘user interruption’ function inside the main portion of the program, which registers the Ctrl-C request, and/or takes an appropriate action,
- Restore interrupt vectors, restore normal hardware states, clean up, and terminate the program immediately, by itself.
All DOS functions can be called from within a Ctrl-C interrupt handler. Some C library functions may not be safe to call - for instance, the function which was reading the DOS keyboard input when the Ctrl-C was detected, will be in progress and might not be re-entrant - see your compiler’s library reference for details.
On entry to the Ctrl-C interrupt handler, interrupts will be disabled, and it would normally be appropriate to enable them, using enable() or STI, unless the handler will always return quickly.
If the handler returns control to DOS, an IRET instruction should be used. There is no return value. General registers may be modified by the Ctrl-C handler. Alternatively, the handler may call DOS to terminate the program (e.g. via DOS function 4Ch, terminate with return code).
5.3 THE CRITICAL ERROR INTERRUPT
Int 24h is the DOS Critical Error interrupt, and is issued by DOS when a device driver indicates a critical failure.
The default critical error handler issues the familiar “Abort, Retry, Ignore?” prompt. You can replace the default handler using setvect() (DOS function 25h). DOS will restore the vector for you when the program exits or is terminated.
On entry to the int 24h handler, registers AX, SI, DI, BP contain information about the nature of the critical error, and the stack contains the values in all registers as provided to the int 21h call which caused the critical error to occur, as well as the return address for the int 21h call. For these reasons, int 24h handlers are usually written in assembler.
5.4 CRITICAL ERROR HANDLER PARAMETERS
On entry to the int 24h handler, the stack is arranged thus:
[SS:SP+0]    IP (PC) of return address for int 24h handler
[SS:SP+2]    CS of return address for int 24h handler
[SS:SP+4]    Flags for return of int 24h handler
[SS:SP+6]    AX as provided to int 21h invocation
[SS:SP+8]    BX as provided to int 21h invocation
[SS:SP+0Ah]    CX as provided to int 21h invocation
[SS:SP+0Ch]    DX as provided to int 21h invocation
[SS:SP+0Eh]    SI as provided to int 21h invocation
[SS:SP+10h]    DI as provided to int 21h invocation
[SS:SP+12h]    BP as provided to int 21h invocation
[SS:SP+14h]    DS as provided to int 21h invocation
[SS:SP+16h]    ES as provided to int 21h invocation
[SS:SP+18h]    IP (PC) of return address for int 21h invocation
[SS:SP+1Ah]    CS of return address for int 21h invocation
[SS:SP+1Ch]    Flags for return from int 21h invocation
On entry to the int 24h handler, BP:SI contain the segment:offset address of the device driver header of the device which flagged the critical error.
The high eight bits of the DI register are undefined. The lower eight bits of DI contain the error description, as follows:
0 = Write-protected disk, 1 = Unknown unit, 2 = Drive not ready, 3 = Invalid command, 4 = Data error, 5 = Invalid request structure length, 6 = Seek error, 7 = Non-DOS disk, 8 = Sector not found, 9 = Out of paper (printer), 10 = Write fault, 11 = Read fault, 12 = General failure, 15 = Invalid disk change (DOS 3.0 and later).
Many of these error codes are not applicable to character devices.
If bit 7 of AH is set, the critical error occurred on a character device (e.g. PRN or AUX), and all other bits of AX are undefined.
If bit 7 of AH is clear, the critical error occurred on a block device (i.e. a disk drive), and the error location is described by the remaining bits in AX. AL contains the drive designator minus 41 hex (i.e. 0 means drive A, 1 means drive B, 2 means drive C, etc). AH describes the error location, as follows:
    7 6 5 4 3 2 1 0
    * . . . . . . .  0 (Error occurred on block device)
    . * . . . . . .  Not used
    . . * . . . . .  "Ignore" allowed?  (0 = no, 1 = yes) (3.1+)
    . . . * . . . .  "Retry" allowed?  (0 = no, 1 = yes) (3.1+)
    . . . . * . . .  "Fail" allowed?  (0 = no, 1 = yes) (3.1+)
    . . . . . * * .  Location: 00=DOS, 01=FAT, 10=Root, 11=Files
    . . . . . . . *  Read or Write operation  (0 = read, 1 = write)
Bits 3, 4, and 5 are only meaningful if the DOS version is 3.1 or later. The DOS version may be checked from inside the critical error handler, using DOS function 30 hex, or it may be determined by startup code and stored in a global variable accessible by the critical error handler.
5.5 CRITICAL ERROR HANDLER OPERATION
The critical error handler may use DOS functions 01 through 0Ch (the old CP/M character I/O functions). It may also use DOS functions 30h and 59h (request DOS version, and request extended error information). Other DOS functions may NOT be called, as DOS is mostly non-reentrant.
The critical error handler must preserve all register values, except the flags (presumably) and AL, which is used to specify the action for DOS to take upon return from the handler, as follows:
0 = Ignore
1 = Retry
2 = Abort
3 = Fail current function
Ideally, a critical error handler built in to a program should also deallocate any other resources that that program might have allocated, such as EMS and/or XMS memory. Temporary files cannot be safely deleted because the DOS file functions must not be called. Possibly if the handler is going to abort the program anyway, it may be safe to call these functions. If anyone has detailed info, please let me know. (*)
5.6 THE DIVIDE OVERFLOW INTERRUPT
The divide overflow interrupt is int 0. It is generated by the processor when the quotient of a signed or unsigned integer division (IDIV or DIV instruction) would exceed the size of the register into which it would be placed.
DOS’s default divide overflow handler issues the message “Divide overflow” and terminates the current application, giving the program no chance to restore interrupt vectors, hardware states, or allocated resources, or close files, etc.
Generally if a divide overflow occurs, the user should reboot their system. As a result (or perhaps the cause) of this, most programs do not provide their own divide overflow interrupt handlers.
If you wish to handle divide overflows, I would suggest using direct writes to the interrupt vector table in low memory to restore all intercepted vectors (except int 23h and 24h, which will be restored by DOS), restoring the hardware state directly, and perhaps deallocating any resources such as EMS and/or XMS, then calling DOS function 4Ch to terminate the program.
It might be possible to write a divide overflow handler which resumes execution after loading an appropriate value into the result register. This requires scanning the offending instruction, and a detailed knowledge of the operation of the various x86 processors, and is left as an exercise for the reader :-)
5.7 ERROR HANDLING SYSTEM
The error handling system I have used in the sample programs uses a function prototyped as follows:
void abort_cleanup(int dos_is_safe);
This function is responsible for performing as much cleanup as possible at program exit time. The dos_is_safe parameter specifies whether DOS functions may be safely used by the cleanup function. This parameter will be FALSE if the function is called from within the critical error handler or a divide overflow handler, and TRUE if the function is called from the Ctrl-C handler or by the program itself during cleanup for an orderly exit.
abort_cleanup should not exit to DOS itself. This will be done by the caller.
If dos_is_safe is FALSE, your abort_cleanup() function should not call any DOS functions. Interrupt vectors should be restored using direct accesses into the interrupt table in low memory (though this technique is frowned upon).
Depending on the types of cleanups required, DOS may have to be called. In certain circumstances (e.g. after a divide overflow), abort_cleanup() may crash the machine in its attempt to clean up properly. On the other hand, if it did not attempt to clean up properly, the machine might be left in an unstable state anyway. You will have to weigh up the pros and cons when deciding how much to try to clean up if dos_is_safe is FALSE. Perhaps you should do the most critical and/or most likely to succeed cleanups first.
5.8 SAMPLE CODE MODULE: CRITICAL ERROR HANDLER MODULE
; NAME    CRIT_ERR

; Rudimentary critical error handler module
; Part of the PC Timing FAQ / Application notes
; By K. Heidenstrom ([email protected])
;
; This module provides rudimentary critical error (int 24h) handling for DOS
; application programs.  It is callable from Borland C.  This file is written
; for small model (near code, near data).  You can change the FAR_CODE equate
; to hopefully make it compatible with other memory models.
;
; This is a minimal implementation for demonstration purposes.
;
; Upon startup, the application should call crit_err_intercept() to install the
; new critical error handler.  No corresponding uninstallation is required.
;
; If the user selects the Abort option to the "Abort, Retry, Ignore" prompt,
; the abort_cleanup() function (which is provided externally) is called, with
; its dos_is_safe parameter set to FALSE.  This function performs as much
; cleanup as possible (restoring interrupt vectors, restoring hardware states,
; setting normal text video mode, and deallocating resources such as EMS and
; XMS memory.  It would also delete temporary files and close any open files if
; dos_is_safe were TRUE.  After abort_cleanup() returns, the critical error
; handler returns the Abort code to DOS, which will then abort the program.
;
; Save this file to CRIT_ERR.ASM and assemble with:
;    masm /Mx crit_err;
; or
;    tasm /mx crit_err;
; to produce CRIT_ERR.OBJ which can be linked into the user program.

FALSE        EQU    0
TRUE        EQU    1

FAR_CODE    EQU    FALSE        ; TRUE for far code models

; void crit_err_intercept(void);
    PUBLIC    _crit_err_intercept
; unsigned int is_at_crit_prompt(void);
    PUBLIC    _is_at_crit_prompt

; void abort_cleanup(int dos_is_safe);
    IF    FAR_CODE
    EXTRN    _abort_cleanup : FAR
    ELSE
    EXTRN    _abort_cleanup : NEAR
    ENDIF

_DATA    SEGMENT
_DATA    ENDS

DGROUP    GROUP    _DATA

_TEXT    SEGMENT PARA PUBLIC 'CODE'
    ASSUME    cs:_TEXT

; Data - in code segment (naughty naughty)

I24_IP    DW    0        ; IP for return from int 24h intercept
I24_CS    DW    0        ; CS for same
I24_FL    DW    0        ; Flags for same

In_Crit    DB    0        ; Flag whether currently at int 24h prompt

    IF    FAR_CODE
_crit_err_intercept PROC far
    ELSE
_crit_err_intercept PROC near
    ENDIF

; This function intercepts interrupt 24h, and replaces the DOS default int 24h
; handler with the new handler, crit_err_handler.  This function should be
; called ONCE and ONLY ONCE at program startup.  No corresponding restore-
; interrupt function is required.

    mov    ax,3524h    ; Request int 24h
    int    21h
    mov    cs:[O24_IP],bx    ; Self-modifying code?
    mov    cs:[O24_CS],es    ; Where?  I didn't see it :-)
    push    ds
    push    cs
    pop    ds
    mov    dx,OFFSET _TEXT:crit_err_handler
    mov    ax,2524h    ; Set int 24h
    int    21h
    pop    ds
    ret
_crit_err_intercept ENDP

    IF    FAR_CODE
_is_at_crit_prompt PROC far
    ELSE
_is_at_crit_prompt PROC near
    ENDIF

; This function returns the status of the In_Crit flag, and should be called
; by the Ctrl-C interrupt handler (if any) to check that the Ctrl-C was not
; pressed while at the Abort, Retry, Ignore prompt.  The function returns
; FALSE if not at the prompt, or TRUE if at the prompt.  If it returns TRUE,
; the Ctrl-C handler is not safe to call general DOS functions.

    mov    al,cs:[In_Crit]
    xor    ah,ah
    ret
_is_at_crit_prompt ENDP

crit_err_handler PROC far

; This function handles interrupt 24 hex, the DOS Critical Error interrupt.
; It calls the original DOS interrupt 24h handler, and checks the returned
; action code.
; If the action code is 2 (abort), it calls abort_cleanup() (provided by the
; application), passing a FALSE value for the dos_is_safe parameter.  In
; either case, it then returns the user-specified action code to DOS.
;
; See documentation above for details of the abort_cleanup() function.

    pop    cs:[I24_IP]    ; IP of return address of int 24h
    pop    cs:[I24_CS]    ; CS of return address of int 24h
    pop    cs:[I24_FL]    ; Flags of int 24h invocation
    mov    cs:[In_Crit],1    ; Set flag
    pushf            ; Simulate an INT
    DB    9Ah        ; CALL xxxx:xxxx
O24_IP    DW    0        ; Offset of call (modified)
O24_CS    DW    0FFFFh        ; Segment of call (modified)
    mov    cs:[In_Crit],0    ; Clear flag
    cmp    al,2        ; Did user choose Abort?
    jne    NotAbort    ; If not
    push    es        ; If so, call abort_cleanup()
    push    ds
    push    di
    push    si
    push    bp
    push    dx
    push    cx
    push    bx
    push    ax
    mov    ax,SEG DGROUP
    mov    ds,ax        ; Set up DS for call to C function
    xor    ax,ax        ; dos_is_safe is FALSE!
    push    ax
    call    _abort_cleanup
    pop    ax        ; Discard parameter
;    mov    ax,0E07h    ; Enable these lines during debugging
;    xor    bx,bx        ;   to generate a beep after your
;    int    10h        ;   abort_cleanup() function completes
    pop    ax
    mov    al,2        ; Restore the Abort code
    pop    bx
    pop    cx
    pop    dx
    pop    bp
    pop    si
    pop    di
    pop    ds
    pop    es
NotAbort:
    push    cs:[I24_FL]    ; Flags of int 24h invocation
    push    cs:[I24_CS]    ; CS of return address of int 24h
    push    cs:[I24_IP]    ; IP of return address of int 24h
    iret

crit_err_handler ENDP

_TEXT    ENDS
    END
Gian Uberto Lauri ([email protected]) sent me a modified version of this module with the names changed to support the Borland C++ 3.1 compiler when compiling a C++ program. Borland C++ encodes the parameter types in the function name (“mangling”). Gian had to change the names of the functions as follows:
_crit_err_intercept –> @crit_err_intercept$qv _is_at_crit_prompt –> @is_at_crit_prompt$qv _abort_cleanup –> @abort_cleanup$qi
These names must be changed both at the PUBLIC or EXTRN declarations, and at the actual PROC and ENDP lines. These changes are specific to Borland C++. Other C++ compilers will handle this differently.
6 INTERRUPTS
An interrupt is an interruption to the processor, that causes it to stop what it is doing and jump to a specially written subroutine, known as an interrupt handler, interrupt routine, or interrupt service routine (ISR).
There are three types of interrupts - processor-generated interrupts, external hardware interrupts, and software interrupts. Processor-generated interrupts are generated internally by the processor (Intel 80x86) in certain conditions, such as a division overflow (see section 5.6). External hardware interrupts are generated by IRQs, and are described shortly. Software interrupts are invoked by software, and are generally used for calling system functions, e.g. BIOS functions, DOS functions, mouse functions, EMS functions, etc.
Interrupts are identified by an interrupt number, in the range 0 to 0FFh.
| Interrupt numbers | Interrupt type |
|---|---|
| 0,1,2,3,4 | Processor |
| 5,6,7 | Software and processor |
| 8-0Fh | Hardware (IRQ0-7) and processor |
| 10h-6Fh | Software (some are also processor interrupts) |
| 70h-77h | Hardware (IRQ8-15) |
| 78h-0FFh | Software |
Some low-numbered interrupts have a split personality, because IBM ignored Intel’s “reserved for processor” comment on the first 32 interrupts. The original 8086/8088 only used ints 0, 1, 2, 3, and 4 for processor interrupts, so IBM used ints 5 and upwards for hardware and software interrupts. With later x86 processors, Intel reclaimed their reserved interrupts, requiring special support in the EMM386 driver to handle these interrupts properly. See section 6.7 for details.
Tor Sjowall {TOR} points out that these conflicts only occur in real mode and virtual 86 mode. In protected mode, there is no such conflict - the processor interrupts have their Intel defined functions, the hardware interrupts are vectored through different interrupts, and the software interrupts are not relevant (since they relate to DOS and BIOS, which are not protected mode programs).
Software interrupts 23h and 24h (Ctrl-C and Critical Error) are described in section 5 and subsections. Software interrupt 1Ch and hardware int 8 are the timer tick interrupts, and are described in section 6.1.
6.1 THE TIMER TICK INTERRUPTS
Interrupt 8 and interrupt 1C hex are the timer tick interrupts.
Int 8 is a hardware interrupt, invoked directly by IRQ0, from CTC channel zero, and is the highest priority IRQ (unless interrupt priorities have been changed from the BIOS defaults). The BIOS POST sets int 8 to point to the BIOS’s int 8 interrupt service routine, traditionally located at F000:FEA5, which performs the delayed floppy disk motor turn-off and updates the system time-of-day. Device drivers and TSRs often intercept this interrupt, so often the vector won’t point directly to the BIOS.
Int 1C hex is issued (i.e. generated) by the BIOS’s int 8 service routine, and normally points to an IRET instruction in the BIOS. Int 1Ch is intended to be used by application programs which require a regular interrupt source. Some TSRs also hook this interrupt - see section 6.35 for details.
6.2 INTERRUPT VECTOR TABLE
The interrupt vector table, or IVT, is a reserved area of RAM occupying the bottom kilobyte of main memory, i.e. from 0000:0000 to 0000:03FF. This is in real mode or virtual 8086 mode, under DOS. In protected mode this is probably completely different. (*)
Each interrupt has a corresponding four-byte far code pointer, located at interrupt number x 4 bytes into the IVT, which points to the interrupt service routine that will be invoked when that interrupt is registered by the processor.
For example, here is a dump of the first 128 bytes of the IVT on my machine:
0000:0000   1A 00 70 00  05 00 70 00  1B 2C 5D 57  05 00 70 00 ..p...p..,]W..p.
0000:0010   05 00 70 00  54 FF 00 F0  4C E1 00 F0  6F EF 00 F0 ..p.T..pLa.poo.p
0000:0020   57 01 80 E6  AD 2B 5D 57  6F EF 00 F0  45 10 1F CF W..f-+]Woo.pE..O
0000:0030   6F EF 00 F0  6F EF 00 F0  57 EF 00 F0  6F EF 00 F0 oo.poo.pWo.poo.p
0000:0040   C6 01 80 E6  4D F8 00 F0  41 F8 00 F0  C0 05 A2 D1 F..fMx.pAx.p@."Q
0000:0050   39 E7 00 F0  18 00 55 02  20 01 B3 E5  D2 EF 00 F0 9g.p..U. .3eRo.p
0000:0060   D4 E3 00 F0  65 0F A2 D1  6E FE 00 F0  64 06 70 00 Tc.pe."Qn~.pd.p.
0000:0070   1B 91 A1 03  A4 F0 00 F0  22 05 00 00  6E 42 00 C0 ..!.$p.p"...nB.@
The vector for interrupt 1C hex starts at 1Ch x 4, which is 70 hex. In the above vector table contents, the vector at 0000:0070 points to 03A1:911B, so every time int 1Ch is issued, the processor will jump to 03A1:911B and execute the ISR that starts at that address.
6.3 INTERCEPTING AN INTERRUPT
To take control of an interrupt, use the getvect() and setvect() functions or DOS functions 35 hex and 25 hex. If necessary, you can directly access the interrupt vector table in low memory (see section 6.2). This may be required if DOS cannot safely be called - for example, in a critical error handler (see section 5.3). Interrupts MUST be locked out while any direct manipulation of this type is performed.
Start by requesting the contents of the interrupt vector, using getvect() or DOS function 35 hex. This gives a far code pointer, which must be stored to be reinstated when your program terminates. The stored ‘old interrupt’ vector is also used for interrupt chaining (section 6.31). Then, set the interrupt vector to point to your new handler, using setvect() or DOS function 25 hex, and away you go.
See section 5 and subsections for details of intercepting the DOS Ctrl-C and critical error interrupts and the divide overflow interrupt, which must be done to ensure that your program reinstates the original interrupt owner upon exit.
6.4 INTERRUPT HARDWARE
Hardware interrupts are known as IRQs (interrupt requests). They interrupt the processor from its current task and cause it to jump to an interrupt handler, aka interrupt service routine (ISR). The processor has only one IRQ input, which is expanded by an 8259 PIC (programmable interrupt controller).
The PC and XT have one PIC, which provides IRQ0-7. IRQ0 and 1 are the timer tick and keyboard interrupts, respectively. IRQ2 through IRQ7 are available on the slot bus, for use by peripheral cards.
The AT has two PICs - the primary PIC, which is equivalent to the single PIC on the PC and XT, and the secondary PIC (also sometimes called the slave PIC). The third input (IRQ2) on the primary PIC is known as the ‘chain’ or ‘cascade’ or ‘slave’ interrupt on the AT, because it is the method by which the secondary PIC issues an interrupt request. The slot bus connection that was IRQ2 on the PC is replaced by IRQ9 on the AT and later machines (ISA bus).
The two PICs and their interconnection are shown in Figure 2.
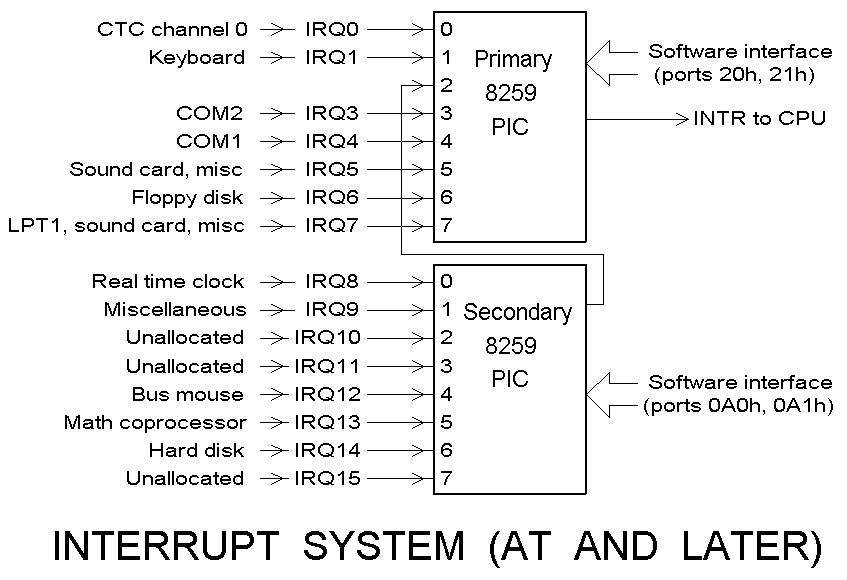 Figure 2
Each PIC is responsible for prioritising its incoming interrupt requests, and issuing an interrupt request signal to the processor - either directly (in the case of the primary PIC) or via the primary PIC (in the case of the secondary PIC).
Hardware interrupts are registered on the rising edge of the PIC input, which corresponds to a rising edge of the IRQ line on the slot bus of ISA machines. This is known as rising edge triggered interrupts. Level triggered interrupts, particularly active low level triggered interrupts, are more sensible for most applications, and EISA machines are apparently configurable for either edge- triggered or level-triggered operation. The MicroChannel Architecture (MCA) bus, used in IBM PS/2 machines, uses level triggered interrupts.
The PICs are accessed via two I/O locations. The primary PIC appears at I/O addresses 20h and 21h, the secondary PIC (not present on PC and XT) appears at I/O addresses 0A0h and 0A1h. The lower address is the command/status register, the upper address is the interrupt mask register (IMR).
6.5 IRQ TO INTERRUPT MAPPING
The default mapping between hardware interrupt requests (IRQs) and interrupts is set up by the BIOS POST, and is as follows.
IRQ      Int    IRQ      Int    IRQ      Int    IRQ      Int
-------------------------------------------------------------
0       8        4       0Ch      8     70h     12      74h
1       9        5       0Dh      9     71h     13      75h
2*      0Ah      6       0Eh      10    72h     14      76h
3       0Bh      7       0Fh      11    73h     15      77h
- Note IRQ2 is not usable directly except on the original PC and XT, which do not have IRQ8-15. The slot bus connection that was IRQ2 on the PC and XT is connected to IRQ9 on AT-class ISA machines. The BIOS default handler for IRQ9 (int 71h) invokes the IRQ2 (int 0Ah) handler for backwards compatibility. I don’t know the details of this. (*)
6.6 INTERRUPT FLAG, INTERRUPT ACCEPTANCE, INTERRUPT NESTING
When a hardware device requests an interrupt, the PIC tells the processor that an interrupt is pending. The processor has an ‘interrupt enable’ flag in the Flags (F) register, which determines whether the processor will respond to the interrupt request from the PIC. This flag is cleared and set by the CLI and STI instructions (respectively) or the disable() and enable() functions or pseudofunctions, which execute CLI and STI instructions (respectively).
If the interrupt enable flag is clear, the processor will not action the interrupt request. In this state, the PIC will continue to examine its inputs, and keep evaluating which interrupt is the highest priority active interrupt request, leaving its interrupt request line to the processor in the active state.
Interrupts are prioritised, with IRQ0 (the timer tick) being highest priority and IRQ7 being lowest priority. IRQ8-15 fit in the gap between IRQ1 (the keyboard scancode interrupt) and IRQ3 (normally used for COM2). This priority is determined by control bytes sent to the PICs by the BIOS initialisation code. It can be changed by reinitialising the PICs but I know of no program that does this.
When the processor is able to accept the interrupt request, it pushes the flags and the CS and IP registers onto the stack, and clears the interrupt flag in the flags register, before allowing the PICs to decide which is the highest priority interrupt and provide the address of the interrupt vector. The processor then executes the interrupt handler for the highest priority pending IRQ. The interrupt routine ends with an IRET, which is like a RETF but also pops the flags, i.e. ‘undoes’ the automatic stacking done by the processor when the interrupt was registered.
During execution of the handler, the PICs continue to evaluate the highest priority interrupt being requested, and if an interrupt with a higher priority than the one in progress comes along, they will issue another interrupt request to the processor. The processor will ignore this request unless the interrupt handler in progress has explicitly enabled interrupts, by executing an STI or enable(). In this case, if a higher priority interrupt is pending, the handler in progress will itself be interrupted, so that the higher priority interrupt can be serviced. On return from the higher priority interrupt handler, the lower priority handler will resume.
If during servicing of an interrupt, a lower priority interrupt source comes along, or the same interrupt is retriggered, the PIC will not interrupt the processor. Once the handler in progress has terminated, the lower or same priority interrupt will be actioned.
The PIC knows which interrupt level is in progress, because it triggered the interrupt itself. But it cannot tell when that interrupt level has been processed. The interrupt handler has to tell it, via the EOI command, see section 6.28.
As the timer tick has the highest priority, care should be taken to ensure that it is as short and efficient as possible, because it cannot be interrupted, even if it enables interrupts. See section 6.9 for an exception to this rule.
6.7 EMM386 INTERRUPT INTERCEPTION
EMM386 places the 80x86 into virtual 8086 mode and intercepts interrupts at a hardware level, i.e. through specific features of the 386 and later processors. This is different from intercepting interrupts at the vector level. The reason for this behaviour is that several interrupts serve dual purposes - they are IBM-allocated hardware or software interrupts, but are also Intel-allocated processor interrupts known as processor exceptions (section 6 introductory).
In real mode, the 80x86 will not generate these new internal interrupts, and behaves like an 8086/8088, 80186, or 80286, but EMM386 must put the 80x86 into virtual 8086 mode, so that it can use the paging facilities of the 386/486/586 to remap memory, etc. In virtual 8086 mode, these exceptions may occur. However, DOS and BIOS functions are designed assuming real mode, and do not expect to be called when these exceptions occur, therefore EMM386 must intercept these interrupts and when they occur it must determine whether the interrupt is a real-mode interrupt (in which case it invokes the appropriate interrupt handler via its vector) or a processor exception (in which case it displays a friendly message asking whether you want to terminate the program, then usually locks up the machine regardless :-)
The extra time required for EMM386 to determine the interrupt type adds a significant amount of overhead to each interrupt, as demonstrated by the example in section 6.8 (software interrupts) and the sample program in section 10.16 (hardware interrupt).
If anyone has more insight into EMM386 and its effects on interrupts, please let me know. (*)
6.8 AVOIDING EMM386 OVERHEAD
Because EMM386 intercepts the interrupt at the hardware level, it can be bypassed by calling the interrupt handler directly via its interrupt vector, avoiding the actual INT instruction that will be intercepted by EMM386. This applies to software interrupts (i.e. function interrupts for BIOS, DOS, EMS, mouse, etc functions) only. The EMM386 overhead on hardware interrupts (IRQs) cannot be bypassed.
When doing this manually, care must be taken to ensure that the processor is in the correct state as expected by the interrupt handler. This involves ensuring that the interrupt flag is clear. Quite a lot of messing around is required for a generic solution that preserves all ingoing registers including the flags (apart from the interrupt flag, of course), as shown in the following code section, which demonstrates how to call a software interrupt directly thus bypassing the EMM386 overhead:
IntNum    EQU    10h            ; Interrupt to be invoked

    pushf
    sub    sp,8
    push    bp
    push    ax
    push    ds
    mov    bp,sp
    push    WORD PTR [bp+14]    ; Take a copy of the flags
    mov    [bp+12],cs        ; Segment of return address
    mov    WORD PTR [bp+10],OFFSET ReturnPoint ; Offset of same
    xor    ax,ax
    mov    ds,ax            ; Address interrupt vector table
    mov    ax,ds:[(IntNum SHL 2) + 2] ; Segment of handler
    mov    [bp+8],ax
    mov    ax,ds:[IntNum SHL 2] ; Offset of handler
    mov    [bp+6],ax
    popf
    pop    ds
    pop    ax
    pop    bp
    cli
    retf                ; 'RETF' to handler
ReturnPoint:                ; Continue
This code section is rather convoluted. It sets up a stack frame as follows:
        BP+...      Contains

        14          Flags at subroutine entry
        12          Segment of ReturnPoint
        10          Offset of ReturnPoint
        8           Segment of handler
        6           Offset of handler
        4           BP
        2           AX
        0           DS
        -2          Flags (copy of BP+16)
A program to compare the speed of 50000 loops calling video BIOS functions 0Eh (teletype output) twice, 3 (request cursor position and size), and 8 (read character and attribute at cursor), first using an INT 10h to call the BIOS function and then using the above code, gave the following results on my 486DX2-66:
    EMM386          Method          Time        Speed (relative)

    Not present     Int 10h         838730      100% (normalised)
    Not present     Above code      991420      84.6%
    Present         Int 10h         2084600     40.2%
    Present         Above code      1440275     58.2%
These results show that installing EMM386 slows the system significantly, but by calling the interrupt directly, some of the overhead is removed. The speed improvement gained by calling the interrupt instead of issuing an INT instruction, when EMM386 is installed, is 44.7%. Without EMM386 installed, calling the interrupt is slower than using INT, because of the messy stack manipulation.
If anyone has any comments on these findings, please let me know. (*)
6.9 LONG TIMER TICK INTERRUPT HANDLERS
A special method may be used if the timer tick interrupt handler must take a long time. Interrupts may be enabled and an EOI sent to the PIC, making the PIC think that the timer tick interrupt has been fully serviced. This allows lower priority interrupts to be serviced and handled in the normal way (but see section 6.9.1), thus preventing problems with the keyboard, mouse, and serial I/O, but of course this means that another timer tick interrupt could come along while the current handler is in progress. This will cause the int 8 handler to be re-entered unless the condition is detected using a flag or ‘semaphore’. If on entry to the interrupt handler the semaphore is set, the interrupt handler must send an EOI and exit, or exit by chaining to the original handler.
Here is an example timer tick interrupt intercepter that hooks into int 8 and implements this technique. Note that the Int8Sem and TriggerFlag variables appear in the code segment, to allow them to be accessed via CS (this avoids wasting time manipulating DS).
        ASSUME    cs:_TEXT    ; Current code segment name
        ASSUME    ds:nothing,es:nothing,ss:nothing

Int8Sem        DB    0        ; Int 8 in progress semaphore
TriggerFlag    DB    0        ; Flag to trigger long function

NewInt08    PROC    far        ; Int 8 intercepter
        pushf            ; Preserve flags
        cli            ; Make sure interrupts are off
        cmp    Int8Sem,0    ; Check whether we're already busy
        jnz    GoOld08        ; If so, don't do anything

; Decide here whether the long function should be performed.  If so,
; branch to DoLongFunc, otherwise continue.  TriggerFlag must be set
; by some external routine in order to trigger the background function.
; TriggerFlag will be reset to zero by the function when it completes.

        cmp    TriggerFlag,0    ; Time to perform the function?
        jnz    DoLongFunc    ; If so

; Idle - just jump to old handler

GoOld08:    popf            ; Fix stack
        DB    0EAh        ; JMP xxxx:yyyy
Old08Ofs    DW    0        ; Vector to original handler - Offset
Old08Seg    DW    0        ; Segment

; Time to perform the long function

DoLongFunc:    inc    Int8Sem        ; Set busy flag
        pushf            ; Simulate stack for an INT
        call    DWORD PTR Old08Ofs ; Chain to old handler (sends EOI)
        sti            ; Enable interrupts
        push    dx        ; Preserve
        push    cx        ; Preserve
        push    bx        ; Preserve
        push    ax        ; Preserve

; -- Insert code here to perform your long function.  Preserve any other
;    registers that you will use, using PUSH and POP.  Note the asynchronous
;    interrupt handler restrictions still apply (this routine cannot call DOS,
;    etc), but this code may take as long as necessary.

        ; -- Your code goes here

        pop    ax        ; Restore
        pop    bx        ; Restore
        pop    cx        ; Restore
        pop    dx        ; Restore
        mov    Int8Sem,0    ; No longer busy
        mov    TriggerFlag,0    ; We have triggered
        popf            ; Restore flags pushed at start of int 8
        iret            ; Finally, return to application
NewInt08    ENDP
This approach can be thought of as an interrupt-triggered ‘branch’ to another section of code. Once this interrupt intercepter calls the old handler to send the EOI and enables interrupts, it effectively becomes the ‘mainline’ and runs ‘in the foreground’, itself being interrupted by other interrupts of any priority. After completing its function, it may return control to the point where the interrupt interrupted execution, or it may choose not to do so (though this requires careful programming). Generally the interrupt handler restrictions still apply, because you do not know what the machine was doing at the time that the interrupt occurred.
If used in a TSR, this technique can cause another problem. If another program hooks int 8, and chains to our interrupt handler using the CALL method so it can regain control after chaining, that program’s interrupt handler may be called recursively. There are no formal guidelines for writing TSRs (at least, not at this level of depth) so I don’t know how this should be handled. Anyone? (*)
There are TSRs that use this technique - I believe DOS’s PRINT program does this - and it may have implications on int 8 handlers which chain to the original handler using the CALL method (see section 6.31). (*)
Manipulation of semaphores is usually done using indivisible instructions, such as the XCHG instruction, so that it’s not possible for the code to be re-entered between the semaphore test, and the semaphore set. In this case, that section of code is uninterruptible, because interrupts are explicitly locked out, so an indivisible instruction is not required. The explicit CLI instruction should not be needed, as the interrupt flag is turned off when the processor branches to the interrupt service routine, but it is good practice to explicitly disable interrupts here, as there are some programs which intercept int 8 but call the original handler with interrupts enabled.
6.9.1 DANGER OF LONG TIMER TICK INTERRUPT HANDLERS
There is one further problem with this technique. If a lower priority interrupt was being handled while the int 8 occurred, and is still in progress, it will not complete and send its EOI until the int 8 handler completes and returns. Therefore, that interrupt and all lower priority interrupts, are locked out for the duration of the extended int 8 code. In some cases, it may be useful to poll the interrupt controller’s In Service Register at the start of the int 8 handler, and if any other interrupts are already being serviced, do not do the extended code. If the interrupt handler must execute the extended code regardless of whether any lower priority interrupts are being serviced, this may have an impact on other system functions. Ideas anyone? (*)
6.10 INTERRUPT MASK REGISTER
Hardware interrupts may be masked individually via the Interrupt Mask Registers (IMRs) in the 8259 PIC chips. Each PIC has an 8-bit IMR, in which each bit corresponds to an IRQ line. Bits 0-7 in the primary PIC’s IMR correspond to IRQ0-7 respectively, and bits 0-7 in the secondary PIC’s IMR correspond to IRQ8-15 respectively. If IRQ2 is masked off in the primary PIC, this masks off IRQ8-15, as they are signalled by the secondary PIC via this cascade input on the primary PIC. Therefore, when enabling any IRQ on the secondary PIC (i.e. IRQ8 through 15), you should also explicitly enable IRQ2 on the primary PIC.
If the bit in the IMR is set, the interrupt is masked (i.e. disabled). This is the opposite of the interrupt enable flag in the processor, which is set to enable interrupts. Setting a bit in the IMR masks (prevents) the interrupt.
The IMR is a read/write register and can be accessed at I/O address 21h (primary PIC) or 0A1h (secondary PIC). See section 6.11 for code examples.
The PIC also contains an interrupt request register (IRR) and an in-service register. These can be read by issuing the appropriate read-back command to the PIC and then reading the command/status register at I/O address 20h (primary PIC) or 0A0h (secondary PIC), see sections 6.12 and 6.13.
6.11 ENABLING AND DISABLING THE TIMER TICK INTERRUPT
Interrupt 8 can be enabled or disabled via bit zero of the interrupt mask register (IMR) in the primary 8259 PIC, at I/O address 21h. Each bit in this register controls the correspondingly numbered IRQ, and int 8 is IRQ0. Setting the bit masks or disables the interrupt, thus the name ‘interrupt mask register’.
Disable interrupts using disable() or CLI around accesses to the IMR. Here are two sample subroutines to control int 8.
See section 6.22 for the explanation of the pushf/cli/popf technique.
DisableInt8:        ; Destroys AL only
    pushf
    cli
    in    al,21h
    or    al,1
    out    21h,al
    popf
    ret

EnableInt8:        ; Destroys AL only
    pushf
    cli
    in    al,21h
    and    al,0FEh
    out    21h,al
    popf
    ret
6.12 READING THE INTERRUPT REQUEST REGISTER
The IRR in the primary 8259 PIC can be read with the following code fragment. It returns the IRR value in AL.
ReadPIC0IRR:        ; Returns IRR in AL
    pushf
    cli
    mov    al,0Ah    ; Read IRR command
    out    20h,al
    jmp    SHORT $+2
    in    al,20h    ; Read the IRR value
    popf
    ret
If you know that no other software is going to be accessing the PIC, for example if you are reading the IRR in a loop with interrupts locked out, you can skip sending the 0Ah to port 20h before every read of the IRR. The PIC remembers that the IRR is selected to appear on a read of port 20h. So you would send the 0Ah to port 20h at the start of the loop, then just read port 20h every time through the loop.
The same routine can be adapted to read the secondary PIC, just access port 0A0h instead of port 20h.
6.13 READING THE INTERRUPT IN SERVICE REGISTER
The ISR (In Service Register, not Interrupt Service Routine) in the primary 8259 PIC can be read with the following code fragment. It returns the In Service Register value in AL.
ReadPIC0ISR:        ; Returns ISR in AL
    pushf
    cli
    mov    al,0Bh    ; Read ISR command
    out    20h,al
    jmp    SHORT $+2
    in    al,20h    ; Read the ISR value
    popf
    ret
The In Service Register tells you what other interrupts are ‘in service’. For example, if a serial port interrupt occurred on IRQ4, and during processing of that interrupt (before the EOI was sent to the PIC), a keyboard interrupt on IRQ1 occurred, and again during processing of that interrupt, the timer tick interrupt came along, then the In Service Register would contain 00010011 binary if read inside the timer tick interrupt, indicating that IRQ4, IRQ1, and IRQ0 are currently ‘in service’, i.e. their handlers are in progress and are nested.
If in the above example, the IRQ4 handler completed and sent its EOI to the PIC before the IRQ1 occurred, its bit would not be set in the In Service Register.
Because only higher priority (lower-numbered) interrupts can interrupt an interrupt handler (unless it sends an EOI early, in which case it is no longer “in service”), any interrupts flagged in the In Service Register must have occurred one after the other in order, from highest IRQ number to lowest IRQ number.
The same routine can be adapted to read the secondary PIC, just access port 0A0h instead of port 20h.
6.14 WHEN YOU SHOULD DISABLE INTERRUPTS
Generally, your program should disable interrupts around a sequence of accesses to an I/O device (such as the PIC, CTC, VGA chips, etc) to ensure that an interrupt service routine does not come along during your access sequence and access the chip, disrupting your access sequence. Interrupts should also be locked out when reading or writing variables that may be being accessed by an interrupt routine, unless you carefully design your communication with the interrupt routine so that this is not necessary.
In particular, accesses to peripherals such as the RTC and CRTC (CRT controller) which have an address register and a data register, must be made with interrupts disabled, as if interrupts are enabled during such accesses, an interrupt handler could access the device and change the address register after your code had set the address but before your code had accessed the register, causing your code to access the wrong register, with possibly disastrous results - e.g. an ex monitor :-)
If this results in interrupts being locked out for less than ten microseconds at a time, this will be acceptable for all normal applications. It might not be acceptable if the timer tick is running very much faster than usual and low jitter is needed - see section 6.15.
Even when no address register is involved, interrupts should still be locked out over access sequences. For example, with interrupts enabled, the sequence
        in    al,21h
        or    al,1
        out   21h,al
looks innocent enough, but what happens if an interrupt is triggered between the IN and the OUT, and the interrupt routine also modifies the IMR, to turn on, or turn off, an unrelated interrupt? The interrupt handler will do its thing, but as soon as it returns, the IMR will be clobbered by an old copy of the IMR with bit 0 set, breaking the changes made by the interrupt handler.
6.15 WHEN YOU SHOULDN’T DISABLE INTERRUPTS
These guidelines apply to DOS and any similar single-tasking operating system.
The maximum length of time that interrupts can safely be locked out for depends on the operating environment. Although there are no formal guidelines, I would suggest 100 microseconds as a reasonable limit for good performance, and a few milliseconds as a sensible upper limit. If high speed timer tick interrupts or high speed serial communication are being used, the limit will typically be much lower, depending on the required interrupt rate, to avoid missing interrupts altogether.
If you require accurately timed interrupt delivery, beware that disabling interrupts for even a short length of time will cause ‘interrupt delivery jitter’ (thanks {JAM} for the term :-) - i.e. occasionally the interrupt will be delayed slightly. See section 6.16 for details.
Locking interrupts out for more than 50 ms continuously may cause missed timer ticks and problems with the keyboard and network (if present), at least.
If a fast timer tick interrupt (see section 8 and subsections) is being used, or another demanding high speed interrupt such as high speed serial reception, it is easier to miss an interrupt (or lose data). If a hardware interrupt is missed because interrupts are locked out, the PIC does not generate an extra interrupt.
6.16 CAUSES OF INTERRUPT DELIVERY JITTER AND FAST TICK LOSS
Interrupt delivery jitter ({JAM}’s term) occurs when interrupt acceptance is delayed, i.e. there is an unusual or inconsistent delay between the interrupt being signalled at the hardware level, and the processor starting execution of the interrupt handler, and the interrupt is serviced late. This happens for three reasons:
- Interrupts are locked out (processor’s interrupt flag is clear)
- Equal or higher priority interrupt in progress (see section 6.6) (not normally applicable to the timer tick interrupt)
- Instruction or DRAM refresh in progress (contributes a very small amount of jitter, and are unavoidable)
The first reason is the usual reason for interrupt delivery jitter on the timer tick interrupt (int 8 and int 1Ch). The first and second reasons are the usual cause of interrupt delivery jitter on other interrupt sources.
For the normal 18.2065 Hz timer tick interrupt, this causes the delivery of interrupts to be uneven (i.e. to jitter slightly), in either a random or a partly random, partly cyclic manner. This is not usually a problem, as the low resolution timer tick is not used when timing requirements are critical.
Interrupt jitter can also affect cases where the timer interrupt itself is not delayed; for example if an absolute timestamp (see section 9) is being used to timestamp serial data received under interrupt or some other occurrence that is signalled via an interrupt, if that interrupt is delayed, the timestamp will reflect the time that the interrupt was serviced, rather than when it was signalled by the serial chip.
If an interrupt must be actioned within a short length of time, for example a serial received character interrupt or a fast tick interrupt (used when the tick rate is increased), delayed interrupt acceptance may result in a missed interrupt. If this occurs, the PIC does not generate an extra interrupt, in other words, the whole interrupt is lost, and this results in a cumulative timekeeping error unless the condition is detected and handled specially (see section 6.17).
There are three main causes of interrupt delivery jitter due to interrupts being locked out:
- Real (hardware) interrupts
- Software interrupts
- Interrupts disabled while accessing hardware or volatile variables
These causes are now described individually.
6.16.1 INTERRUPT DELIVERY JITTER DUE TO REAL INTERRUPTS
Real interrupts include the timer tick (int 8), keyboard scancode (int 9), serial communication (if enabled) (including serial and bus mouse), RTC (int 70h) (if enabled), and network card (if present) interrupts. The handlers for all of these interrupts (except the timer tick) should re-enable interrupts quickly so that higher priority interrupts including the timer tick are not delayed for long, but some handlers do not enable interrupts because of bad design or deliberately, due to other considerations. Also EMM386 imposes extra overhead during interrupt acceptance; during this time another interrupt cannot be accepted, I think. (*)
For example, if a network card interrupt handler on IRQ3 (for example) does not enable interrupts, and this interrupt is invoked on every network data block received by the machine, then every time a block of data is received, interrupts are locked out for, perhaps, 100 us. If a timer tick interrupt is signalled during this time, its acceptance will be delayed for up to 100 us, and interrupt delivery jitter occurs.
Also, {JAM} points out that screen savers, which typically hook int 8, often clear the whole screen with interrupts disabled, resulting in a very long int 8 every once in a while when the screen saver ‘kicks in’. Many other programs also intercept int 8 and will increase the amount of time occupied by each int 8 and/or by occasional int 8 invocations - network software uses int 8 as a timebase for timeout detection {JAM}, mouse drivers use it, and lots of pop-up and non-pop-up TSRs also use int 8.
{TOR} points out that some BIOSes can also be the culprit:
The usual BIOS implementation of the keyboard interrupt and the floppy drive interface are among the worst for blocking interrupts. I have actually seen a keyboard driver [int 9 handler] issue its buffer full ‘beep’ with interrupts locked out…
6.16.2 INTERRUPT DELIVERY JITTER DUE TO SOFTWARE INTERRUPTS
Every time a software interrupt is issued, the processor disables interrupts before executing the interrupt handler. Well-behaved software interrupt handlers re-enable interrupts immediately on entry, but not all software interrupt handlers are well-behaved. In any case, there is a short length of time during which interrupts are disabled, and this time is lengthened if EMM386 is installed, because EMM386 intercepts the interrupt at a hardware level, and has to work out whether the interrupt is software-generated or is processor-generated, because several low-numbered interrupts are both processor exceptions and software interrupts.
Therefore, every time your program or any code called by your program issues a software interrupt, interrupts are locked out for a short time, and possibly a long time if the interrupt handler is badly written or if several programs (e.g. TSRs) have intercepted that interrupt and many interrupt chains are performed before the request reaches its actual handler.
Other software interrupts which may spend a significant length of time with interrupts locked out are:
- Screen scrolling via the BIOS
- Hard drive read, write, and seek accesses (possibly)
- Network accesses
- Mouse driver function calls
- EMS function calls
- XMS function calls
- Potentially, any code you did not write yourself!
6.16.3 INTERRUPT DELIVERY JITTER DUE TO HARDWARE ACCESSES
Often, interrupts must be disabled manually, using CLI, around access sequences to hardware devices (see section 6.14) or accesses to volatile variables that may be modified by a hardware interrupt handler. If an interrupt is flagged during the short time that interrupts are locked out, it will be delayed until interrupts are re-enabled, causing interrupt delivery jitter.
There are also other reasons why software might disable interrupts, usually (but not always) for short periods only. If your program requires very low jitter, it will probably have to do everything itself, because it cannot call any normal BIOS or DOS functions!
6.16.4 AVOIDING INTERRUPT DELIVERY JITTER
If your application must run with a very fast timer tick interrupt, or must have very low interrupt jitter for whatever reason, it must avoid all of the causes of interrupt jitter described in sections 6.16 through 6.16.3.
Interrupt jitter due to instruction execution (i.e. the interrupt cannot be accepted until the instruction in progress is completed) is unavoidable, but could probably be reduced by using short instructions and avoiding prefixes. Other causes of interrupt delivery jitter must be avoided for good results.
This comes down to the following restrictions:
- Disable all hardware interrupt sources via the PIC(s) except the interrupt source you are using
- Do not issue software interrupts
- Do not call code over which you do not have control
- Do not chain to the original interrupt handler
- Do not disable interrupts using CLI at all
- Run the program without EMM386 if possible
Following these guidelines should ensure that interrupts are never locked out due to a hardware interrupt, software interrupt, or deliberate execution of a CLI instruction.
Disabling IRQ1 (keyboard scancode) will disable the keyboard, of course, and disabling serial interrupts may disable the mouse. Most other interrupts are not active in the background (e.g. the floppy disk interrupt is only active when a disk access is in progress) and should be unaffected.
If you are using int 8 and the interrupt rate is fairly slow, you may choose to chain to the original int 8 handler, because this will not cause jitter as it only executes after the interrupt has been registered. However, this could cause problems if TSRs and/or drivers are using int 8 and occasionally do something nasty such as using the long tick interrupt handler technique described in section 6.9, where they gain full control of the machine for a while. In short, if you chain to the original handler, you are giving execution to code over which you have no control, so if jitter is critical, you do so at your own risk!
If you need very fast interrupts or very low interrupt jitter, be very careful about what you do and who you call - you may need to do everything yourself to avoid interrupt latencies!
I don’t know the details of EMM386 and its effects on interrupt jitter. For example, it may internally trap some privileged instructions, and delay interrupts while processing these instructions. If anyone knows the details, please let me know! (*)
6.17 DETECTING INTERRUPT DELIVERY JITTER AND MISSED FAST TICK INTERRUPTS
Interrupt delivery jitter on int 8 can be detected by reading CTC channel zero on entry to your interrupt handler and looking at the amount of variation from the highest raw value read, or the expected raw value (assuming that the reload value is known). See the sample program in section 10.16.2 for an example of this technique. If your application will be sensitive to interrupt jitter, you should incorporate this type of check, and if jitter is excessive, perhaps advise the user that there is a problem and he/she should ascertain which driver or TSR is causing the problem and get technical help to fix it if possible.
If a fast timer tick rate is being used, a missed interrupt can be detected by using another CTC channel as a reference, providing that the CTC channel is not required (and will not be touched) for any other purpose. I would suggest using channel two, which is normally used for speaker audio generation. You would set channel two to a large divisor (e.g. 65536) and mode two, and make sure that nothing else touched it - i.e. disable, or at least don’t use, the BIOS video function that emits a beep (int 10h with AX = 0E07h), and possibly hook into the keyboard subsystem to prevent the beep when the type-ahead buffer gets full.
Your fast tick interrupt routine would read a timestamp from CTC channel two to determine how many fast ticks have been missed and adjust its behaviour accordingly. This approach would prevent the cumulative error, but would not fix the ‘jumpiness’ or ‘jitter’ of the timekeeping.
6.18 DISABLING INTERRUPTS FOR LONGER THAN ONE TIMER TICK
In some applications, you may choose to disable interrupts for longer than the recommended maximums in section 6.15. You can also selectively disable the timer tick interrupt and any other hardware interrupt source, via the PIC IMR (section 6.11). You will have to deal with the implications of doing this, however.
While interrupts are disabled via the processor’s interrupt flag, interrupts accumulate, so as soon as the interrupt flag is set (via a POPF or STI), {JAM} says: “the program does not regain control until ALL outstanding interrupts are processed, including interrupts that happen while the outstanding ones are being handled. On networked machines, that time may be in milliseconds!”
6.19 DISABLING INTERRUPTS FOR LONG PERIODS OF TIME
If it is necessary to disable interrupts for a long period of time, causing timer ticks to be missed, be aware that doing this is likely to sabotage any network software on the machine, and will also break the mouse driver while interrupts are locked out. You should take the following precautions.
Don’t start the section of code where interrupts are locked out, until the floppy disk drive motors have all turned off. Check the byte at low memory location 0040:003F. If it’s nonzero, one or more floppy disk drive motors are active. Wait until it is zero.
Assuming you don’t want the machine to lose time, you can either read CTC channel zero regularly and watch for a borrow and increment the BIOS timer tick count when that occurs (remember the wrap-around and the midnight flag), or upon completion of the no-interrupt section of code, read the RTC and calculate and store the appropriate timer tick value. This also requires setting the midnight flag if appropriate.
Generally if you want to disable interrupts for that long, you will be running the program on a dedicated machine, and you may not be too concerned about loss of time. In this case, since you have control of the machine that the software will be running on, you could install the ATRTC driver, see section 3.3, which removes the dependency on the BIOS timer tick for timekeeping. The other problems still remain, however.
6.20 OVERHEAD OF AN INTERRUPT
When an interrupt is accepted, the processor branches to the interrupt handler. On modern processors, this causes the prefetch queue to be flushed, wasting a small amount of time. Of course the prefetch queue is being flushed all the time, by branches and jumps and calls, etc, so this is not a major problem. The prefetch queue will be flushed when the interrupt is accepted, and again when the interrupt handler returns with an IRET.
A bigger problem is code and data caching. {JAM} Because this caching is done in blocks, the interrupt may cause wanted code to be flushed from the cache, to make room in the cache for the interrupt handler code, wasting considerable time in reloading the cache when the interrupt completes.
There is nothing that can be done about either of these problems.
{JAM} In protected mode, interrupt overhead is very much higher, because of the privilege changes, mode switches, etc that are involved. Interrupt overhead on a 386SX-25 is in the order of a few hundred microseconds.
I assume this refers to a real-mode interrupt handler being used with protected mode code. If the interrupt handler operated in protected mode, or was a dual- mode interrupt handler (could operate in either mode), this overhead would not exist, presumably. If anyone has more detailed information on this subject, please let me know. Also any detailed information on what EMM386 does to interrupts and how much overhead it imposes, and if there is any way to bypass it, would be great. (*)
Tor Sjowall {TOR} also mentions an additional source of interrupt overhead - the stack switch that DOS does on hardware interrupts if you have a line ‘STACKS=X,Y’ in CONFIG.SYS. I don’t know how this stack switching works, or at what level it operates. Please let me know if you can help. (*)
6.21 EFFECT OF BACKGROUND INTERRUPTS
The timer tick interrupt is normally permanently enabled, and from the point of view of the code being interrupted, it introduces a ‘gap’ in time, at regular intervals (assuming interrupts are enabled). You could imagine that the processor gets abducted by aliens in a UFO (if you had a vivid imagination :-) One moment it’s executing your main routine, minding its own business, then suddenly it is taken away and made to do something else, then when it returns to where it was, it continues normally, without even knowing that it had been doing something else, except that some time has elapsed. Excuse the analogy. Your foreground code is constantly being interrupted without its knowledge.
{JAM} explains this quite nicely as follows:
“The IBM PC has a constant active background process that results in a small gap in any loop. This becomes magnified when programs are compiled for protected mode. Moreover, the standard hardware can add additional gaps. Most often these gaps are under our control. Finally, when connected to a network, many types of background activities can happen, most of which we cannot predict and are beyond our control. Whenever we design a program to function on networked machines, we must remember that these background processes are in effect and we must take them into account. For example, when we poll a device, we must be aware that there will be missing time slices from that polling”.
Unless specifically enabled by your program, the only interrupt sources likely to be operating regularly while the machine is idle, are int 8 (timer tick), int 9 (keyboard scancode), and interrupts for the serial mouse or bus mouse, and network card interrupts.
6.22 SAFE CONTROL OF INTERRUPTS
When you access hardware devices (reading or writing the CTC registers, for example), you could disable interrupts around the access, like this:
    void write_some_registers(void) {    /* Unsafe method! */
        disable();            /* Or asm cli */
        outportb(port1, value1);    /* whatever you need to do */
        outportb(port2, value2);    /* whatever you need to do */
        enable();            /* Or asm sti */
        return;
        }
This assumes that the function that called this function was operating with interrupts enabled, and wants them re-enabled when this function has finished talking to the hardware. This may not be the case!
For example, the function that called this function may already be doing something critical which requires interrupts to be locked out, and remain locked out continuously during the call to our write_some_registers() function.
The safe way to handle this is as follows:
    void write_some_registers_safely(void) {
        asm pushf;
        asm cli;            /* or use disable() */
        outportb(port1, value1);    /* whatever you need to do */
        outportb(port2, value2);    /* whatever you need to do */
        asm popf;
        return;
        }
Here, we push the flags register onto the stack before disabling interrupts, then pop the flags register back once we have finished. This ensures that interrupts are locked out during our hardware manipulation, and also that the correct state of the interrupt flag is restored once we have finished.
If interrupts were enabled on entry, the popf sets the interrupt flag ON, and the function effectively only disables interrupts for the minimum time, i.e. between the disable() (CLI) and the popf.
If interrupts were disabled on entry, the popf sets the interrupt flag OFF, which it already was from the disable() (CLI instruction). Thus the routine never enables interrupts.
This simple technique ensures that the routine can be safely used in either situation - either interrupts allowed, or interrupts not allowed.
According to an article by James Ralph ([email protected]) in PC Magazine, September 13 1994, page 340, there is a bug in some 286 processors which causes the popf instruction to briefly enable interrupts. The workaround proposed by James is to use an IRET (which presumably does not suffer from this bug) instead of a POPF (an IRET pops IP, CS, and the flags). This approach requires that you push CS and IP onto the stack first. The example given by James is similar to this:
        pushf            ; Keep flags including interrupt flag
        cli            ; Disable interrupts

; Do critical stuff in here - interrupts are locked out

        push    cs        ; Have flags on stack, now push CS
        call    NEAR AnIRET    ; CALL pushes IP, IRET pops IP, CS, flags

; Continue with the main function - interrupt flag is now restored to its
; original value on entry to the function

        ret            ; End of the function

; Put the IRET somewhere in the code segment - it can be used by multiple
; instances of the above code.

AnIRET:        iret
Another way to handle this would be:
        pushf            ; Keep flags including interrupt flag
        cli            ; Disable interrupts

; Do critical stuff in here - interrupts are locked out

        push    cs        ; Have flags on stack, now push CS
        push    WORD PTR cs:RetAdr ; Push a value for IP
        iret            ; Pops IP, CS, and flags
RetAdr        DW    RetPoint    ; Offset to 'return' to
RetPoint:

; Continue with the main function - interrupt flag is now restored to its
; original value on entry to the function
I have not taken this precaution in the sample code, because I’m lazy, but you probably should use this method unless your program will never be run on 286 machines or is 386/486/586-specific.
6.23 TIMER TICK INTERRUPT HANDLER GUIDELINES
Note that these comments also apply to other asynchronous interrupts, such as the keyboard interrupt (int 9) and the serial and parallel port interrupts. For full details, find a DOS reference that discusses ISR programming and TSR techniques.
Both int 8 and int 1Ch are asynchronous hardware-triggered interrupts (although int 1Ch is actually software-generated). See section 6.35 for a discussion of the differences in usage between int 8 and int 1Ch.
There are major restrictions on what can safely be done inside an asynchronous interrupt handler, because when it is invoked, the hardware and software state of the machine is not known.
For example, DOS may be in the middle of writing to a printer port, waiting for user input, or processing a disk I/O request, or the BIOS may be busy scrolling the text screen, plotting a pixel, beeping the speaker, or programming the DMA controller ready to transfer a sector of data from a floppy disk. Also, a C library function that uses static variables may be in progress. In fact, more than one of these ‘levels’ may be busy. For example, an fopen() call could be in progress, which called DOS, which called the BIOS to read a sector from a floppy disk, which is busy programming the DMA controller. Therefore, all of these software and hardware blocks are busy.
In general it is best to limit the functions performed by an interrupt handler to minimal hardware manipulation, and use a shared variable interface with the main program, whenever possible. Be careful to make your main program aware of the interrupt routine - programs do not normally expect certain variables to change magically of their own accord. Use the ‘volatile’ keyword when declaring these variables and use disable() and enable() (CLI and STI) around any critical code sections.
Also, if your timer tick interrupt handler may use a lot of stack space you should consider switching to another stack. This is much easier if the interrupt handler is written in assembler.
Keep int 8 and int 1Ch routines as short and fast as possible to reduce delays imposed on other interrupt sources.
6.24 ACCESSING HARDWARE DEVICES IN AN INTERRUPT HANDLER
Asynchronous interrupts are ‘background’ processes. It is not always safe for them to access hardware devices, because the ‘foreground’ processes - the main body of your program, or a function (e.g. DOS, BIOS, EMS, XMS, mouse, network, etc) called by your program - may be in the process of accessing the device, or may be expecting the device to remain in a certain state.
Often, foreground accesses consist of reading and/or writing a few I/O locations in sequence, as with the CTC. To make things safe for your interrupt routines and for TSRs, when you access devices in this way in your foreground code, you must ALWAYS disable interrupts around the sequence. This applies to devices such as the RTC, CTC, PICs, DMA controller, VGA ASICs, etc.
Many hardware devices can be accessed (carefully) by an interrupt routine. This may be because they are not normally accessed in the foreground, or because the interrupt routine uses a part of the device that is not used by the foreground processes, or because the interrupt routine’s accesses do not conflict with the foreground process’s accesses.
If you know enough to access the hardware directly, you will know when and how the foreground processes will access the device, so you can figure out what your interrupt routine can and cannot do safely with that device. Reading the CTC in an interrupt handler is always safe, providing that your foreground program is well-behaved (always disables interrupts around access sequences) and always reads the appropriate number of bytes from the data register, so the lobyte/ hibyte flag remains in sync (see section 7.17).
6.25 CALLING DOS AND BIOS IN AN INTERRUPT HANDLER
Much of the BIOS, and all of DOS, is not re-entrant, and therefore cannot safely be called from an asynchronous (hardware) interrupt handler, because it might have been busy (i.e. in progress) when the interrupt occurred.
None of the applications in this document require DOS or BIOS to be called from an asynchronous interrupt handler. If you need to do this, get a reference on TSR programming, as it is non-trivial!
6.26 CALLING C LIBRARY FUNCTIONS IN AN INTERRUPT HANDLER
Many C library functions call DOS or BIOS functions, and are subject to the same restrictions. Also, some C library functions may not be re-entrant for other reasons - for instance, they may use global or static variables, or allocate memory which is in the process of being allocated to the foreground program. Check your compiler’s library reference or programmers’ guide for information about TSR considerations and re-entrancy of library functions.
6.27 RE-ENTRY OF INTERRUPT HANDLERS
Generally hardware interrupt handlers are not re-entered, i.e. are not restarted during their execution, because they do not send an EOI (see section 6.28) until they have completed, and then interrupts are locked out (see section 6.29). There is one exception to this rule, which applies when a TSR uses the long timer interrupt technique described in section 6.9. This technique can also be used with the keyboard scancode interrupt, when a TSR pops up using that interrupt, but see section 6.9.1 for a potential problem.
In these cases, the interrupt handler of a foreground program may actually be re-entered during processing, if it chains to the original handler using the CALL method (see section 6.31), because the original handler (which is the TSR’s handler) can issue an EOI, allowing the entry part of the interrupt handler to be re-entered. The TSR’s own interrupt handler will be aware of re-entry considerations, because the TSR will be causing them, but an interrupt handler in a foreground program may not have been designed with this in mind. They probably should be designed to support this technique. See section 6.9 for more details.
If the code in the interrupt handler is inherently non-reentrant, this can be handled using a semaphore to detect re-entrance, as described in section 6.9. If the semaphore is set at the start of your handler, it should probably chain to the original handler using the JMP method without performing its normal function. In some cases it is possible that the semaphore would become set and would never clear. Hopefully nobody is even reading this stuff, as it is excessively boring. Yibble yibble yobble yoo, I am a fence post. It is time for my pill - I have to take one every 54.9254 milliseconds.
6.28 THE ‘END OF INTERRUPT’ SIGNAL
Interrupts 8 to 15 (corresponding to IRQ0 to 7) and interrupts 70 hex to 77 hex (corresponding to IRQ8 to 15) are generated by hardware devices. An interrupt service routine for these interrupts must inform the 8259 PIC(s) when the device which generated the interrupt has been serviced, so that the PIC can reset its priority structure. This is done using a non-specific EOI (end of interrupt) command to the PIC. For int 8 to 15 (IRQ0 to IRQ7), a single EOI is used:
outportb(0x20, 0x20); /* in C, or */
    mov al,20h
    out 20h,al        ;    in assembler.
For int 70 hex to 77 hex (IRQ8 to IRQ15), two EOIs are used:
    outportb(0xA0, 0x20);
    outportb(0x20, 0x20);    /*    in C, or */
    mov al,20h
    out 0A0h,al
    out 20h,al        ;    in assembler.
For IRQ8 through IRQ15, the EOI is typically sent to the secondary PIC first, as in these examples, though I don’t believe there is any significance to the order in which they are sent.
Normally the EOI is sent at the end of the interrupt routine just before the IRET instruction. See section 6.29 for interrupt control details.
You can use the specific EOI command if you prefer - the value is 60 hex plus the IRQ number within the PIC, for example to send a specific EOI for IRQ4:
outportb(0x20, 0x64);
and to send a specific EOI for IRQ11:
    outportb(0xA0, 0x63);    /* IRQ11 is input 3 on the second PIC */
    outportb(0x20, 0x62);    /* The chain IRQ is IRQ2 */
6.28.1 LEVEL TRIGGERED INTERRUPT RESET
IBM PS/2 machines that use MCA (Microchannel Architecture) buses have level triggered interrupts. This poses a problem for the timer interrupt - how to clear the timer interrupt request. I have no formal documentation on this, but I saw the following note in an article by Bob Smith ([email protected]) in mid November 1995:
On an IBM Micro Channel Architecture system, the timer tick handler in the BIOS sets the Clear IRQ0 bit (bit 7 in I/O port 61h). Without this, the hard disk won’t work. This might, in fact, apply to all level-triggered interrupts in general, but I found out about setting that bit before having to experiment any further.
So it appears that the timer interrupt must be explicitly acknowledged and cleared on an MCA system, in addition to sending the EOI. This makes sense as there is no other way for the level to be reset to deassert the interrupt request in a level triggered interrupt system. There may be some similar requirement for an EISA system running in level triggered interrupt mode. Any more information would be welcomed. (*)
This also has implications when int 8 is operated at a higher rate, because the int 8 intercepter would have to manually acknowledge the interrupt, in addition to sending the EOI, every time it didn’t chain to the original int 8 handler. This may mean that a standard int 8 handler for a fast timer tick interrupt (see section 8) will not work on a PS/2.
6.29 ENABLING AND DISABLING INTERRUPTS IN AN INTERRUPT HANDLER
On entry to an interrupt handler, processor interrupts are disabled (as if a disable() or CLI had been issued). Normal practice is to enable interrupts as soon as possible, perform processing, disable interrupts again, issue an EOI if applicable (see section 6.28), and return from interrupt. However, int 8 is the highest priority interrupt source, and until the EOI is sent, no other interrupts will get through (except NMI of course) so there’s no need to enable interrupts during int 8 or int 1Ch processing, unless you hare re-ordered the interrupt priorities.
The EOI command is sent to the PIC(s) at the end of the interrupt handler. For interrupt handlers which enable interrupts during processing, it is normally wise to disable interrupts using disable() or CLI just before issuing the EOI, so that another equal or lower priority interrupt does not occur after the EOI but before the IRET. Typical coding would be:
IntHandler:    sti
        push    ax
        push    other registers
        ; ... interrupt processing here
        pop    other registers
IntFinished:    mov    al,20h
        cli
        out    20h,al
        pop    ax
        iret
This particular consideration does not normally apply to int 8 handlers as they are normally the highest priority interrupt and do not need to enable interrupts during their operation. If an int 8 handler does enable interrupts, however, the above precaution should be taken.
6.30 STACK USAGE AND STACK CHECKING IN AN INTERRUPT HANDLER
Stack usage (function nesting depth) must be kept to an absolute minimum unless your interrupt handler performs a stack switch to a local stack. Normally, you will be using the stack of whichever program was active at the moment that the timer tick occurred, and you don’t know how much spare room there is in that stack.
For interrupt handlers written in C, don’t go allocating automatic strings or arrays! Declare any local variables static if possible. If your compiler has stack checking ON by default, and isn’t too bright, you may need to turn stack checking OFF for all interrupt handlers, and for any functions that may be called by them, using the appropriate compiler directive.
The directives for Borland C++ 4.0 (and probably 3.1 as well) are:
    #pragma option -N-    turn OFF stack checking
    #pragma option -N    turn ON stack checking if perviously enabled
These can be placed around the whole function (or group of functions) that are to be compiled without stack checking, or just around the first line of the function (that gives the return type, function name, and parameters). That information was kindly sent by Michael Mauch ([email protected]) who mentions another problem he found with BC++ 4.0. He had an inlined function that was called by an interrupt handler. Both the interrupt handler and the inlined function were declared with stack checking off. When he temporarily disabled inlining, during debugging, the compiler generated a stack check in the called function! The moral of the story is you can’t always trust your compiler :-)
If anyone can provide details of stack checking directives for other compilers, please let me know. (*)
6.31 CHAINING TO THE OLD INTERRUPT HANDLER
Most interrupts have a default handler. Before your program takes over control of an interrupt, it must store the contents of the interrupt vector, which will be a far (i.e. segment and offset) pointer to the original handler, and which must be restored when your program terminates (see section 6.3).
Often your replacement interrupt handler will need to use the original handler. This is called chaining to the original handler of the interrupt, and is done through the pointer that your program stored when it intercepted the interrupt. Sometimes your replacement interrupt handler will always chain to the original handler, and sometimes chaining is done conditionally, i.e. when required or when appropriate.
When chaining to an original interrupt handler, remember that the original interrupt handler was written to assume that it was the handler for this interrupt source. Sometimes this requires a little care to make sure that it will operate properly if called by your replacement handler. For example, the BIOS int 8 handler issues an EOI command (see section 6.28) every time it is called, so if your interrupt handler chains to the BIOS’s interrupt handler, it should not issue the EOI itself. It must issue the EOI if it does not chain to the BIOS’s interrupt handler, however. Also, the original interrupt handler will probably assume that interrupts will be disabled when it is invoked, as this is the case when it is invoked directly, so you must ensure that interrupts are disabled before chaining.
There are two ways of chaining to the old handler - you can bury her, burn her or dump her. I mean, you can call it, or you can jump to it. Call it when your interrupt handler needs to regain control after the old handler has been invoked. Jump to it when you do not need to get control back, as this uses less stack space and is tidier. In the Thames.
Remember that the processor pushes the flags, CS, and IP (in that order) when it accepts an interrupt, and an IRET (which is the way most handlers will exit) pops these registers back again. Therefore if you chain to a handler with a CALL, you must push some flags first, then use the far form of CALL, so that the IRET will return correctly.
Chain_Call:
    ; ... Initial interrupt processing here
    pushf            ; Simulate stack for an INT
    cli
    call    FAR OldIntPtr    ; Call old handler
    ; ... More interrupt processing here
    iret

Chain_Jump:
    ; ... Initial interrupt processing here
    cli
    jmp    FAR OldIntPtr    ; Call old handler
Note that some interrupts, specifically int 1Ch, do not require chaining, as the default handler is just an IRET. But see sections 6.33 and 6.35.
See the interrupt handlers in the sample programs for more details.
If you use the CALL method to chain to the old interrupt, in an int 8 handler, beware that there may be a TSR using the Long Tick Interrupt technique described in section 6.9, which will send an EOI but not return, thus causing your interrupt handler to be re-entered while it was part-way through execution. You probably should design the handler to support this possibility.
If you use the JMP chaining method, this consideration does not apply.
6.32 WRITING INTERRUPT HANDLERS IN ASSEMBLY LANGUAGE
Here are some guidelines and warnings that you should heed if you are coding an interrupt handler in assembly language.
On entry to the interrupt handler, the only registers that will be known are CS and IP. DS is undefined. You must preserve any other registers that you modify, except the flags (which will be restored by the IRET).
Also see sections 6.23 to 6.26 for restrictions on what may be called from, and done inside, your interrupt handler.
6.32.1 ASSEMBLY LANGUAGE INTERRUPT HANDLERS: ACCESSING VARIABLES
If your interrupt handler must have access to memory variables, such as flags, structures or buffers used to communicate with other parts of your program, there are three main ways to do this:
- Common code and data segment (COM files; tiny model), access with CS
- Put variables in code segment and access them using CS
- Put variables in data segment and set DS so you can access them.
The first approach is used in single-segment COM-files (also known as tiny model) in which the code and data segment-paragraphs are the same. In these programs, CS will already address the segment (because the interrupt handler is in the same segment as the data), so you can access variables using CS. This is done via the ASSUME directive, which tells the assembler what segment each of the segment registers is supposed to contain. The directive:
ASSUME cs:_TEXT,ds:nothing,es:nothing,ss:nothing
tells the assembler that only the CS register is known at the moment, and that CS addresses the _TEXT segment. You would change the name to whatever segment you use for your single segment. This directive should appear before the interrupt handler. The ASSUMEd registers remain in effect until modified by another ASSUME directive.
The above ASSUME directive tells the assembler that only the _TEXT segment is addressable, and that every access to a variable in that segment will require a CS segment override prefix. You need not explicitly code the CS override on every instruction - the assembler takes care of this automatically (unless you’re using A86 :-) But be very careful with string instructions, because they don’t make references to data objects, and an explicit segment override may be required. For example, if only CS is ASSUMEd:
    mov    ax,SomeVariable        ; This will generate a CS
                    ;   override and will work,

    mov    si,OFFSET SomeTable    ; Point to start of table
    lodsw                ; Uh-oh!  No override will
                    ;   be generated on this!

    lodsw    cs:            ; This will work
The second method is used with multiple segment programs. The variables are placed in the code segment, typically near to the interrupt handler, and are accessed in a similar way. An ASSUME directive should be used to tell the assembler that CS is the only known segment register, and that it addresses the code segment (_TEXT or whatever). The trouble with this method is that the main program has to access those variables in the code segment, which is messy.
This second method is most often used in large assembly language programs.
The third method is the method used in C programs and most high level programs, where placing variables in the code segment is frowned upon and/or impossible. The variables are placed in the data segment, as normal. This requires that somehow, a segment register (typically DS) must be loaded with the appropriate segment at some point in the interrupt routine, before those variables are addressable. This also requires that the segment register (e.g. DS) is pushed at the start of the interrupt handler and popped again before it terminates.
Again, an ASSUME directive should be used to tell the assembler what segment registers point to what. Here is a sample code fragment:
DATA        SEGMENT
SomeVariable    DW    0        ; Some variable, used by int. handler
AnotherVar    DW    0        ; Another variable, ditto
DATA        ENDS

CODE        SEGMENT

        ASSUME    cs:CODE,ds:nothing,es:nothing,ss:nothing

MyIntHandler    PROC    far
        pushf            ; Preserve flags
        push    ax        ; Preserve register
        push    ds        ; Preserve DS
        mov    ax,SEG DATA    ; Get data segment to AX
        mov    ds,ax        ; Move it to DS
        ASSUME    ds:DATA        ; (CS, ES and SS are unchanged)
        mov    ax,SomeVariable    ; Get some variable
        add    ax,AnotherVar    ; etc, you get the idea...
        ; -- More code here
        pop    ds        ; Restore DS
        ASSUME    ds:nothing    ; Cannot address anything useful with DS
        pop    ax        ; Restore AX
        popf            ; Restore flags
        DB    0EAh        ; JMP xxxx:yyyy
OldIntOfs    DW    0        ; Vector to original handler - Offset
OldIntSeg    DW    0        ; Segment
MyIntHandler    ENDP
I suggest using tiny model for assembly language programs (avoids segment register setting in the interrupt handler), or for assembly language programs in other models, place the variables in the code segment, and for C programs, place them in the data segment. This is a matter of personal preference, though.
6.32.2 ASSEMBLY LANGUAGE INTERRUPT HANDLERS: STARTING CONDITION
The interrupt flag in the flags register will be clear (i.e. interrupts locked out) unless a badly behaved interrupt handler has chained to your interrupt handler but left interrupts turned on. If you are doing critical hardware access in your handler, you may want to issue a CLI just in case. This should not apply to int 8, as it is the highest priority interrupt and should never be interrupted (except by an NMI!)
You may have noticed that I pushed and popped the flags in the sample code in section 6.32.1. This is probably not necessary in such a case as the original flags are popped by the IRET at the end of the old interrupt handler that is being chained to via the JMP instruction (see section 6.31), but I think it’s wise to make sure that the chained interrupt handler starts with the same flags that it would have had if our interrupt handler was not present.
The direction flag will probably be clear, but DON’T COUNT ON IT! If you do any string manipulation in your interrupt handler, be sure to include a CLD instruction to ensure that the direction flag is known. Forgetting this precaution is an open-armed invitation to subtle intermittent bugs.
6.32.3 ASSEMBLY LANGUAGE INTERRUPT HANDLERS: PRESERVE THE REGISTERS
Of course, your interrupt handler must not modify any registers - use PUSH and POP to preserve the old values in registers if you need to use the registers for something else.
Watch out for instructions that modify unexpected registers - for example the 16-16-32 MUL instruction modifies DX; even if you don’t use the high word of the result, DX will still be modified.
6.33 USING INTERRUPT EIGHT IN A TSR
You must intercept int 8 when speeding up the timer tick (see section 8). Int 8 can also be used by TSRs which want a regular interrupt source. TSRs should not use int 1Ch, though some do - see section 6.35.
On installation, your TSR should obtain the contents of the int 8 vector using getvect() or DOS function 35 hex, and store it, then replace the interrupt handler with its own handler.
Every time the TSR’s int 8 handler is called, it must chain to the old interrupt handler, usually by jumping to it, as described in section 6.31. Your TSR then has a regular 54.9254 millisecond interrupt source. If a foreground program reprograms the timer tick for a faster rate (see section 8), calls to your int 8 handler may be unevenly spaced. In the worst case, it is possible for int 8 invocations to be spaced as closely as 27.4627 ms, half the normal spacing, and as far apart as 82.3881 ms, 1.5 times the normal spacing. Over a period of time the interval between int 8 calls should average out to 54.9254 ms, though. See sections 6.23 to 6.26 for details of restrictions and techniques for interrupt handlers.
If your TSR can be uninstalled from the command line (a useful feature), the original int 8 vector contents must be restored, but before restoring vectors when uninstalling, ensure that the int 8 vector, and the vectors for any other interrupts your TSR intercepts, are currently pointing to the handler in the installed copy of the TSR. If they do not, one or more TSRs have been loaded after your TSR, and it is not safe to uninstall your TSR because restoring the interrupt vectors will unhook the other TSRs and sabotage their operation. In this case, you must advise the user that the TSR cannot be uninstalled as other TSRs have been installed above it.
I believe there is a package called Tesseract, or maybe AMIS, written by Ralf Brown of the Interrupt List fame, which provides a general TSR template and also permits compatible TSRs (i.e. ones written to be compliant with the system) to be unloaded in any order. This sounds like a good idea, though I have not used it. I found ftp://oak.oakland.edu/SimTel/msdos/info/altmpx35.zip which is dated 13 Sept 1992, but I don’t know if this is the latest version. If someone knows the latest version and its home site, please advise me so I can include a reference here. (*)
6.34 USING INT 8 WITHOUT CHAINING
In some cases, for minimal interrupt overhead when int 8 is being operated at a high rate, it may be necessary to use int 8 without chaining. Doing this will cause the DOS time to freeze (unless an RTC-based CLOCK$ driver such as ATRTC, see section 3.3 is installed), will prevent floppy disk drives from turning off after two seconds of inactivity, will probably prevent timeout- based ‘green’ functions (slow-mode, hard drive spindown on laptops, etc) from kicking in, and will probably break the mouse driver and any network software, as well as most screen savers and some pop-up TSRs, so this is not something that should be done by a well-behaved program that is intended for general use.
You can see the effect of disabling the timer interrupt by using the sample program in section 7.12 to set CTC channel zero to an inappropriate mode, such as mode zero, thus stopping the timer tick.
6.35 USING INT 1C HEX INSTEAD OF INT 8
Int 1Ch is intended for use by user programs for timing. It is invoked 18.2065 times per second by the BIOS int 8 handler. On entry to the handler, interrupts will be disabled. Do not issue an EOI command to the interrupt controller - the BIOS int 8 handler takes care of this after the int 1Ch handler returns.
TSRs should not use int 1Ch - see below for a discussion of this.
In theory, you should not need to chain to the original int 1Ch handler, as the default handler is a dummy handler, simply an IRET. However, some existing TSRs hook int 1Ch. For compatibility with those TSRs you should make your non-TSR programs chain to the old int 1Ch handler if they use int 1Ch.
See sections 6.23 to 6.26 for details of what can, and cannot, be safely done inside an int 1Ch handler.
To use int 1Ch, during initialisation the program should store the address of the original int 1Ch handler and replace the old handler with a new one, and on termination, the program should restore the old handler address. Chain to the old handler in the normal way on every int 1Ch call. It does not matter whether you chain before you perform your own processing, or after.
A program which intercepts int 8 or int 1Ch should trap critical errors and the DOS Ctrl-C vector, and optionally the Divide Overflow vector, so that if the program is terminated due to a critical error or a user Ctrl-Break or Ctrl-C, the interrupt vector can be restored to its original address as part of the clean-up. See section 5 and subsections for details on trapping the Ctrl-C and critical error vectors.
In my view, it is inappropriate for a TSR to hook int 1Ch. Some people have disagreed with this opinion, so for their benefit I will present the evidence that I have found, and explain the logic by which I arrived at my conclusion.
-
The MS-DOS Encyclopedia has two articles that relate to interrupts and TSRs. This book is published by Microsoft Press and edited by Ray Duncan. The two relevant articles are Article 11 on TSRs by Richard Wilton, and Article 13 on Hardware Interrupt Handlers by Jim Kyle and Chip Rabinowitz. Article 11 has a TSR example which uses int 8. The article makes no mention of int 1Ch at all. Article 13’s example code also uses int 8 and the article only mentions int 1Ch in a table of low-numbered interrupts as “Timer tick (user defined)”.
- The PC and XT technical references have the following to say about int 1Ch:
“This vector points to the code to be executed on every system-clock tick. This vector is invoked while responding to the timer interrupt, and control should be returned through an IRET instruction. The power- on routines initialise this vector to point to an IRET instruction, so that nothing will occur unless the application modifies the pointer. It is the responsibility of the application to save and restore all registers that will be modified.”
- From the book “DOS Programmer’s Reference”, 3rd edition, published by Que
Corporation, written by Dettmann, Kyle and Johnson (see section 12), in
the section on int 8:
“Int 08h, which is called 18.2 times per second to advance the time-of- day counter, is tied directly to channel 0 of the system timer chip. People who write TSRs with utilities such as SideKick, for example, find Int 08h particularly useful for time-related triggering (as with a clock or alarm). This interrupt calls Int 1Ch (Timer Tick). Most TSRs should connect to Int 1Ch rather than to Int 08h.”
In the section on int 1Ch:
“Vector 1Ch, the timer tick interrupt called by int 8 (system metronome), is initialised to point to an IRET instruction. A TSR that needs to be triggered at each clock tick can reset the vector for this interrupt to point to a custom interrupt handler.
“Because this function is called from inside the int 08h code, before handling of that top-priority action is completed, it shares top priority and will prevent the system from responding to any other hardware interrupt requests, including those from serial devices or disk units, while it executes. Therefore it is necessary to keep to an absolute minimum the time spent in any handler for this function, or you will risk the loss of data when time-sensitive applications are running.
“The best practice for a TSR is merely to set a flag from this function, then inspect the flag from another handler hooked into the int 28h (DosOK) chain, which gives ample time to take care of any needed processing without blocking hardware interrupts.”In a section on TSR programming:
“If DOS is not waiting for input, you can use the timer interrupt. The timer interrupt (1Ch) ticks 18.2 times per second. You can attach to this interrupt in the following service routine that checks the hot-key flag as well:
“Timer Interrupt activates
“Call next timer interrupt service
…
The TSRs in the MS-DOS Encyclopedia use int 8 but do not say that int 8 should be used, and do not give reasons. The DOS Programmer’s Reference states clearly that int 1Ch should be used by TSRs but do not give reasons, and its section on int 1Ch is worded so as to imply that int 1Ch should not be chained if used in a TSR, though it is obvious (and clearly shown in the TSR programming section of the same book) that it should be chained. Since the MS-DOS Encyclopedia is sanctioned by Microsoft and edited by Ray Duncan, I feel it has more weight (particularly the hardback edition :-) than the Que book, even though Jim Kyle, one of the authors of the Que book, co-designed the AMIS TSR interface! The technical reference also makes the point that the default handler for int 1Ch is an IRET, and clearly states that “nothing will occur unless the application modifies the pointer”, though this text was written before TSRs were commonplace and is probably not written with TSR considerations taken into account.
In my view, TSRs should not use int 1Ch, they should use int 8. Applications may use either (though they must use int 8 if they are speeding up the timer tick; this is a separate issue). If an application hooks int 8, it must chain to the original handler. If an application hooks int 1Ch, it should also chain to the original handler, to support existing TSRs which use int 1Ch.
My logic in coming to this conclusion is:
Int 1Ch is (or was originally) defined for user program use,
The default handler is an IRET, and was provided simply to keep
the machine from crashing when int 1Ch is issued by the
BIOS int 8 handler and no user program is using int 1Ch,
Therefore an application grabbing int 1Ch does not need to chain,
Therefore a TSR writer should not assume that int 1Ch will be chained,
Therefore a TSR writer should use int 8, not int 1Ch.
Some TSRs do use int 1Ch,
Therefore an app using int 1Ch should chain, to support these TSRs.
I believe that a TSR should operate as transparently as possible, i.e. the environment presented to a user program should be the same with or without the TSR. The default handler for int 1Ch is an IRET, so an application does not need to chain when it hooks int 1Ch. If a TSR hooks int 1Ch, the default int 1Ch handler (from an application program’s point of view) is no longer an IRET, and the new ‘default’ handler must be chained. This has changed the environment from one where the default handler was just provided so that the machine didn’t crash and there was no reason to chain, to one where chaining is required. Therefore I regard this as bad programming practice for a TSR writer.
As to the question of whether an application program should chain int 1Ch, there are clearly some TSRs in existence that do use int 1Ch, so application programs should now chain int 1Ch. In my opinion this is unfortunate, but due to the number of programmers who write DOS software, and the lack of thorough documentation on TSR writing from IBM and Micro$oft, such misunderstandings and design misfeatures are a sad fact of life. There are other cases where programs must go to lengths to do things they shouldn’t have to do, in order to work around problems due to bad design in other programs - for example, the old DOS VDISK program, which grabbed extended memory uncooperatively because it was written before the XMS standard evolved, is a good example - memory managers must check for its existence explicitly and refuse to install if VDISK is found.
If you think that this lack of coordination is surprising, consider that an organised software company developing an operating system would provide its programming staff with a thorough design document, and allow only experienced system-level programmers to work on the interrupt routines, whereas Micro$oft has provided precious little documentation on writing reliable low-level code, and (because of DOS’s lack of support for anything more esoteric than file and memory management), forced large numbers of programmers with varying amounts of low-level programming experience to ‘go to the hardware’ when they want a fast tick interrupt or a serial port that can operate faster than 300 baud :-) With this sorry state of affairs, it’s a miracle that so many TSRs can live together at all!
6.36 SAMPLE PROGRAM: USING INT 1CH WITH CRITICAL ERROR AND CTRL-C HANDLING
The following program demonstrates using int 1Ch and handling critical errors and Ctrl-C using the critical error handling module from section 5.8.
The program traps Ctrl-C (it has its own Ctrl-C handler) and critical errors (via the crit_err_intercept() function in CRIT_ERR.ASM), and takes over the int 1Ch interrupt. It does not chain to the original int 1Ch handler, as this is supposed to be a dummy IRET instruction. If a badly written TSR is using this interrupt, then it will just have to miss out while my program is running (see section 6.35 for more details).
Every timer tick, it toggles the speaker state, causing a ticking noise. The speaker toggle is done inside new_int_1Ch().
First, the user has the opportunity to press Ctrl-C while DOS function 1 is in progress. This triggers the Ctrl-C handler, which terminates the program with the message “Program terminated by Ctrl-Break or Ctrl-C”. The abort_cleanup() function is called with dos_is_safe set to TRUE.
If the user presses Enter instead of Ctrl-C, the program continues, and tries to open the file “A:NOSUCH.FIL”. Leave the disk drive empty for this test. This invokes the critical error handler and issues the Abort, Retry, Ignore (or Fail) prompt. If the user selects Abort, the critical error intercepter (in CRIT_ERR.ASM) calls abort_cleanup() with dos_is_safe FALSE, then returns the Abort error code to DOS, which terminates the program. If the user selects Fail, the program continues, and calls abort_cleanup() with dos_is_safe TRUE, then terminates normally via exit(0).
abort_cleanup() resets the control signals for the speaker and cleans up the int 1Ch vector. If DOS is not safe, it restores the vector directly by patching the interrupt vector table directly. It only attempts to restore the int 1Ch vector if the old_int_1Ch variable is not equal to 0xFFFFFFFF, i.e. the vector has actually been intercepted!
In any case, the ticking sound should stop when the program terminates for any reason, indicating that the interrupt vectors were correctly restored and the machine is in a stable state.
/*
Sample program #4
Demonstrates using int 1Ch and handling Ctrl-C and critical errors
Part of the PC Timing FAQ / Application notes
By K. Heidenstrom ([email protected])

Save and assemble the critical error module CRIT_ERR (above)
Save this sample code to SAMPLE4.C
Compile this module with:
    bcc -c -I<inc_path> -ms sample4.c
Link the modules with:
    tlink /c /x <c0_path>\c0s.obj sample4.obj crit_err.obj,
        sample4, nul, <lib_path>\cs
Where inc_path is the path to your C header files, c0_path is the path to your
startup modules C0x.OBJ and lib_path is the path to your C libraries Cx.LIB.
*/

#include <dos.h>    /* Needed for enable(), disable(), MK_FP() */
#include <fcntl.h>    /* Needed for O_RDONLY */
#include <io.h>        /* Needed for _open() and _write() */
#include <stdio.h>    /* Needed for printf() */
#include <stdlib.h>    /* Needed for exit() */

#define FALSE 0
#define TRUE 1

#define STDERR 2    /* DOS handle for standard error */

void crit_err_intercept(void);        /* Provided in CRIT_ERR.OBJ */
unsigned int is_at_crit_prompt(void);    /* Provided in CRIT_ERR.OBJ */

typedef void interrupt (far *intfuncp)(); /* Pointer to interrupt handler */

intfuncp old_int_1Ch = (intfuncp)0xFFFFFFFFL;

void abort_cleanup(int dos_is_safe) {
    if (dos_is_safe) {
        if (old_int_1Ch != (intfuncp)0xFFFFFFFFL) {
            setvect(0x1C, old_int_1Ch);
            old_int_1Ch = (void far *)0xFFFFFFFFL;
            }
        /* Insert other cleanups here - DOS can be safely called */
        }
    else {
        disable();            /* Probably superfluous */
        if (old_int_1Ch != (intfuncp)0xFFFFFFFFL) {
            *((intfuncp far *)MK_FP(0, 0x1C << 2)) = old_int_1Ch;
            old_int_1Ch = (void far *)0xFFFFFFFFL;
            }
        /* Insert other cleanups here - DOS can NOT safely be called */
        }
    outportb(0x61, inportb(0x61) & 0xFC);    /* Clean up speaker control */
    return;
    }

void interrupt ctrl_c_handler(void) {
    static char message[] = "\r\nProgram terminated by Ctrl-Break or Ctrl-C\r\n";
    if (is_at_crit_prompt())
        abort_cleanup(FALSE);
    else {
        abort_cleanup(TRUE);
        _write(STDERR, &message, sizeof(message));
        }
    exit(255);
    }

void interrupt new_int_1Ch(void) {
    outportb(0x61, (inportb(0x61) & 0xFE) ^ 0x02);
    return;            /* From interrupt */
    }

void intercept_int_1Ch(void) {
    old_int_1Ch = getvect(0x1C);
    setvect(0x1C, new_int_1Ch);
    return;
    }

unsigned int dos_func_1(void) {
    _AX = 0x100;
    geninterrupt(0x21);    /* DOS keyboard input with echo and break */
    return _AL;
    }

void main(void) {
    int n;

    printf("Sample program #4 - Demonstrates using int 1Ch and handling Ctrl-C and critical errors\n");
    printf("Part of the PC Timing FAQ / Application notes\n");
    printf("By K. Heidenstrom ([email protected])\n\n");

    crit_err_intercept();        /* Trap critical errors */
    setvect(0x23, ctrl_c_handler);    /* Trap Ctrl-C interrupt */
    intercept_int_1Ch();        /* Intercept int 1Ch */
    printf("Type characters, press Ctrl-C to test the Ctrl-C handler\n");
    printf("Press Enter to continue\n");
    do {
        n = dos_func_1();
        } while (n != '\r');        /* Wait for C/R */
    printf("Now testing critical error handler, opening 'A:NOSUCH.FIL'\n");
    printf("Please remove any disk (if any) from drive A\n");
    printf("Select the Abort option to test the critical error handler\n");
    n = _open("a:nosuch.fil", O_RDONLY);
    if (n != 0 && n != -1)
        _close(n);
    abort_cleanup(TRUE);
    printf("Normal program termination\n");
    exit(0);
    }
6.37 DEBUGGING INTERRUPT HANDLERS
Saul Cozens ([email protected]) wrote:
I have noticed that many people attempt to debug interrupt handlers by adding a printf statement so they know that the ISR has been called.
Yes, of course printf() is right out. printf() calls DOS (usually), therefore it cannot safely be used from within an interrupt handler such as an int 8 handler. Saul suggests that the BIOS ‘write string’ function is a safer bet. The BIOS video functions are listed as non-reentrant, but often you can get away with calling them from an interrupt handler. A common technique when trying to figure out just what an interrupt handler is doing, is to issue a bell at appropriate points, using int 0x10, function 0x0E with 0x07 in AL. For a cleaner approach, on every interrupt just clear the Timer 2 Gate bit on Port B and toggle (flip) the Speaker Enable bit. This will produce a click on each interrupt. Alternatively, increment a character in screen memory. The character at offset 0F00h into the regen buffer is the bottom left corner character in 80x25 text modes.
I found a bug with Borland C 3.1. When a function is declared as an interrupt function, the compiler quite rightly perserves all the registers automatically (I used Turbo Debugger to look at the compiled code). Unfortunately it does not save the high words of the 32-bit registers, even when the options are set to ‘use 32-bit registers’.
I have also noticed this problem - in Borland Pascal 7. A library arithmetic function (long div) uses 32-bit registers, if the appropriate compiler option is set. If this function is called from within an interrupt routine, the hiword of EAX is destroyed. The ‘interrupt’ keyword on the function definition causes the 16-bit registers to be preserved on the stack, but not the 32-bit registers. This bug is particularly nasty because this function is called invisibly to the programmer, as part of an innocent-looking calculation. There may also be implications when running with a DOS extender.
John Stockton ([email protected]) sent me the following information which contains a fix for this problem and also mentions another related problem:
Duncan Murdoch ([email protected]) has provided inline TP/BP code to save and restore EAX..EDX in an ISR:
 procedure PushEAXtoEDX ; {from DM}
 Inline(
   $66/ {db $66}  $50/ {push ax}
   $66/ {db $66}  $53/ {push bx}
   $66/ {db $66}  $51/ {push cx}
   $66/ {db $66}  $52    {push dx} ) ;

 procedure PopEDXtoEAX ; {from DM}
 Inline(
   $66/ {db $66}  $5A/ {pop dx}
   $66/ {db $66}  $59/ {pop cx}
   $66/ {db $66}  $5B/ {pop bx}
   $66/ {db $66}  $58    {pop ax} ) ;
and he has pointed out that something like:
    var X, Y : longint ;
    {...}
    X := 10 ; Y := 10 ;
    { repeatedly : } if X * Y <> 100 then BEEP ;
in the main program can detect this problem and its cure.
Matters are worse if the main program and the ISR both use the hardware FPU programmed in Pascal. One can save and restore the FPU state, and that does help but does not cure the problem. It seems that TP/BP FPU code uses non-reentrant 80x86 routines around 80x87 instructions.
Inspiration dawned during an E-mail exchange with Norbert Juffa ([email protected], whose files should be read by anyone interested in Pascal and floating point).
I (with a ‘486) now compile the ISR in the {$N-,E-} state which forces 6-byte software real arithmetic, and the main code in the {$N+,E-} state using extended variables and hardware arithmetic. With a little care to disable interrupts while transferring values between types real and extended, all seems well.
Thank you John for that information.
Another thing that used to catch me out was that single stepping (using Turbo Debugger) through bits of code that re-program the PIT causes a system crash. This is presumably because the writes to certain registers must be consecutive and the Turbo Debugger writes to the PIT itself every time it does a ‘step’.
When programming the CTC, the entire access sequence must be completed without interference, so interrupts must be locked out, and the sequence of accesses must be executed from start to finish without being interrupted by anything, including a debug single step interrupt or breakpoint.
This section may be improved later (*)
7 HARDWARE INFORMATION AND PROGRAMMING
7.1 THE 14.31818 MHZ CLOCK
A crystal oscillator or oscillator module generates a 14.31818 MHz clock which is divided by 12 to give the 1.1931816666666… MHz clock frequency (period is 12/14318180, or 0.83809534452 us), which is fed to all three channels of the counter/timer chip. This is the basic timing resolution of the counter/timer.
7.2 CLOCK FREQUENCY ACCURACY
The 14.31818 MHz clock’s absolute accuracy depends mainly on the quality of the 14.31818 MHz crystal or crystal oscillator module, and is typically in the region of +/- 5 ppm (0.0005%; 0.4 seconds per day) to +/- 20 ppm (0.002%; 1.73 seconds per day). Errors consist of initial frequency error, and variations due to temperature and long-term drift. Because of these inaccuracies, there is little point in specifying times or frequencies to more than five or six digits as I have done above.
If required, frequency accuracy can be improved by installing a high quality, close-tolerance crystal, or a high quality crystal oscillator module, which will reduce all of the above error sources. If accuracy is still inadequate, with a crystal it may be possible to add a small variable capacitor to the oscillator circuit, to ‘pull’ the crystal onto the correct frequency. If anyone has specific advice on this, please let me know. (*)
Alternatively, your software could incorporate an adjustment so that once the amount of error has been measured, manually by the user over a long period of time, it could be corrected by the software. Of course this must be configured individually for every machine the software will run on, and temperature and long term drift will still have an effect.
Historical note: If you were wondering “Wouldn’t 1 MHz have been easier?”, yes it would, but that would have required an extra crystal. IBM were… er, ‘clever’ - they used a master clock of 14.31818 MHz, and used logic chips to derive the 4.77 MHz CPU clock, the timer clock, and the NTSC colour subcarrier frequency for the CGA card, so they could save a few dollars. Although the 14.31818 MHz signal is not required by modern CPUs and video cards (in fact, it is now only used for the CTC clock!), the strange frequency still hangs around like a stale fart - we are stuck with it forever. :-(
7.3 THE COUNTER/TIMER CHIP (CTC)
The counter/timer chip (CTC) in the IBM PC family is an Intel 8253 in the PC and XT, or an Intel 8254 in the AT and later machines (except the PS/2 {JAM}) or a functional equivalent, and is part of the processor support chipset on the motherboard. On modern motherboards, it is part of one ASIC in a chipset.
The CTC has three fully independent channels, numbered zero, one, and two. Each has a clock input, a gate input, and an output, and in the PC, family, these are wired as follows:
Chan    Clock input     Gate input      Output                  Channel is used for
----    -----------     ----------      ------                  -------------------

0        1.193182 MHz   Tied high       To IRQ0                 Timer tick
1        1.193182 MHz   Tied high       DRAM refresh            DRAM refresh
2        1.193182 MHz   Timer 2         Gate Speaker gating     Audio generation
Software access to the CTC is via four adjacent addresses in the directly addressable I/O page. Programming information starts at section 7.9.
In most respects the 8253 and 8254 are identical. The following description applies to both types of CTC unless specifically stated.
7.4 CTC CHANNELS
Each channel operates independently, and can be programmed for one of six modes of operation. Normally, modes 2 or 3 are used. In these modes, the CTC channel takes the CTC clock (1.193182 MHz) and ‘divides’ this frequency down to produce a lower frequency at the output pin. Other modes operate differently.
The frequency division is controlled by the ‘divisor’ value, a 16-bit unsigned number between 1 and 65536 (65536 is represented as zero), which is individually programmable for each channel in the CTC. Setting a very small divisor value gives a very high output frequency. A divisor of 65536 gives the lowest output frequency, 18.206507364909 Hz (cycle period is 54.92541649846559 ms).
7.4.1 CTC CHANNEL ZERO
CTC channel zero normally operates in mode two or three with a divisor of 65536, giving an output frequency of 18.2065 Hz (period is 54.9254 ms). Its gate input is tied high. Its output drives the IRQ0 input of the primary PIC (8259 interrupt controller chip). On every rising edge of the channel zero output pin (i.e. transition from low to high), IRQ0 is triggered, invoking interrupt 8, the timer tick interrupt (see section 6.1).
7.4.2 CTC CHANNEL ZERO DEFAULT OPERATING MODE
Traditionally, CTC channel zero has been set to operate in mode three by the BIOS POST, but recent 486 BIOSes that I have seen appear to be using mode two by default. The only significant differences are the width of the pulse from the CTC pin that triggers the timer tick interrupt, which is narrow in mode two but is still plenty wide enough for the Intel 8259 PIC chip, and the value read from the CTC channel zero counter (which decrements twice as quickly in mode 3).
From a hardware point of view, either mode should work on all motherboards, but if some code in the BIOS assumes that CTC channel 0 is in the mode that the BIOS originally programmed, it may not work correctly if CTC channel 0 has been reprogrammed for the other. Of course, reprogramming the CTC divisor for a higher sample rate will also cause this problem. The only example of this that I know of, is the joystick read function (int 15h called with AH = 84h and DX = 1) (see section 10.4.2). Please tell me if you find any other problems related to changing the mode. (*)
7.4.3 CTC CHANNEL ONE
CTC channel one triggers DRAM refresh cycles. DRAM (Dynamic Random Access Memory) is the main system memory in your computer (typical machines have four to eight megabytes of RAM, or 32 to 64 megabytes if you want to run Win 95 :-) DRAM stores data as electrical charges on tiny capacitors inside the chip, and this type of memory must be refreshed regularly to prevent the capacitors from discharging. On the PC and XT, refresh cycles are implemented via the DMA controller. On the AT and later machines, refresh cycles are performed by dedicated hardware. It appears that the AT does use CTC channel one to initiate DRAM refreshes, but I have heard that you cannot change the refresh rate on ATs and later machines. Can anyone shed any light on this? (*)
The normal divisor for CTC channel one is 18, which gives a DRAM refresh cycle every 15.0857162013608 microseconds. Every refresh cycle forces the processor to wait briefly, and a popular trick used to be to slow down the DRAM refresh rate on PCs and XTs by increasing the divisor, to reduce the refresh overhead, giving a few percent performance improvement, so your flash 8MHz Turbo XT would actually seem to run at 8.05 MHz! Seems pretty pathetic now, doesn’t it :-)
CTC channel one is not even accessible on the PS/2’s ASIC {JAM}.
CTC channel one has no interrupt connection, but can be used for timing via the Refresh Detect signal on bit 4 of Port B. See section 7.37.
7.4.4 CTC CHANNEL TWO
CTC channel two generates audio for the speaker. It is the most versatile CTC channel, because its gate input can be controlled by software, and its output can be read by software via Port B (see section 5.5).
CTC channel two can be used for timing, but it cannot generate an interrupt. See section 7.29 and section 7.31 for examples of programming CTC channel two. See the section 5.5 for details of the speaker interface.
7.5 SPEAKER INTERFACE
The speaker interface on the PC and XT is implemented via the 8255 PPI chip, which occupies I/O addresses 60h to 62h inclusive, and also provides the interface to the keyboard. Port B (read/write, at I/O address 61h) and Port C (read-only, at I/O address 62h) are used by the speaker interface.
On the AT and later machines, which do not have a PPI chip, these functions are implemented in an ASIC in the chipset, or with discrete logic, as a partly read-only, partly read/write register at I/O address 61h, known as Port B.
In most respects, the PC/XT and AT interfaces are similar. CTC channel two gate input can be controlled by software via a read/write bit in an I/O register; this signal is known as Timer 2 Gate. The CTC channel two output pin can be read back directly, via a read-only bit in an I/O register, and is AND-gated with a signal called Speaker Data (software controlled, via a read/write I/O register bit), the speaker being driven from the output of the AND gate, sometimes via a simple resistor-capacitor lowpass filter to remove high frequency components. On the PC and XT only, the speaker control signal (after the AND gate, and inverted) can also be read back by software, though this seems to be an undocumented feature and may not work on all machines.
Figure 1 shows the speaker interface signals and circuitry.
Figure 1
PC and XT : I/O address 61h, "PPI Port B", read/write
    7 6 5 4 3 2 1 0
    * * * * * * . .  Not relevant to speaker - do not modify!
    . . . . . . * .  Speaker Data
    . . . . . . . *  Timer 2 Gate

PC and XT : I/O address 62h, "PPI Port C", read only
    7 6 5 4 3 2 1 0
    * * . . * * * *  Not relevant to speaker, read-only
    . . * . . . . .  Timer 2 output read-back
    . . . * . . . .  Speaker signal (after AND gate, inverted), undocumented

AT and later : I/O address 61h, "Port B", partly read/write, partly read-only
    7 6 5 4 3 2 1 0
    * * . . . . . .  Not relevant to speaker, read-only
    . . * . . . . .  Timer 2 output read-back, read-only
    . . . * . . . .  Refresh Detect (read-only), see section  7.37
    . . . . * * . .  Not relevant to speaker - do not modify! (read/write)
    . . . . . . * .  Speaker Data (read/write)
    . . . . . . . *  Timer 2 Gate (read/write)
I have a nasty suspicion that the PS/2 may not implement Port B properly. Can anyone confirm or deny this? (*)
Audio generation can be done via CTC channel two, by setting Timer 2 Gate high and Speaker Data also high. This enables channel two, and enables its output to control the speaker directly. Alternatively, if Timer 2 Gate is set low, CTC channel two output goes high (assuming an appropriate mode is programmed for channel two), and Speaker Data can be manipulated to drive the speaker directly.
The former technique is used in the sample program in section 7.30.
Here is a code fragment that determines whether the speaker hardware is the PC/XT type or the AT type. It uses bit 7 of the I/O port at 61h. On an XT, PPI Port B is fully read/write, and bit 7 is the keycode acknowledge signal to the keyboard interface on the motherboard. On an AT, bits 4-7 of Port B are read-only, and bit 7 is the motherboard RAM parity error signal. By toggling bit 7 six times and testing whether the port reads the expected value, this code fragment determines what type of Port B hardware and keyboard interface is present. This code destroys AX and CX.
        pushf            ; Keep interrupt flag
        mov    cx,400h        ; Six attempts (top bits of CH)
        cli                 ; Lock out interrupts during this stuff
        in     al,61h        ; Get Port B contents
        jmp    SHORT $+2    ; Short delay
        mov    ah,al        ; Original value to AH
Flip61Loop:    xor    ah,10000000b    ; Flip top bit
        mov    al,ah        ; Get value to AL
        out    61h,al        ; Write value to port
        jmp    SHORT $+2    ; Short delay
        jmp    SHORT $+2    ; Short delay
        in    al,61h        ; Read it back
        xor    al,ah        ; Set bit 7 if value didn't stay
        shl    al,1        ; Shift bit into carry
        rcl    cx,1        ; Shift bit into bottom of CX
        jnc    Flip61Loop    ; Loop if more flips (six in total).
        popf            ; Restore interrupt flag
        test    cl,cl        ; Was port read/write?    Zero if so.
This code fragment will leave the zero flag true if the machine is a PC or XT (i.e. Port B bit 7 is read/write), or zero flag false if the machine is an AT or later machine (i.e. Port B bit 7 is read-only). You could follow it with the instruction:
jnz Not_PCXT ; If not, it's an AT
7.6 CTC INTERNAL REGISTERS
Each CTC channel operates independently. Each channel contains:
- A 6-bit Mode register
- A 16-bit Reload register (the ‘divisor register’ in modes 2 and 3)
- A 16-bit Counting register (the ‘Counting Element’ in Intel docs)
- A 16-bit Latch register
- An 8-bit Status Latch register
- A lobyte/hibyte flag
- A ‘T’ (toggle) flip-flop, used in mode three
The major functional blocks are shown in Figure 3.
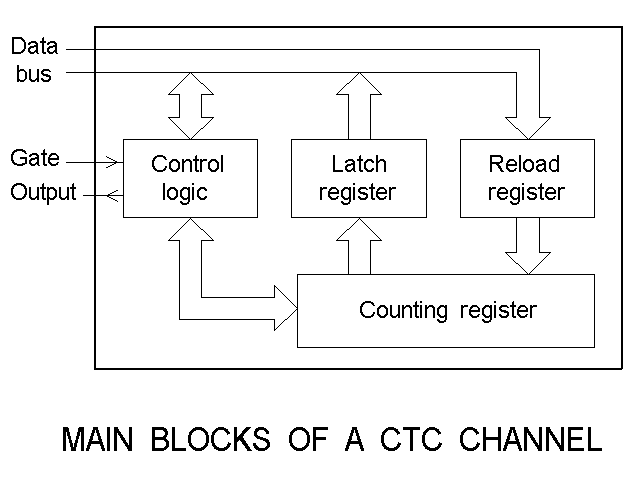 Figure 3
The Mode register controls the operating mode (section 7.8) and the access mode (see section 7.7) of the channel. It is written at the start of the programming sequence. When it is written, the channel output pin usually goes into a defined state - see the individual mode descriptions, section 7.8.
The Reload register can be programmed by software. The Counting register is reloaded from this register at certain times (depending on the operating mode). In modes 2 and 3, which operate as frequency dividers, this register is also called the divisor register.
The Counting register is a down-counting 16-bit counter. Its exact behaviour depends on the operating mode, but generally it counts down on every CTC clock pulse (0.8381 us). It cannot be read directly - it is always read via the Latch register.
The Latch register is a 16-bit software-readable transparent latch which follows the Counting register unless the Latch command is issued. This command makes the Latch register freeze, so that a stable count value can be read.
The 8-bit Status Latch register is used with the read-back function when the channel status is latched, see section 7.18.
The lobyte/hibyte flag is an internal flag which determines which half of the 16-bit Reload and Latch registers will be accessed through the 8-bit access port.
7.7 ACCESS MODES
Because the I/O interface to the CTC is only eight bits wide, the CTC implements three Access modes which control how values are written to the Reload registers and read from the Latch registers.
- Lobyte only
- Hibyte only
- Lobyte then hibyte (using the lobyte/hibyte flag)
If lobyte only, or hibyte only, are selected, the registers are read or written with a single access. If lobyte/hibyte access is selected, a read or write to the data port will access the lobyte or hibyte of the registers, according to the lobyte/hibyte flag, which toggles automatically after each register access. In the lobyte/hibyte access mode, two 8-bit accesses are required to fully read the Latch register and to fully write the Reload register. Regardless of the access mode, the Counting register always operates as a 16-bit counter.
If a channel is set for lobyte-only or hibyte-only access, when the data port is written, the other byte is taken to be zero. For example, for a channel set for lobyte-only access, writing 50 to the data port will set the reload register to 50, and a write of zero to the data port will set the reload register to 0, i.e. a divisor of 65536 in modes 2 and 3. For a channel set for hibyte-only access, a write of 50 to the data port will load the reload register with 12800.
7.8 CTC OPERATING MODES
Each channel in the CTC can be independently set to one of six operating modes:
- Mode 0: Interrupt on terminal count
- Mode 1: Hardware-retriggerable one-shot
- Mode 2: Rate generator
- Mode 3: Square wave generator
- Mode 4: Software-triggered strobe
- Mode 5: Hardware-triggered strobe
While reading the mode descriptions below, you may want to refer to section 7.3 and 7.4 for the gate and output connections for each channel.
7.8.1 OPERATING MODES: BEHAVIOUR COMMON TO ALL MODES
When the mode word is written, all internal logic in the channel, including the lobyte/hibyte flag, is reset, and the output immediately goes to the initial state (which depends on the mode).
A new value can be written into the Reload register at any time. The operating mode determines the exact effect that this will have, see the individual mode descriptions below.
Loading and decrementing of the Counting register occurs on the falling edge of the CTC clock input.
The CTC samples the gate input on the rising edge of the CTC clock input. In modes one, two, three, and five, a rising edge on the gate input sets an internal flip-flop, whose output is sampled on rising edges of CTC clock. This flip-flop is reset after its output has been sampled. Therefore the timing of the rising edge on gate need not be synchronised with CTC clock.
In modes where falling edge on CTC clock loads the Counting register and also decrements it, the Counting register is not decremented on the CTC clock pulse which loads it. It starts decrementing on the next CTC clock.
The BCD/Binary flag allows BCD operation to be selected. In BCD mode, the Counting register operates in 4-digit binary-coded-decimal format. If the Counting register is zero and is decremented, it wraps around to 9999 hex. The Intel documentation does not describe how the chip will behave if the Reload register contains any digits outside the range 0-9 and I have not tested to find this out, as it may be implementation dependent. Also this feature is not normally used in the PC, and may well be non-functional on some workalikes (chipsets). In other words, don’t use BCD mode!
7.8.2 OPERATING MODE ZERO: INTERRUPT ON TERMINAL COUNT
When the mode word is written, the output pin goes low and the CTC waits for the Reload register to be loaded by software, whereupon it transfers the value in the Reload register into the Count register on the next falling edge of the CTC clock. Subsequent falling edges of CTC clock will decrement the Counting register if the gate input is high. If the gate is low, the Counting register will not decrement. The gate input is sampled on the rising edge of CTC clock.
When the Counting register decrements from one to zero, the output goes high, and remains high until another Mode word is written, or another value is written into the Reload register. The Counting register continues to count even after it has decremented to zero - it wraps around to FFFF hex (9999 in BCD mode) - but this doesn’t affect the output pin state.
The Reload register may be written at any time. In two-byte access mode, when the first byte of the Reload register is written, counting stops and the output goes low. Once the Reload register is loaded, the next clock pulse will load the Counting register from the Reload register, and counting will resume, starting from the new value.
See section 7.31 for an example of this mode being used with channel two and section 10.7 for this mode being used in PWM audio generation.
7.8.3 OPERATING MODE ONE: HARDWARE-RETRIGGERABLE ONE-SHOT
This mode uses the gate input as a trigger. Gate is sampled on the rising edge of CTC clock. The trigger occurs on the rising edge of the gate input.
When the mode word is written, the output pin goes high and the CTC waits for the Reload register to be loaded by software. It is then armed, and waits for a rising edge on the Gate input. Once this is detected, the next falling edge of CTC clock sets the output low and transfers the Reload register into the Counting register, and counting is enabled. On every subsequent falling edge of CTC clock, the Counting register decrements. When the Counting register decrements from one to zero, the output returns high and remains high, though the Counting register continues to decrement (it wraps around).
During the counting period, the gate input may go low, and this will be ignored. A rising edge on gate during counting (a re-trigger) will cause the Reload register to be transferred into the Counting register on the next falling edge of CTC clock, as above, thus restarting the timer and extending the low-pulse at the output.
The Reload register may be written at any time, but this will not affect the count in progress. This will affect the value reloaded into the Counting register when re-triggered.
This mode is not used with channel 0 or 1, as their gate inputs are tied high.
7.8.4 OPERATING MODE TWO: RATE GENERATOR
In mode two, the channel operates as a frequency divider. The reload register becomes the divisor, by which the CTC clock frequency is divided, to produce the output frequency. A low gate input stops the counter. When gate returns high, the counting register is reloaded and the count sequence begins again.
When the mode word is written, the output goes high. When the Reload register has been written, the Reload register is transferred to the Counting register on the next falling edge of the CTC clock. The Counting register decrements by one on every falling edge of CTC clock.
When the Counting register is decremented to one, the channel’s output goes low. On the next falling edge of CTC clock the Counting register is reloaded from the Reload register, the output returns high, and the cycle continues.
If the gate input goes low, counting stops and the output goes high immediately. Once the gate input has returned high, the next falling edge on CTC clock reloads the Counting register from the Reload register and operation continues.
Programming a new value into the Reload register does not affect the count in progress. The next reload (due to the Counting register reaching 1 or due to the gate input going low then high) starts from the newly programmed value.
A divisor (Reload register) value of one must not be used with this mode.
To summarise, the Counting register starts at the Reload register value and decrements down to one, then reloads. The output is low while the Counting register is equal to one. Thus output pulses are generated at 1.193182 MHz divided by the Reload register (divisor) value. The period between output pulses is the CTC clock period (0.8381 us) multiplied by the Reload register (divisor) value, and they are one CTC clock period wide.
This makes mode two unsuitable for use with timer two for generating audio for the speaker, because the speaker cannot respond to such short pulses. For this reason, the 8254/8253 has operating mode three.
7.8.5 OPERATING MODE THREE: SQUARE WAVE GENERATOR
Like mode two, mode three operates as a frequency divider. The difference is in the output signal. Whereas mode two produces a short pulse for every timer reload, mode three produces a square wave output.
In this mode, the reload pulse is fed into an internal ‘T’ (toggle) flip-flop, which toggles (reverses state) on each pulse, and the output of this flip-flop becomes the output signal. Every time the Counting register reloads, the output pin toggles to the opposite state. This gives a square wave output, with equal high and low times (i.e. a 50% duty cycle, or 1:1 mark to space ratio). If an odd divisor is used, the duty cycle is not exactly 50% (as explained below).
However, two reloads are needed to produce one output cycle, so the reload rate must be doubled to compensate for the halving action of the ‘T’ flip-flop. This is accomplished by making the Counting register decrement by two instead of by one for every CTC clock. So in mode three, the Counting register decrements in steps of two and reloads twice as fast as it would in mode two, and the twice- speed reload frequency is halved by the ‘T’ flip-flop to produce an even square wave output at the correct frequency.
Odd divisor values are handled strangely. On every reload, the Reload register minus one (which will be an even value) is loaded into the Counting register. If the output pin is high, the chip waits until the Counting register has decremented to zero (not one, as would be normal), and reloads the Counting register on the next CTC clock after that. If the output pin is low, it reloads the Counting register after the Counting register reaches one, as normal. This makes the high pulse one CTC clock cycle wider than the low pulse, and shifts the output square wave’s duty cycle slightly above 50%. The duty cycle error is only significant if the divisor value is small.
The output pin goes high immediately when the mode word is written. Once the Reload register has been written, counting begins.
If the gate input drops low, counting stops and the output pin goes high immediately. When the gate input has returned high, the next falling edge on CTC clock reloads the Counting register from the Reload register, leaving the output pin high, and counting resumes. If the Reload register is written while counting is in progress, the new value has no effect until a reload occurs, either due to the gate input going low then high, or due to a normal reload, which happens twice for every output cycle.
A divisor (Reload register) value of one must not be used with this mode.
As well as the different output generated by the timer in modes two and three, there is a difference when the timer is read on-the-fly - see section 9.
7.8.6 OPERATING MODE FOUR: SOFTWARE-TRIGGERED STROBE
Mode four operates as a retriggerable delay, generating a pulse when the delay expires. When the mode word is written, the output pin goes high. Once the Reload register has been written, the next falling edge of CTC clock loads the Counting register from the Reload register, and counting begins. When the Counting register decrements to zero, the output goes low for one CTC clock pulse then returns high. The Counting register continues to decrement, wrapping round to FFFF hex (or 9999 hex in BCD mode), but no more output pulses will occur.
If the Reload register is written during counting, after the Reload register is fully written (both bytes, if programmed for lobyte/hibyte access), the next falling edge of CTC clock reloads the Counting register, retriggering the delay period or starting a new delay if the previous delay had expired.
A low gate input disables counting but the gate input has no other effect.
7.8.7 OPERATING MODE FIVE: HARDWARE-TRIGGERED STROBE
Mode five is a cross between mode one and mode four, using a rising edge on the gate input to trigger or retrigger the delay period.
When the mode word is written, the output pin goes high and the CTC waits for the Reload register to be loaded by software. It is then armed, and waits for a rising edge on the Gate input. Once this is detected, the next falling edge of CTC clock transfers the Reload register into the Counting register, and counting is enabled. On every subsequent falling edge of CTC clock, the Counting register decrements. When the Counting register decrements to zero, the output goes low for one CTC clock pulse width then returns high. The Counting register continues to decrement, wrapping round to FFFF hex (or 9999 hex in BCD mode), but no more output pulses will occur until the channel is re-triggered by another rising edge on the gate input.
During the counting period, the gate input may go low, and this will be ignored. A rising edge on gate during counting (a re-trigger) will cause the Reload register to be transferred into the Counting register on the next falling edge of CTC clock, as above, thus restarting the timer and re-triggering the delay.
The Reload register may be written at any time, but this will not affect the count in progress. This will affect the value reloaded into the Counting register when re-triggered.
This mode is not used with channel 0 or 1, as their gate inputs are tied high.
7.9 THE 8254/8253 REGISTERS
On the PC family, the 8254/8253 timer occupies four I/O addresses in the directly addressable I/O page, as follows:
40h Channel 0 data port (read/write)
41h Channel 1 data port (read/write)
42h Channel 2 data port (read/write)
43h Mode/Command register (write only - read is ignored)
7.9.1 THE MODE/COMMAND REGISTER
The Mode/Command register at I/O address 43h is defined as follows:
7 6 5 4 3 2 1 0
* * . . . . . .  Select channel: 0 0 = Channel 0
                    0 1 = Channel 1
                    1 0 = Channel 2
                    1 1 = Read-back command (8254 only)
                        (Illegal on 8253)
                        (Illegal on PS/2 {JAM})
. . * * . . . .  Command/Access mode: 0 0 = Latch count value command
                        0 1 = Access mode: lobyte only
                        1 0 = Access mode: hibyte only
                        1 1 = Access mode: lobyte/hibyte
. . . . * * * .  Operating mode: 0 0 0 = Mode 0, 0 0 1 = Mode 1,
                    0 1 0 = Mode 2, 0 1 1 = Mode 3,
                    1 0 0 = Mode 4, 1 0 1 = Mode 5,
                    1 1 0 = Mode 2, 1 1 1 = Mode 3
. . . . . . . *  BCD/Binary mode: 0 = 16-bit binary, 1 = four-digit BCD
You might prefer the following diagram and explanation.
       7     6     5     4       3     2     1     0
    ===============================================
       SC1   SC0   RL1   RL0   M2   M1     M0   BCD
    ===============================================

    COMMAND SELECT BITS       MODE SPECIFIER BITS

    Binary/BCD mode

        0 = Binary
        1 = BCD

    Mode number

        0     0     0 = Mode 0
        0     0     1 = Mode 1
        0     1     0 = Mode 2
        0     1     1 = Mode 3
        1     0     0 = Mode 4
        1     0     1 = Mode 5
        1     1     0 = Mode 2
        1     1     1 = Mode 3

    Latch/Read/Write operation

        0     0 = Latch count value command (for read)
        0     1 = Read/Write lobyte only
        1     0 = Read/Write hibyte only
        1     1 = Read/Write lobyte then hibyte

    Timer/counter number

       0     0 = Select channel 0
       0     1 = Select channel 1
       1     0 = Select channel 2
       1     1 = Read-back command on 8254 (not allowed on 8253 and PS/2)
The SC1 and SC0 (Select Channel) bits form a two-bit binary code which tells the CTC which of the three channels (channels 0, 1, and 2) you are talking to, or specifies the read-back command. As there are no ‘overall’ or ‘master’ operations or configurations, every write access to the mode/command register, except for the read-back command (see section 7.18), applies to one of the channels. These bits must always be valid on every write of the mode/command register, regardless of the other bits or the type of operation being performed.
The RL1 and RL0 bits (Read/write/Latch) form a two-bit code which tells the CTC what access mode you wish to use for the selected channel, and also specify the Counter Latch command to the CTC. For the Read-back command, these bits have a special meaning (section 7.18). These bits also must be valid on every write access to the mode/command register.
The M2, M1, and M0 (Mode) bits are a three-bit code which tells the selected channel what mode to operate in (except when the command is a Counter Latch command, i.e. RL1,0 = 0,0, where they are ignored, or when the command is a Read-back command, where they have special meanings, see section 7.18). The modes are described in section 7.8 and subsections. These bits must be valid on all mode selection commands (all writes to the mode/command register except when RL1,RL0 = 0,0 or when SC1,0 = 1,1).
Like the Mode specification, the BCD bit must be valid on all mode selection commands. This bit simply specifies whether the channel will count in binary (the usual mode) or BCD, when it will behave as four separate cascaded 4-bit BCD counters. The counters always count DOWNWARDS, which can make BCD mode awkward to use. Also see section 7.8.1.
7.9.2 THE DATA PORTS
Writing to the data ports sets the Reload register (one or two writes are used, according to the access mode - see section 7.7). Reading the ports returns the Latch register (lobyte, hibyte, or alternating lobyte and hibyte, depending on the access mode, see section 7.7) or the status register if a status read-back command has just been issued (see section 7.18).
7.9.3 ACCESSING THE REGISTERS
Accessing a CTC channel involves writing one byte to the mode/command register at I/O address 43h, to tell the chip what you want to do, followed by reading or writing one, two or sometimes three bytes in succession, to or from the data port for the appropriate channel. This should always be done with interrupts disabled, because the CTC “remembers where it’s up to”, and will get confused if the normal sequence of register accesses is interrupted.
Always use byte-sized I/O instructions to access these ports. In assembly, use OUT nn,AL or IN AL,nn (not AX). In C, use inportb() and outportb() or the equivalent 8-bit I/O functions or pseudofunctions for your compiler.
7.9.4 I/O RECOVERY DELAYS
Modern CPUs operate internally and externally at very high speeds. Modern fast machines must be compatible with old ISA bus cards, which have slow peripheral devices such as serial ports, parallel ports, video and disk controllers, etc, accessed via the CPU’s I/O space. I/O-addressed peripherals on the motherboard (the 8254/8253 CTC, the 8237 DMA controllers, the 8259 interrupt controllers, the real time clock, etc) are also slow by the standards of a modern CPU.
On these fast machines, whenever the CPU makes an access to an I/O device (via the IN and OUT instructions and variants), hardware on the motherboard must slow down the access, in order to guarantee that the timing requirements of the slow peripheral are not violated (i.e. to give the peripheral enough time to provide or accept the data correctly and prepare for the next data transfer).
There are two parameters of interest - the access time, and the recovery time. These times are in the order of several hundred nanoseconds, but depend on the motherboard and peripheral device in question. These times do not apply to memory accesses, which are cached and are much faster and use few wait states.
The following diagram is a simplified representation of what happens when the CPU executes two I/O read instructions (for example, “in al,42h / in al,40h”).

At point ‘a’ the CPU makes an I/O read request. The address and control buses become valid. The address decoding logic sees that the address is in the range 40h-43h and selects the CTC. From this point, the CTC takes Tacc (the access time) to get itself ready and present the data on the data bus. At point ‘b’ the CTC has made the data available on the data bus. At ‘c’ the CPU reads the data from the data bus. At point ‘d’ the cycle is complete and the address and control buses go inactive. The CPU transfers the data into the AL register. At point ‘e’ the CPU generates a second access cycle just like the first. The peripheral also requires a certain amount of time to elapse between points ‘d’ and ‘e’ - this is called the peripheral’s recovery time.
The access time is the time required by the peripheral to accept data correctly (for an I/O write) or provide data correctly (for an I/O read). It is required on every access to an I/O device. The recovery time is the time required by the peripheral after an I/O access, before the peripheral is ready to receive another I/O request.
An analogy would be a little old lady in a car at an intersection. When the light changes, she fumbles around looking for the handbrake, then she tries to remember which pedal to push to go faster. Then she finally takes off. This is like the access time requirement. Then at the next intersection, she has to slow down and stop, and get ready for the lights to change again. This takes time. If the lights change before she has stopped and finished getting ready, she will do something stupid like crunching the gearbox or driving into a tree. This requirement is the recovery time.
On slow motherboards (the old PC and XT, and probably most 286-based boards), the access time and recovery time are both guaranteed to be met because the CPU’s bus interface is fairly slow, and comparatively fast peripheral devices are used (the 8254’s recovery time is 165 or 200 ns, compared to the old 8253’s recovery time of 1000 ns!).
On fast motherboards, the access time is assured because the chipset on the motherboard inserts I/O wait states, but on some fast motherboards, notably some 286 and early 386 motherboards, the recovery time is not guaranteed. The motherboard says “I have to wait until this peripheral is ready, but after the access is complete, I don’t care”. With these boards, two back-to-back I/O accesses to the same peripheral (such as the sequence shown in the diagram above) will cause the second access to be ignored or misinterpreted by the peripheral.
This design misfeature of some 286 and 386 motherboards is probably the result of a design compromise. From the point of view of a chipset designer there are several ways to deal with I/O recovery time requirements -
- Enforce a recovery time after every I/O access, or
- Enforce a recovery time between any back-to-back I/O accesses, or
- Enforce a recovery time between back-to-back I/O accesses to the same peripheral, or
- Never enforce a recovery time after an I/O access.
The first alternative would slow the machine unduly, because the recovery time would be enforced even if the next accesses were memory accesses (which would not affect the I/O-addressed peripheral). The second option is complicated to implement (though modern motherboards use this method, I believe). The third option is even more complicated. The fourth is the simplest approach, but it means that back-to-back accesses to the same peripheral will violate that peripheral’s recovery time requirements.
To support these motherboards, programmers would insert the famous “jmp short $+2” sequence into their code between back-to-back I/O accesses to the same device. The instruction is effectively a NOP (no-operation) instruction but it has an extra delaying effect because it clears the processor’s instruction prefetch queue on the 286 and 386, requiring an external bus access, which must wait for the I/O access cycle to complete.
Modern motherboards detect back-to-back I/O accesses, and insert wait states to ensure that recovery times are not violated, so there is no need to use this trick with them, but to support older systems, you may wish to do so. The sample code and programs in this document do use the “jmp short $+2” trick, because I am in the habit of using it.
In C, you could use the inline assembler feature of most compilers, but Michael Mauch ([email protected]) advises that the optimiser may optimise out this instruction, so he suggests (for Borland C++ 3.1 and 4.0), emit(0xEB,0x00); which is not optimised out. You could set up a macro, e.g. #define breather emit(0xEB,0x00). In Turbo Pascal, you could use the appropriate directive to emit the two-byte instruction. The object code is $EB/$00. If anyone knows a better or more generic way to implement this in C and/or Pascal, please tell me. (*)
An alternative method to the “jmp short $+2” method is to insert an access to another I/O location. This enforces another access time delay, which should cover the recovery time requirements of the first device. You could then interleave accesses to the device you are interested in, with accesses to the ‘dummy’ device. Apparently it is common practice to use “in al,61h” as the dummy instruction for this purpose. Port 61h is Port B (see section 7.5) and it can be read at any time with no unusual side-effects, so is ideal for this purpose, except that the IN instruction destroys AL, which is often inconvenient. An OUT instruction is more covenient but there is no port that can safely have any value OUTed to it. In the quoted message below, Bob Smith ([email protected]) mentions that some IBM BIOSes use an OUT to port 4Fh (an unused I/O address) to insert delays.
In an article in Usenet newsgroup comp.lang.asm.x86 in December 1995, Bob Smith ([email protected]) posted the following interesting information:
The reason there is a short jump to the next instruction is certainly, as [most people would say], that some I/O devices need more recovery time. Moreover, the 386 processor treats a flush of the prefetch queue specially with respect to I/O operations. The problem is that that trick doesn’t work any more! Quoting from the (now out-of-print) “i486 Microprocessor Data Sheet” (Intel order #240440-001):
“6.3.1 WRITE BUFFERS AND I/O CYCLES
“Input/Output (I/O) cycles must be handled in a different manner by the write buffers. I/O reads are never reordered in front of buffered memory writes. This ensures that the 486 microprocessor will update all memory locations before reading status from an I/O device.
“The 486 microprocessor never buffers single I/O writes. When processing an OUT instruction, internal execution stops until the I/O write actually completes on the external bus. This allows time for the external system to drive an invalidate into the 486 microprocessor or to mask interrupts before the processor progresses to the instruction following OUT. Repeated OUT instructions will be buffered.
“I/O device recovery time must be handled slightly differently by the 486 microprocessor than with the 386 microprocessor. I/O device back-to-back write recovery times could be guaranteed by the 386 microprocessor by inserting a jump to the next instruction in the code that writes to the device. The jump forces the 386 microprocessor to generate a prefetch bus cycle which can’t begin until the I/O write completes.
“Inserting a jump to the next write will not work with the 486 microprocessor because the prefetch could be satisfied by the on-chip cache. A read cycle must be explicitly generated to a non-cacheable location in memory to guarantee that a read bus cycle is performed. This read will not be allowed to proceed to the bus until after the I/O write has completed because I/O writes are not buffered. The I/O device will have time to recover to accept another write during the read cycle.”
FWIW, I have seen some BIOSes (in IBM systems) use an OUT (of any value) to I/O port 4Fh (an otherwise unused port) in order to provide the needed synchronization.
Thanks Bob for that information. I believe Glen Blankenship (obother@netcom. com) also quoted the same information in a separate message.
7.10 PROGRAMMING THE MODE AND RELOAD REGISTER
Until initialised, all channels are in an undefined state. The BIOS POST sets the operating modes for all channels. Channels can be programmed in any order. For any particular channel, the Mode register must be programmed first. Once the mode is set, one or two bytes (depending on the access mode - see section 7.7) are written into the data port for that channel; these are loaded into the Reload register. The channel is then initialised and begins operating according to the programmed mode.
To program the mode and reload value for a CTC channel, issue a command byte of ccaammmb binary, where ‘cc’ = channel number, ‘aa’ = access mode, ‘mmm’ = mode, ‘b’ = BCD/binary selection (see section 7.9.1 for the bit definitions) then write the lobyte, or the hibyte, or lobyte then hibyte (depending on the access mode) of the reload value to the data port of the selected channel.
Note - a reload value of 1 should NOT be used in modes two and three. Also, in these modes, low reload values will give very high output frequencies, and are not normally used with channel zero because the tick rate would be too high.
The Reload register may be reprogrammed at any time, just by writing the lobyte, hibyte, or lobyte then hibyte (depending on the access mode), to the data port. See section 7.7 and subsections for details.
7.11 EFFECT OF REPROGRAMMING CHANNEL ZERO ON THE TIMER TICK INTERRUPT
The system time is maintained using the timer tick interrupt, and reprogramming the mode of channel zero will reset the channel. When the mode word is written, the channel zero output pin of the CTC goes high immediately. If it was already high, no interrupt is generated. If it was low, an interrupt is generated, causing the BIOS timer tick count variable to be incremented incorrectly. If CTC channel zero was previously programmed for mode 2, its output would already be high, and no extra interrupt would be generated.
This should not be done continuously in an application unless you restore the correct DOS time at termination. Normally it is sufficient to reprogram channel zero at the start of your program, and leave it in that mode until finished. This does cause a slight jump in the time, but as it only happens once on every run of the program, it is not really worth worrying about.
If you want to be more careful, you can wait until the timer tick interrupt occurs, and reprogram channel zero immediately after the interrupt has occurred. You can detect the interrupt by watching the BIOS tick count variable until it changes (only the loword need be monitored, as it always changes on each tick interrupt). When the interrupt has just occurred, the channel zero output pin will be high, so reprogramming the channel will not generate an interrupt, and the Counting register will be near the start of its 54.9254 ms cycle.
A similar approach should be used when terminating the program, after channel zero has been reprogrammed with a smaller divisor to give a faster tick rate. Assuming your int 8 handler chains to the BIOS int 8 handler every 54.9254 ms, wait until the tick count changes (i.e. your int 8 handler has called the BIOS int 8 handler), then reprogram channel zero with the default parameters (mode 3 or 2, divisor of 65536).
These considerations do not apply when the Reload register is loaded without a mode initialisation command written to the Mode/Command register, as done with the dynamic interrupt rate technique (see section 8.6).
7.12 SAMPLE PROGRAM: PROGRAMMING THE MODE AND RELOAD VALUE
This function programs the operating mode and the reload value (the divisor in modes two and three) for a specified channel. If you use channel zero in a non-standard setup, you should restore it to its normal mode and divisor (mode two or three, with a divisor of 65536) when you’ve finished using it. See section 5 for details of how to intercept the Ctrl-C and Critical Error vectors, so that you can restore the normal mode at program termination even if the program is terminated by Ctrl-Break or Ctrl-C being pressed by the user, or due to a critical error.
The init_channel() function accepts a channel number, a reload value which will be in the range 0 to 65535 (in modes two and three, a zero divisor gives division by 65536, and a divisor of one should not be used), and an operating mode number. The access mode is not provided as a parameter - the function always programs the channel for lobyte/hibyte access.
See section 6.22 for the explanation of the pushf/cli/popf technique.
/*
Sample program #5
Program the operating mode and reload value for a CTC channel
Part of the PC Timing FAQ / Application notes
By K. Heidenstrom ([email protected])

Save this file to SAMPLE5.C and compile with:
    bcc -I<inc_path> -L<lib_path> -ms sample5.c
Where inc_path is the path to your C header files and your startup modules
C0x.OBJ, and lib_path is the path to your C libraries Cx.LIB.
*/

#pragma inline;        /* Required for asm pushf, popf, and cli */

#include <ctype.h>    /* Needed for toupper() */
#include <process.h>
#include <stdio.h>    /* Pass go, add printf(), program is 8K already :-) */
#include <stdlib.h>    /* Needed for atoi() */

char *accessmodes[] = {
    "",
    "lobyte-only",
    "hibyte-only",
    "lobyte/hibyte"
    };

void init_channel(unsigned int channum, unsigned int accessmode,
    unsigned int mode, unsigned int reload) {
    if (channum > 2 || accessmode < 1 || accessmode > 3)
        return;
    asm pushf;        /* Preserve interrupt flag */
    asm cli;
    outportb(0x43, (channum << 6) + (accessmode << 4) + ((mode & 0x07) << 1)); /* Mode */
    if (accessmode & 1)
        outportb(0x40 + channum, reload & 0xFF);    /* Reload reg lobyte */
    if (accessmode & 2)
        outportb(0x40 + channum, (reload >> 8) & 0xFF); /* Reload reg hibyte */
    asm popf;        /* Restore interrupt flag */
    return;
    }

void usage(void) {
    printf("Usage: SAMPLE5 <channel> <accessmode> <operatingmode> <reload>\n\n");
    printf("\tchannel is 0, 1, or 2\n");
    printf("\taccessmode may be:\n");
    printf("\t\tL = Lobyte only\n");
    printf("\t\tH = Hibyte only\n");
    printf("\t\tW = Lobyte/hibyte (16-bit)\n");
    printf("\toperatingmode may be:\n");
    printf("\t\t0 = Interrupt on terminal count\n");
    printf("\t\t1 = Hardware-retriggerable one-shot\n");
    printf("\t\t2 = Rate generator\n");
    printf("\t\t3 = Square wave generator\n");
    printf("\t\t4 = Software-triggered strobe\n");
    printf("\t\t5 = Hardware-triggered strobe\n");
    printf("\treload is an unsigned 16-bit value, use zero for divide-by-65536\n");
    return;
    }

void main(unsigned int argc, char * argv[]) {
    unsigned int channum, accessmode, mode, reload;

    printf("Sample program #5 - Set the mode and reload value for a CTC channel\n");
    printf("Part of the PC Timing FAQ / Application notes\n");
    printf("By K. Heidenstrom ([email protected])\n\n");

    if (argc < 5) {
        usage();
        exit(1);
        }
    channum = argv[1][0] - '0';
    switch (toupper(argv[2][0])) {
    case 'L':
        accessmode = 1;
        break;
    case 'H':
        accessmode = 2;
        break;
    case 'W':
        accessmode = 3;
        break;
    default:
        usage();
        exit(1);
        }
    mode = argv[3][0] - '0';
    if (channum > 2 || mode > 5) {
        usage();
        exit(1);
        }
    reload = atoi(argv[4]);
    printf("Setting CTC channel %d for %s access, mode %d, with " \
        "reload value %ld\n", channum, accessmodes[accessmode],
        mode, (long)(reload ? reload : 65536L));
    init_channel(channum, accessmode, mode, reload);
    exit(0);
    }
7.13 READING THE RELOAD REGISTER
It is not possible to read the Reload register contents. In modes two and three, it may be possible to infer the reload register value using clever techniques, but I don’t believe there is any good reason to pursue this.
7.14 READING THE COUNTING REGISTER
Reading the Counting register on-the-fly gives you a fairly accurate time value with a resolution of 0.8381 us for calculating elapsed time or timestamping internal or external events. You do not actually read the Counting register directly, it is read via the Latch register, which follows the Counting register value unless it is latched via the latch command.
You can read the Counting register by making one or two (depending on the access mode) reads from the data port of the appropriate channel, however this value is not latched, and is not stable. In lobyte/hibyte access mode, there is a delay between reading the lobyte and hibyte, so the lobyte and hibyte don’t correspond to the same instant in time, and you may read an incorrect value. This problem does not occur if the access mode is lobyte-only, or hibyte-only.
{JAM} Some CTC hardware implementations do not buffer the counter properly, so if the Counting register is read at the instant it is changing value, you may read the counter part-way through the ‘ripple-through’, i.e. some low-order bits may have decremented but high-order bits may not have decremented yet. Therefore, even in lobyte-only or hibyte-only mode, the Counting register cannot be read reliably in this way.
The CTC provides a latch command to avoid these problems. When the latch command is issued, the Latch register freezes, and the Counting register continues to count. Thus the Latch register contains a stable count which can be read via the data ports in the normal way. Once the appropriate number of bytes (one or two, depending on the access mode) have been read, the Latch register unlatches and resumes following the Counting register.
7.15 THE LATCH COMMAND
To latch a channel, write a latch command byte to the Mode/Command register. The latch command byte is cc000000 binary, where ‘cc’ is the channel number. Then you can read the latched count from the data register for that channel. The Latch register remains latched until it has been fully read, or until the counter is reprogrammed with a new mode word. The latched value must be read before any other operation is performed on the channel, except initialising the channel with a new mode word.
{JAM} Latching the count in progress should not affect the Counting register but when several machines were tested, they tended to occasionally miss a CTC clock, i.e. fail to decrement, if latch commands were being issued. This was much more pronounced on an Epson 386SX/20 PLUS, which would miss roughly one clock for every two latch commands issued! This seems to be an isolated example of bad hardware design, but is still disturbing.
The channel can also be latched via the read-back command (section 7.18).
The meaning of the value you read depends on the mode of the channel. The meaning of the count in modes two and three are described in sections 7.15.1 and 7.15.2.
7.15.1 MEANING OF COUNT VALUE IN MODE TWO
In mode two, the value will be in the range of 1 to the divisor register value. It will start at the divisor register value, and decrement down to 1. When it would decrement to zero, it instead reloads to the divisor register value. For example if the divisor was 5, the count sequence would be 5, 4, 3, 2, 1, 5, 4… If the divisor is 0 (i.e. 65536), the sequence is 0, 65535, 65534, … 2, 1, 0, 65535…
For channel zero, a rising edge on the output pin triggers the timer tick interrupt at the instant that the channel reloads its Counting register from the Reload register.
{JAM} On PS/2 machines, if the latch command is issued at the instant when the Counting register changes from 1 to the reload value, occasionally the read will yield a zero, even if the Reload register does not contain zero. In other words, if the Reload register is 20, the count sequence would be 5, 4, 3, 2, 1, 20, 19, 18… At the instant between the 1 and the 20, the timer does actually decrement to zero, and sometimes a zero will be read, even though zero is not in the valid counting sequence.
If the divisor is 65536, the above problem mentioned by {JAM} does not occur. In other cases, you could work around the problem by specifically checking for a value of zero and substituting the reload value.
In mode two, if you are using a divisor of 65536 (the normal value for channel zero), you can convert the down-counting value into an up-counting value by performing a 16-bit negation, i.e. up_count = 0 - read_count0(); or neg ax (or whichever register contains the count). This will give a 16-bit value which increases from 0 to 65535 then back to 0 again.
If the divisor is not 65536, just subtract the count value from the divisor value to get an up-counting value which will increase from 0 to divisor minus one, then back to 0 again. See the above problem noted by {JAM}.
7.15.2 MEANING OF COUNT VALUE IN MODE THREE
Refer to section 7.8.5 for a description of the operation of mode three. The raw count will always be an even value, because the Counting register decrements in steps of two instead of steps of one. The behaviour with an even divisor is easiest to describe, so I will assume that the divisor value is even. In this case, the count register counts down from the divisor value, in steps of two, until it reaches two, then reloads to the divisor value on the next CTC clock. The output latch toggles state at this moment. For example, if the divisor is 6, the count sequence would be 6, 4, 2, 6, 4, 2, 6, 4, 2… with the output latch toggling at the transition between each ‘2’ and ‘6’.
In this mode, to generate a full timestamp, you need to latch and read the Counting register and the output pin state, so you know whether the channel is on its first or second countdown. The timer tick interrupt only occurs on the rising edge of the output of the T flip-flop, at the end of every second countdown (if we define the first countdown as when the output of the T flip- flop is high, and the second countdown as when its output is low). The read- back function is useful for this (it allows the count register and the output state to be latched and read by software), and is described in section 7.18.
Mode two is more suitable than mode three for timestamping or timing functions, because the Counting register behaves sensibly and there is no need to know whether it is on the first or second countdown.
On machines that support readback (all AT-class machines except the PS/2, see section 7.24.2), the count can therefore be read on-the-fly in mode three. See section 7.20 for details.
See also section 7.15 for {JAM}’s comments on loss of CTC clocks when the channel is latched or read-back.
7.16 SAMPLE CODE: READING THE COUNT IN MODE TWO
This function latches, reads, and returns the current Counting register contents of CTC channel zero. Remember that the Counting register counts downwards.
This function assumes that CTC channel zero is operating in mode two with a divisor of 65536. See section 7.10 and 7.12 for sample code to set the mode and divisor.
See section 6.22 for the explanation of the pushf/cli/popf technique.
/*
Function to latch and read the Counting register of CTC channel zero, assuming
    that the channel is set to operate in mode two with a divisor of 65536.
Part of the PC Timing FAQ / Application notes
By K. Heidenstrom ([email protected])
*/

unsigned int read_channel0_mode2(void) {
    unsigned int cv;
    asm pushf;                /* Preserve interrupt flag */
    asm cli;
    outportb(0x43, 0);            /* Latch the count register */
    cv = inportb(0x40);            /* Lobyte of count */
    cv += inportb(0x40) << 8;        /* Hibyte of count */
    asm popf;                /* Restore interrupt flag */
    return cv;                /* Return down-counter */
    }
7.17 THE LOBYTE/HIBYTE FLAG
Each timer channel has an internal flag which keeps track of whether the lobyte or the hibyte of the count should be provided when the data port is read. Each time the data port is read, this flag toggles state (unless the channel was programmed for hibyte-only or lobyte-only access, i.e. bits 5 and 4 were 0,1 or 1,0 when it was initialised).
After programming a timer channel, the flag is clear, and reading the data port will yield the lobyte, then the hibyte, then the lobyte, then the hibyte, etc. But if some other badly-behaved software reads the data port only once (or any odd number of times), the flag would be set, and you would read the hibyte first, then the lobyte, so you would be out of sync with the counter. There is no processor-accessible flag to tell you whether you are reading the lobyte or the hibyte. Issuing a latch command doesn’t affect the lobyte/hibyte flag, either, unfortunately.
This is why it’s essential to disable interrupts while accessing the CTC, and always read or write BOTH bytes (unless the channel is programmed for lobyte- only or hibyte-only access).
My experience has been that if you initialise the counter in your program (initialising it clears the lobyte/hibyte flag), it will stay synchronised, and there is no need to worry about the flag at all. If anyone has found otherwise, please tell me about it. (*)
See section 7.27 for a program which attempts to determine the lobyte/hibyte flag state (among other things).
7.18 THE READ-BACK COMMAND
The read-back command word is written to the mode/command register. Bits 7 and 6 of the command word (normally the counter select bits) are both ‘1’. Read-back is not supported on the 8253 (PCs and XTs); it was added with the 8254 (AT and later). However, {JAM} says all AT documentation states that this bit combination is reserved and, alas, the PS/2 LSI integration of the CTC does not implement the read-back command - on a PS/2 the read-back command is ignored. {JAM} has tested IBM ValuePoints and they are alright. It is just the PS/2 that does not support read-back (see section 7.24.2).
A read-back command is specified by writing a value to the mode/command register as follows:
    7 6 5 4 3 2 1 0
    1 1 . . . . . .  (Specify read-back command)
    . . * . . . . .  Latch count flag: 0 = Yes, 1 = No
    . . . * . . . .  Latch status flag: 0 = Yes, 1 = No
    . . . . * . . .  Read-back timer channel 2: 1 = Yes, 0 = No
    . . . . . * . .  Read-back timer channel 1: 1 = Yes, 0 = No
    . . . . . . * .  Read-back timer channel 0: 1 = Yes, 0 = No
    . . . . . . . 0  (Reserved for future expansion)
Command word bits 3, 2, and 1 enable read-back for timer channels 2, 1, and 0 respectively, thus any combination of the three channels can be selected for read-back with one command word. Bits 5 and 4 enable the two types of read-back. Important - Setting these bits to zero enables the function.
Bit 5 specifies latching the count value. This is the same as issuing a counter latch command (cc000000 binary), but several counters can be latched at the same time, depending on which counters are enabled by bits 3, 2, and 1 of the read-back command word.
Bit 4 specifies latching the channel status. If this function is enabled (by setting the bit to 0), the next read of the data register for that channel will yield a status read-back byte, which is defined as follows:
    7 6 5 4 3 2 1 0
    * . . . . . . .  Output pin state
    . * . . . . . .  Null Count flag
    . . * * . . . .  Access mode as specified at initialisation
    . . . . * * * .  Operating mode as specified at initialisation
    . . . . . . . *  BCD flag as specified at initialisation
The bottom six bits return the values programmed into the channel when it was last initialised by a write of a mode word. Bits 7 and 6 relate to real-time events.
Bit 7 indicates the actual state of the output pin of the timer chip at the moment that the read-back command was issued, and bit 6 indicates whether a newly-programmed divisor value has been loaded into the Counting register yet (if clear) or the channel is still waiting for a trigger signal or for the Counting register to count down to zero before a newly programmed Reload value is loaded into the Counting register (if set).
The bit is set upon a mode or Reload value write to the channel, and cleared when the Reload value is loaded into the Counting register.
7.19 SAMPLE CODE: READ-BACK
This function performs a full read-back on a specified CTC channel and fills in a readback_data structure with the count and the read-back status byte.
/*
Function to read-back a counter/timer channel count and status
Part of the PC Timing FAQ / Application notes
By K. Heidenstrom ([email protected])
*/

#pragma inline;        /* Required for asm pushf, popf, and cli */

typedef struct {
    unsigned int count;
    unsigned char status;
    } readback_data;

void readback_channel(unsigned int channum, readback_data * rbdp) {
    if (channum < 3) {
        asm pushf;            /* Preserve interrupt flag */
        asm cli;            /* Disable interrupts */
        outportb(0x43, 0xC0 + (2 << channum));    /* Latch count, status */
        rbdp->status = inportb(0x40 + channum); /* Get status */
        rbdp->count = inportb(0x40 + channum);    /* Get count lobyte */
        rbdp->count += inportb(0x40 + channum) << 8; /* Get count hibyte */
        asm popf;            /* Restore interrupt flag */
        return;
        }
    }
7.20 READING THE COUNT IN MODE THREE (8254 ONLY)
Reading the count on-the-fly to get an absolute timestamp in mode three is more awkward than reading the count in mode two, and has a higher overhead.
As far as I know, there is no reason why your program should not program CTC channel 0 to operate in mode 2 and leave mode 2 in effect when your program exits or is terminated (modern BIOSes set mode 2 as the default mode anyway, see section 7.4.2), so there should be no requirement to be able to read the count in mode 3. However, if the CTC is an 8254 (not an 8253 or a PS/2 CTC) it is possible to read the count in mode 3, so I will describe how this is done.
The function presented in the section 7.21 is the result of some testing and experimentation. I have found it to be reliable on all of the machines I was able to test with, but if you have trouble with it, let me know. (*)
The basis of reading the count in mode three is to read the count value, and also read the output pin state, then combine them. The count register counts down in sequence 0, 65534, 65532, 65530 … 8, 6, 2, 0, 65534, 65532… with the output pin state toggling on each transition from 2 to 0. The rising edge of the output pin will initiate a timer tick interrupt, therefore I regard this as starting the count sequence, so when the output pin is low, the counter is on its second pass. See sections 7.8.5 and 7.15.2 for more details.
We could use a read-back command to read the count and the output pin status, and derive an up-count combined value as:
up_count = ((0 - actual_count) / 2) + (output_state ? 0 : 0x8000);
This will work, and is reliable on some machines, but on other machines, the output pin state is occasionally read incorrectly, probably due to delays in the logic of the timer chip. So, I had to modify the routine to read the output pin state, read the count, read the output pin state again, then determine the true count in progress.
The logic here is as follows: If the second output state is the same as the first (this is nearly always the case), then the output state and the count are both valid. If the output states are different, then a counter reload has occurred during the reading process, so use the count value to determine whether the count was latched just before, or just after, the output changed state. If the count value (after converting to an up-count) is small, then it was read just after the output changed state, so use the second output state. If the count is large, then it was read just before the output changed state, so the first output state is applicable.
Now that I have the correct output state, the equivalent up-count value can be calculated using the above formula. This yields a 16-bit up-counting value which corresponds to the negative of the equivalent raw count in mode two.
Needless to say, the part of the routine that talks directly to the timer chip operates with interrupts locked out.
7.21 SAMPLE CODE: READING THE COUNT IN MODE THREE
This function latches, reads, and returns the current effective count value for timer channel zero, converted to a 16-bit up-counting value. It works with 8254 CTCs and fully compatible ASICs, but does not work with 8253s or on PS/2 machines.
This function assumes that CTC channel zero is operating in mode three with a divisor of 65536. This USED TO BE the default mode set up by the BIOS, but mode 2 is the default used by modern 486 BIOSes that I have seen. See section 7.4.2 for details. The function also assumes that channel zero is set for lobyte/hibyte access (bits b5,4 = 1,1 in control register at initialisation) and that the lobyte/hibyte flag is correctly synchronised (see sections 7.7 and 7.17.
See section 7.12 for sample code to set the mode and divisor.
/*
Function to read the count register (down-counter) of timer channel zero,
    assuming that the timer is in mode three, with a divisor of 65536.
    Returns the count in up-counter format.  Requires an 8254 timer chip.
Part of the PC Timing FAQ / Application notes
By K. Heidenstrom ([email protected])
*/

unsigned int read_timer0_mode3(void) {
    unsigned char st1, st2;         /* Status read-back values */
    unsigned int cv;                /* Count value */
    disable();                      /* No ints please - can use asm cli */
    outportb(0x43, 0xE2);           /* Latch and read back status byte */
    st1 = inportb(0x40);            /* Read status byte */
    outportb(0x43, 0x00);           /* Latch count for timer 0 */
    cv = inportb(0x40);             /* Lobyte of count */
    cv += inportb(0x40) << 8;       /* Hibyte of count */
    cv = (0 - cv) >> 1;             /* Convert to up-count, 0-32767 */
    outportb(0x43, 0xE2);           /* Latch and read back status byte */
    st2 = inportb(0x40);            /* Read status byte */
    enable();                       /* Ints back on - can use asm sti */
    if ((st1 ^ st2) & 0x80)         /* If output pin changed state... */
        if (cv < 0x4000)            /* If reload just occurred... */
            st1 ^= 0x80;            /* Use newer output pin status */
    if ((st1 & 0x80) == 0)          /* If on second countdown... */
        cv |= 0x8000;               /* Set b15 */
    return cv;                      /* Return as up-counter */
    }
7.22 SAMPLE CODE: OPTIMISED MODE THREE COUNT READING FUNCTION
The following function reads the count register of CTC channel zero assuming that CTC channel zero is operating in mode three with a divisor of 65536 and is set for lobyte/hibyte access, and the lobyte/hibyte flag is correctly synchronised.
The value is returned in up-counting format, in the range 0-65535, and is the effective value that would be read from the counter in mode two using a raw read, except that the counting direction is reversed (the value returned by this function is an up-counter, the raw value is a down-counter).
; Function to read the count register (down-counter) of CTC channel zero,
; assuming that the channel is in mode three, with a divisor of 65536.
; Returns the count in up-counter format.  Requires an 8254 timer chip.
; Part of the PC Timing FAQ / Application notes
; By K. Heidenstrom ([email protected])
;
_read_timer0_mode3 PROC near    ; or FAR for far code model
    ; unsigned int read_timer0_mode3(void);
        pushf            ; Keep interrupt flag
        mov    al,11100010b    ; Latch and read back status byte only
        cli            ; Lock out interrupts
        out    43h,al        ; Send it
        jmp    SHORT $+2    ; Delay
        in    al,40h        ; Get status byte
        mov    ah,al        ; To AH
        jmp    SHORT $+2    ; Delay
        mov    al,00000000b    ; Latch count for timer 0
        out    43h,al        ; Send it
        jmp    SHORT $+2    ; Delay
        in    al,40h        ; Get lobyte of count
        mov    dl,al        ; Save in DL
        jmp    SHORT $+2    ; Delay
        in    al,40h        ; Get hibyte of count
        mov    dh,al        ; Save in DH
        jmp    SHORT $+2    ; Delay
        mov    al,11100010b    ; Latch and read back status byte again
        out    43h,al        ; Send it
        jmp    SHORT $+2    ; Delay
        in    al,40h        ; Get status byte
        popf            ; Restore interrupt flag
        neg    dx        ; Convert to ascending count

        xor    al,ah        ; Did the output change?
        jns    GotCount    ; If not, no problemo

        test    dh,dh        ; Was count high or low?
        js    GotCount    ; If count was about to carry, keep old
        not    ah        ; If count just carried, change output

GotCount:    shl    ah,1        ; Get output pin status to CF
        cmc            ; Pin high = count 0-32767
        rcr    dx,1        ; Pin low = count 32768-65535
        ret            ; Return 16-bit ascending count in DX
_read_timer0_mode3 ENDP
7.23 SAMPLE PROGRAM: MANIPULATE THE CTC AND PORT B
The following program is a command driven utility that manipulates the CTC and the Port B hardware. It lets you send commands to the mode/command register, read and write the data registers in single-byte or lobyte/hibyte modes, set and display the Timer 2 Gate and Speaker Gate signals, and read the Timer 2 output on port B or C (see section 7.5). It has a simple help summary which is displayed when ‘?’ is entered at the prompt. The program performs minimal error checking and is not intended to be bulletproof. You may find it useful for testing some subtle details of the CTC’s operation.
Parameters to a command must be separated from the command name by one or more spaces or tabs. Commands on the same line may be separated by semicolons (;) and the whole command line will be executed with interrupts locked out. Result text is stored in an internal buffer and displayed once the command line has been fully processed.
Numeric parameters are assumed to be binary by default. To specify a hex value, prefix the hex digits with ‘x’ (e.g. ‘xFEDC’). To specify a decimal value, prefix the digits with ‘d’ (e.g. ‘d12345’).
/*
Sample program #6
Utility to manipulate the CTC
Part of the PC Timing FAQ / Application notes
By K. Heidenstrom ([email protected])

Save this file to SAMPLE6.C and compile with:
    bcc -I<inc_path> -L<lib_path> -ms sample6.c
Where inc_path is the path to your C header files and your startup modules
C0x.OBJ, and lib_path is the path to your C libraries Cx.LIB.
*/
#pragma inline;        /* Required for asm pushf, popf, and cli */

#include <ctype.h>    /* For tolower() */
#include <dos.h>    /* For inportb() and outportb() */
#include <io.h>        /* For read() and write() */
#include <stdio.h>    /* For printf() */
#include <stdlib.h>    /* For exit() */
#include <string.h>    /* For strlen() */

#define FALSE 0
#define TRUE 1

#define STDIN 0

#define LINELEN    120    /* Line length limit */

static unsigned int eval_ok;

static char resulttext[10240];        /* Buffer for result text */
static char * resulttextp;

unsigned int eval_value(char * s) {
    unsigned int p, v;
    char c;
    p = v = 0;
    eval_ok = TRUE;
    if (s[0] == 'd') {        /* Decimal value */
        ++p;
        while ((c = s[p++]) > ' ') {
            v *= 10;
            if ((c >= '0') && (c <= '9'))
                v += (c - '0');
            else
                return (eval_ok = FALSE);
            }
        return v;
        }
    if (s[0] == 'x') {        /* Hex value */
        ++p;
        while ((c = s[p++]) > ' ') {
            v <<= 4;
            if ((c >= '0') && (c <= '9')) {
                v += (c - '0');
                continue;
                }
            if ((c >= 'a') && (c <= 'f')) {
                v += (c - 'a' + 10);
                continue;
                }
            return (eval_ok = FALSE);
            }
        return v;
        }
    while ((c = s[p++]) > ' ') {    /* Binary value - default */
        v <<= 1;
        if ((c == '0') || (c == '1'))
            v += (c - '0');
        else
            return (eval_ok = FALSE);
        }
    return v;
    }

void rw_reg(unsigned int is16, unsigned int chan, char * parms) {
    unsigned int ioadr, v;
    ioadr = 0x40 + chan;
    if (parms[0]) {
        v = eval_value(parms);
        if (eval_ok == FALSE) {
            sprintf(resulttextp, "Bad parameter value: '%s'\n", parms);
            resulttextp = resulttext + strlen(resulttext);
            return;
            }
        outportb(ioadr, v & 0xFF);
        if (is16)
            outportb(ioadr, v >> 8);
        return;
        }
    v = inportb(ioadr);
    if (is16) {
        v += (inportb(ioadr) << 8);
        sprintf(resulttextp, "Channel %d read lobyte/hibyte:  0x%04X\n", chan, v);
        }
    else
        sprintf(resulttextp, "Channel %d read byte:  0x%02X\n", chan, v);
    resulttextp = resulttext + strlen(resulttext);
    return;
    }

void do_command(char * cmd, char * parms) {
    unsigned int v;
    switch (cmd[0]) {
    case '?' :
        sprintf(resulttextp,
            "Command format: cmd [parms] [; cmd [parms]] [...]\n\n"
            "Commands on the same line are executed with interrupts locked out\n"
            "Values may be hex ('x' prefix), decimal ('d' prefix) or binary (default)\n"
            "\nCommands are:\n\n"
            "0  [value] - read [write] channel 0 data register\n"
            "1  [value] - read [write] channel 1 data register\n"
            "2  [value] - read [write] channel 2 data register\n"
            "00 [value] - read [write] channel 0 data register as lobyte/hibyte\n"
            "11 [value] - read [write] channel 1 data register as lobyte/hibyte\n"
            "22 [value] - read [write] channel 2 data register as lobyte/hibyte\n"
            "C  value   - write value to mode/command register\n"
            "R          - read back timer 2 output via port B or C\n"
            "G [on|off] - read [set] timer 2 gate on port B\n"
            "S [on|off] - read [set] speaker gate on port B\n"
            "Q          - quit\n"
            "\nExample command:  g on; c 10110110; 22 x1234; s on\n"
            );
        resulttextp = resulttext + strlen(resulttext);
        break;
    case '0' :
    case '1' :
    case '2' :
        if (cmd[1] == cmd[0])
            rw_reg(TRUE, cmd[0] - '0', parms);
        else
            rw_reg(FALSE, cmd[0] - '0', parms);
        break;
    case 'c' :
        if (!parms[0]) {
            sprintf(resulttextp, "Must give parameter for 'c' command\n");
            resulttextp = resulttext + strlen(resulttext);
            return;
            }
        v = eval_value(parms);
        if (eval_ok == FALSE) {
            sprintf(resulttextp, "Bad parameter value: '%s'\n", parms);
            resulttextp = resulttext + strlen(resulttext);
            return;
            }
        outportb(0x43, v & 0xFF);
        break;
    case 'r' :
        sprintf(resulttextp, "Timer 2 readback on port B (AT) is %s; on port C (PC/XT) is %s\n",
            (inportb(0x61) & 0x20) ? "high" : "low",
            (inportb(0x62) & 0x20) ? "high" : "low");
        resulttextp = resulttext + strlen(resulttext);
        break;
    case 'g' :
        if (parms[0])
            outportb(0x61, (inportb(0x61) & 0xFE) | (parms[1] == 'n'));
        else {
            sprintf(resulttextp, "Timer 2 gate is currently %s\n",
                (inportb(0x61) & 0x01) ? "on" : "off");
            resulttextp = resulttext + strlen(resulttext);
            }
        break;
    case 's' :
        if (parms[0])
            outportb(0x61, (inportb(0x61) & 0xFD) | ((parms[1] == 'n') << 1));
        else {
            sprintf(resulttextp, "Speaker gate is currently %s\n",
                (inportb(0x61) & 0x02) ? "on" : "off");
            resulttextp = resulttext + strlen(resulttext);
            }
        break;
    case 'q' :
        asm sti;
        exit(0);
    default :
        if (parms[0])
            sprintf(resulttextp, "Bad command: '%s %s'\n", cmd, parms);
        else
            sprintf(resulttextp, "Bad command: '%s'\n", cmd);
        resulttextp = resulttext + strlen(resulttext);
        }
    return;
    }

void do_commandline(char * s) {
    static char cmdbuf[LINELEN];
    static char parmbuf[LINELEN];
    unsigned int sp, dp1, dp2, endflags;
    char c;
    resulttextp = resulttext;
    asm cli;
    sp = 0;
    do {
        dp1 = 0; dp2 = 0;
        while ((s[sp] <= ' ') && (s[sp] != '<!JEKYLL@3780@56>'))
            ++sp;        /* Skip leading whitespace */
        while ((s[sp] > ' ') && (s[sp] != ';')) {
            c = s[sp++];
            cmdbuf[dp1++] = tolower(c);
            }
        cmdbuf[dp1] = '<!JEKYLL@3780@56>';
        if ((s[sp] != '<!JEKYLL@3780@56>') && (s[sp] != ';')) {
            while ((s[sp] <= ' ') && (s[sp] != '<!JEKYLL@3780@56>'))
                ++sp;        /* Skip whitespace */
            while ((s[sp] != '<!JEKYLL@3780@56>') && (s[sp] != ';')) {
                c = s[sp++];
                parmbuf[dp2++] = tolower(c);
                }
            }
        while (dp2) {
            if (parmbuf[dp2 - 1] <= ' ')
                --dp2;
            else
                break;
            }
        parmbuf[dp2] = '<!JEKYLL@3780@56>';
        if (dp1)
            do_command(cmdbuf, parmbuf);
        if (s[sp] == ';')
            ++sp;
        } while (s[sp]);
    asm pushf;
    asm pop endflags;
    asm sti;
    if (resulttextp != resulttext)
        write(1, resulttext, strlen(resulttext));
    if (endflags & 0x200)
        printf("\nWarning!  Interrupts were inadvertently enabled during the command!\n");
    }

void main(void) {
    static char inpbuf[LINELEN];
    unsigned int p;
    printf("Sample program #6 - Manipulates the CTC directly\n");
    printf("Part of the PC Timing FAQ / Application notes\n");
    printf("By K. Heidenstrom ([email protected])\n\n");
    printf("Type '?' for help, 'Q' to quit\n");
    while (1) {
        printf("\n>");
        if ((p = read(STDIN, inpbuf, LINELEN - 2)) > 0)
            --p;
        inpbuf[p] = '<!JEKYLL@3780@56>';
        do_commandline(inpbuf);
        }
    }
7.24 HARDWARE PROBLEMS AND DIFFERENCES
7.24.1 DIFFERENCES BETWEEN THE INTEL 8253 AND 8254
Though the 8254 was a “completely new design” from the 8253, the differences to the user or programmer are that the 8254 has the read-back command (see section 7.18), and the 8254 fixes a problem on the 8253 when used in mode 3 with a reload value of 3 (which does not concern us).
7.24.2 CHIPSET IMPLEMENTATIONS
Differences in timer implementations in chipset ASICs are likely to be vague and unpredictable. Prof. John Mertus {JAM} (see section 1.7) has done some research on this, and found some machine-specific hardware differences. These are described in the applicable sections here, indicated with the marker {JAM}.
One thing John discovered is that the PS/2 ASIC does not implement the read-back function (see section 7.18). Personally, I am pssed off at IBM for making such a cretinous and inconsiderate mistake. Because of them, we cannot just look at the machine type byte in the ROM and be sure that, if the machine is an AT-class machine, read-back will work - we must specifically test whether the machine supports read-back, and our programs may have to behave differently depending on the result of the test. Normally, clones are criticised for not being fully IBM compatible - this time, it is IBM! Rant mode off, dismount :-) BTW, {JAM} also reports that the 8254 CTC is implemented properly on the IBM ValuePoints. Any information on other machines would be welcomed. ()
7.24.3 INTEL 8253/8254/82C54 CLOCK SYNCHRONISATION PROBLEMS
This information is from Intel Q&A and application notes, and was sent to me by Louis Warshaw ([email protected]). Thanks Louis!
Unfortunately I found the Intel documentation very vague, so I will quote the relevant parts and hope that Intel don’t sue me :-) The problems concern synchronisation between the CTC clock input (the 1.193182 MHz clock) and the write access pulses when the data registers are written or when a counter latch command is issued.
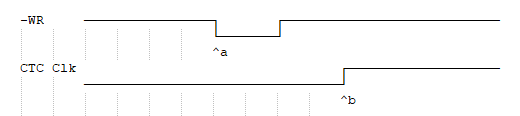
The timing diagram shows a write access to a data register (I/O address 40h, 41h, or 42h) and a rising edge on the CTC clock. The chip’s specification for the time between point ‘a’ and point ‘b’ is called Twc, and is specified as 55 nanoseconds maximum for the Intel 8254.
Here is what the Intel documentation says. My comments are in square brackets.
“Question: Why is Twc specified to the rising edge of [CTC] Clock, but yet Clocks are loaded [sic] on the falling edge?
“Answer: This is used for software synchronisation of loading a new count [reload value]. The new value must be in the Twc window to guarantee that the new count [reload value] is loaded on the next falling edge [of CTC clock].”
I think this is just saying that the reload register must be fully loaded before the rising edge of CTC Clock, in order to be decremented on the following falling edge of CTC Clock. I assume that if the reload register is not loaded at least Twc nanoseconds before the rising edge, the chip will just wait for the next rising edge, thus there is an uncertainty of one CTC Clock width as to exactly which CTC Clock will start decrementing the counting register, and this depends on the reload register becoming fully loaded at least shortly before the rising edge before the falling edge that will decrement it.
“Question: Why should Gate be pulsed immediately following a write of a new count [reload] value, when using an asynchronous clock source [CTC Clock not synchronous with the Write pulse] in modes two and three?
“Answer: If an asynchronous clock input is used for a counter [channel], you need to use Gate to synchronise the loading of the new count [reload value].”
As for the second point, Intel’s question and answer are so vague that I can not come to any conclusion about the implications for the programmer.
“Question: What does the comment on page 3-74, figure 17, Note, Peripheral Components, 1993 mean? “NOTE: A Gate transition should not occur one [CTC] clock prior to terminal count”.
“Answer: Modes 2 and 3 use the [CTC] clock frequency for the Rate Generator and Square Wave Mode respectively. In modes 2 and 3, the 8254 (and 82C54) uses “look ahead” logic to precondition OUT to go low on the falling edge of the CLK input upon terminal count. Without this look ahead feature, the 8254 would not have time to resolve its internal logic at the same time OUT is to go low upon reaching terminal count. Monitoring the count value in software, before disabling counting via the Gate, is usually sufficient to prevent this combination of events. This has always been the operation of the 8254 (and 8253, and 82C54) and no problems resulting from this [sic].”
Again nice and vague. I think this is saying that terminal count is anticipated by the look-ahead logic one CTC clock before it actually occurs, i.e. in mode 2 when the Counting Register reaches two, and if Gate goes low while the Counting Register is two, the output may actually go low as normal on the next CTC clock even though the Gate input is low. I wonder how this relates to mode 3.
Two more problems are described. These apply only to the 82C54, the CMOS version of the 8254. I do not know whether any PCs actually use the 82C54.
There are two ‘failure modes’ documented - the Twc count write failure mode and the Tcl counter latch command failure mode.
“The Twc [counter write] failure mode occurs in a very narrow window between the Twc min and Twc max timing when writing the last [or only] byte of a count [Reload register] value. The Twc specification defines the relationship between the writing of a count [Reload] value and the Clk [CTC clock] pulse and whether the Clk pulse will or will not be reflected in the subsequent counting operation. The Clk pulse is a low to high transition on one of the 82C54’s Clk input pins. [The 82C54 documentation states Twc min = 0, Twc max = 55 ns].

“If the rising edge of a Clk pulse happens before the Twc min specification then it is too early and will not be reflected in the count. If the Clk pulse happens after the Twc max specification then the Clk pulse will be reflected in the count. If the Clk happens between Twc min and Twc max it may or may not be reflected in the count value. Twc min is 0 ns and Twc max is 55 ns or a 55 ns window [sic].
“There is a worst case 8-20 ns [floating] window between Twc min and Twc max where the 82C54 counter control logic is corrupted and the counter enters an undefined state. The counter must be re-initialised by rewriting the counter Mode word. The problem is worse at cold temperatures (0 degrees C) and low VCC (4.5V). Only the counter being written to is affected. The other counters continue to count properly.
“The Twc failure mode actually varies across the normal skew of the fabrication process. The 82C54’s typical wafer fabrication process failure mode window is between 300 picoseconds to 1 nanosecond. The actual window may typically be less but this represents the +/- 100 picosecond resolution of the Teradyne test computer used to characterise the Twc failure mode. When the process shifts within the normal skew to the slow implant corner the failure mode window increased [sic] to a worst case of 8-20 nanoseconds.
“The failure mode is a function of an asynchronous Clk and -WR input signals. When -WR and Clk are asynchronous the -WR may occur at any time in relation to the Clk. If -WR and Clk are synchronous -WR will always occur in the same relation ship [sic :-)] to Clk. The 82C54 Clk and -WR inputs are synchronous when the Clk input is the system microprocessor clock, or a derivative of it. If the 82C54 Clk source is independent of the system clock then the -WR and Clk are asynchronous unless hardware synchronised external [sic] to the 82C54.
“There are three modifications which compensate for the failure mode:
Use a Clk input signal which is a derivative of the system microprocessor clock source. This makes the interaction of the -WR and Clk totally predictable. The -WR and Clk will not happen coincidentally and the synchronisation prohibits occurrence of a -WR within the failure mode window time of Clk.
Through the use of the 82C54 Read Back Command the software detects the state of the Counter Status byte Null Count flag which indicates whether the count has been moved from the Count Register [Reload register] to the Counting Element (CE) [Counting register] or “loaded”. See Figure 1 Internal Block Diagram of a Counter ( Figure 5, 82C54 Data Sheet).
Unless the Null Count flag is cleared the count has not been successfully loaded. If the Null Count flag is not cleared then the software rewrites the Mode word and count value [Reload value].
- Externally synchronise the -WR and Clk input signals. This is done by gating -WR with Clk. The -WR and Clk inputs then appear synchronous to the 82C54 which prohibits the occurrence of a -WR within the failure mode window time of Clk.”
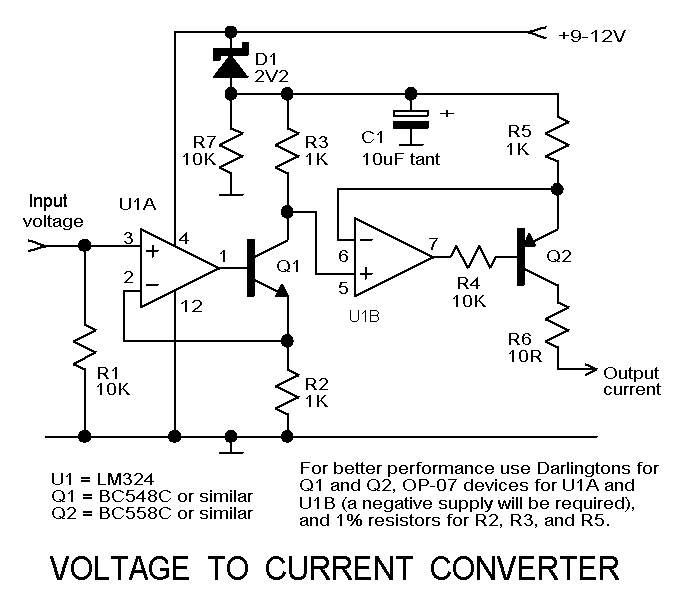 Figure 5
As far as I can tell from discussion with Louis Warshaw, the problem affects writing a reload value on-the-fly to a CTC channel. The -WR signal on the timing diagram represents the pulse issued by the processor to write the last or only byte of the new reload value to the channel. The problem occurs if the rising edge of the Clk to that channel occurs within a certain time of the trailing (rising) edge of the write. There is a timing window which is between 8 and 20 ns wide, and may dynamically shift within the 0 to 55 ns specification Twc window, relative to the rising edge of -WR. If a rising edge of Clk appears within this 8 to 20 ns wide window, the internal logic of the counter will be corrupted and the counter will go into never-never land until reinitialised by a Mode write to the Mode/Command register.
“Counter Latch Command failure mode, Tcl
“The failure mode occurs during a very narrow window between -WR and Clk when latching a count [Counting register] value. The approximately 10 nanosecond window between -WR rising edge and -Clk falling edge, when asynchronously writing a Counter Latch or Read Back command, the count value read may be in error. The byte value read is not in sequence in relation to the previous or following byte read. The Counting Element [Counting register] and counter control logic are unaffected by the failure mode and continues [sic] to decrement properly.
“The error window has been verified on a Teradyne test computer to be a 200-300 picoseconds [sic] window between -WR rising edge and Clk falling edge when writing a Counter Latch or Read Back command.
“The failure mode is not a violation of the Tcl specification. The Tcl specification tells the user a Clk pulse falling edge which happens close to the -WR rising edge of a Counter Latch or Read Back command will (Tcl min) or will not (Tcl max) be reflected in the count value subsequently read from the Counter Output Latch [Latch register]. The Tcl specification provides for a +/- one Clk pulse, or one bit error, in the count value latched. The failure mode results in a multiple bit error in the count value read [from the Latch register].
“There are three modifications which compensate for the failure mode:
Use a Clk signal which is a derivative of the system microprocessor clock source. This makes the interaction of the -WR and Clk [sic] totally predictable. The -WR and Clk never happen coincidentally and the synchronisation prohibits occurrence of a WRX [sic] within the failure mode window time of Clk.
Latch and read the count twice if an error greater than one bit error occurs.
Externally synchronise the -WR and Clk input signals. This is done by gating -WR with Clk. -WR and Clk then appear synchronous to the 82C54 which prohibits the occurrence of a -WR within the failure mode window time of Clk.
This is saying that if the -WR access on a counter latch or read-back command falls within a narrow window a certain length of time after the falling edge of the Clk to that channel, an incorrect count value is latched in the Latch register. Presumably this occurs because the value provided by the Counting register becomes briefly invalid a short time after the Counting register decrements, and if the latch command happens to occur during that short time, the invalid value will be latched into the Latch register. Thus, with an 82C54 where the Clk is not synchronous with -WR, you cannot trust the value latched by a Counter Latch or read-back command.
7.25 IS THE CTC AN 8253 OR AN 8254?
Well, you can check the BIOS Machine Type Byte at location F000:FFFE. Values 0xFD, 0xFE, and 0xFF indicate PCjr, XT/Portable, and original PC respectively, all of which have 8253 CTCs. A Type Byte value of 0xFC indicates an AT or later machine, which should have an 8254. In other words,
unsigned int is_machine_an_AT(void) {
    return (*(unsigned char far *)MK_FP(0xF000, 0xFFFE) == 0xFC);
    }
However, this method is not foolproof, because some clones may not have a valid Machine Type byte, and because of IBM’s brilliance in not implementing a proper 8254 in the PS/2’s ASIC. With this test, some clones, and PS/2 machines, would report an 8254 when they may only have an 8253. Also, when the CTC is emulated, as it is for DOS applications running under OS/2, and presumably under Linux, the full functionality of the CTC may not be available.
The sample program in section 7.26 contains some code that determines whether the CTC is an 8253 or an 8254 or something else (i.e. a faulty chip or a partially emulated chip) which can be extracted and used to determine the CTC type, but note that it leaves CTC channel two in a non-standard mode (mode 0). This should not be a problem, as channel two is used for audio generation and is fully initialised by any code that will subsequently use that channel.
7.26 DETERMINING THE EXACT STATE OF THE CTC
You might need to determine the state of a particular channel in the timer chip. The only things you can really find out are the state of the lobyte/hibyte flag (this cannot be read directly, but its state can be inferred by reading the count several times, assuming the channel is being clocked), and the programmed operating mode and BCD/binary flag, which can be determined by the read-back command (assuming that the timer chip is an 8254).
The logic of the function infer_lobyte_hibyte_flag() in the program in section 7.27 is: read the count, then repeatedly re-read the count until a different value is obtained. Then infer the state from whether the lobyte or the hibyte of the value has changed. If the lobyte changed, then the flag is in sync (normal). If the hibyte changed, then the flag is out of sync. In the latter case, the flag can be brought into sync by reading the data register once.
For each counter read operation, the count is latched prior to being read. The routine disables interrupts, to ensure that the number of CTC clocks between reads is minimal.
7.27 SAMPLE PROGRAM: REPORT CHANNEL STATES
/*
Sample program #7
Reports CTC type (8253, 8254, or faulty/emulated) and the operating states
    (lobyte/hibyte flag, mode, binary/BCD, output state) of all channels.
Part of the PC Timing FAQ / Application notes
By K. Heidenstrom ([email protected])

Save this file to SAMPLE7.C and compile with:
    bcc -I<inc_path> -L<lib_path> -ms sample7.c
Where inc_path is the path to your C header files and your startup modules
C0x.OBJ, and lib_path is the path to your C libraries Cx.LIB.
*/

#pragma inline;        /* Required for asm pushf, popf, and cli */

#include <bios.h>
#include <dos.h>
#include <process.h>
#include <stdio.h>
#include <stdlib.h>

#define TESTVALUE 0x55AA    /* Value to use as reload test value */

#define BACKWARDS ((unsigned int)((TESTVALUE >> 8) + ((TESTVALUE & 0xFF) << 8)))
                        /* Backwards TESTVALUE */

#define EXP_CSTAT 0x30        /* Expected counter status */

#define CTC_EMUL    0    /* CTC is faulty or emulated by OS */
#define CTC_8253    1    /* CTC is an 8253 */
#define CTC_8254    2    /* CTC is an 8254 */

#define LHF_INSYNC    0    /* Lobyte/hibyte flag is in sync */
#define LHF_OUTSYNC    1    /* Lobyte/hibyte flag is out of sync */
#define LHF_UNKNOWN    2    /* Lobyte/hibyte flag cannot be determined */

typedef struct {
    unsigned int count;
    unsigned char status;
    } readback_data;

/* Code */

unsigned int read_channel_raw(unsigned int channum) {
    unsigned int cv;
    if (channum < 3) {
        asm pushf;
        asm cli;
        outportb(0x43, channum << 6);
        cv = inportb(0x40 + channum);
        cv += inportb(0x40 + channum) << 8;
        asm popf;
        }
    return cv;
    }

/* Simple short delay - just wait for at least one CTC clock to occur */

void wait_ctc_clock(void) {
    unsigned int ch0count;
    ch0count = read_channel_raw(0);
    while (read_channel_raw(0) == ch0count)
        ;
    return;
    }

/* The following function is described in section  7.18 */

void readback_channel(unsigned int channum, readback_data * rbdp) {
    if (channum < 3) {
        asm pushf;            /* Preserve interrupt flag */
        asm cli;            /* Disable interrupts */
        outportb(0x43, 0xC0 + (2 << channum));    /* Latch count, status */
        rbdp->status = inportb(0x40 + channum); /* Get status */
        rbdp->count = inportb(0x40 + channum);    /* Get count lobyte */
        rbdp->count += inportb(0x40 + channum) << 8; /* Get count hibyte */
        asm popf;            /* Restore interrupt flag */
        return;
        }
    }

/* This function determines the CTC type.  It stores the current contents of
   Port B (speaker and timer 2 gate control port), then turns off speaker
   enable and sets timer 2 gate low.  It then attempts to read-back the
   status of CTC channel 2, and stores this in ch2rbd.status; this will be
   used to restore channel 2 to its original operating state if it turns out
   that the CTC is an 8254.
   The function then programs CTC channel 2 for mode zero with a reload value
   specified by TESTVALUE.  In this mode, channel 2 will reload on the next
   CTC clock, and will not decrement, as its gate input is low.  We then wait
   for at least one CTC clock to occur (detect this by reading CTC channel 0
   and waiting for a change in the latched value).  CTC channel 2 then contains
   a known value, and is in a stable state.  We know the expected latched count
   value and the expected status value to be returned on a read-back.  It is
   then possible to determine the CTC type by reading a few things and looking
   at the CTC's responses.  Specifically, the routine checks that it can latch
   and read a stable value equal to the reload register value - if this fails,
   the CTC is assumed to be faulty or emulated.  Then it issues a read-back
   command and keeps the read-back status byte, then latches and reads the
   count.  If the CTC is an 8253, this will yield a 'backwards' count - i.e.
   TESTVALUE with hibyte and lobyte interchanged, because the lobyte/hibyte
   flag was reversed by the read-back (which reads the data register three
   times).  On an 8254, this latch and read will yield TESTVALUE.
   Next, it performs another readback (to reinstate the original lobyte/hibyte
   flag if the CTC is an 8253) and keeps the read-back status again, then it
   latches and reads the count again.  This should _always_ yield TESTVALUE,
   for either an 8253 or 8254.
   It then checks for the expected behaviour of an 8253 and an 8254 separately.
   If the CTC does not give the correct response, it will be reported as faulty
   or emulated.
   Note that this function spends most of its time with interrupts locked out.
   */

unsigned int detect_ctc_type(void) {
    unsigned int ctctype;            /* Value to be returned */
    unsigned int port61;            /* Port 61h value */
    readback_data ch2rbd, rbd1, rbd2;    /* Read-back storage */
    unsigned int backwards, forwards;    /* Latched count values */

    ctctype = CTC_EMUL;        /* Assume faulty or unknown CTC type */

    asm pushf;
    asm cli;

    port61 = inportb(0x61);        /* Get Port B value */
    outportb(0x61, port61 & 0xFC);    /* Turn off timer 2 gate and speaker */

/* Try read-back on channel two, only useful if CTC turns out to be an 8254 */

    readback_channel(2, &ch2rbd);
    readback_channel(2, &ch2rbd);    /* Attempt to read-back channel two */

    outportb(0x43, 0xB0);    /* Channel 2, two bytes, mode 0, binary */
    outportb(0x42, TESTVALUE & 0xFF);    /* Lobyte of reload value */
    outportb(0x42, TESTVALUE >> 8);        /* Hibyte of reload value */

    wait_ctc_clock();
    wait_ctc_clock();    /* Wait for a couple of CTC clock pulses */

/* Just read the raw value a couple of times, make sure it's stable */

    if ((read_channel_raw(2) != TESTVALUE) ||
        (read_channel_raw(2) != TESTVALUE))
        goto got_type;    /* Structured programming?  Never heard of it */

/* Try a read-back - on an 8253, this will reverse the lobyte/hibyte flag */

    readback_channel(2, &rbd1);

/* Read the count - on an 8253 this will be TESTVALUE backwards, on an 8254
   it will be TESTVALUE */

    backwards = read_channel_raw(2);

/* Try another read-back, into rbd2 this time */

    readback_channel(2, &rbd2);

/* Now latch and read the count again */

    forwards = read_channel_raw(2);

/* Now, try to figure out what it is! */

    if ((rbd1.status != EXP_CSTAT) && (rbd2.status != EXP_CSTAT) &&
        (backwards == BACKWARDS) && (forwards == TESTVALUE))
            ctctype = CTC_8253;
    if ((rbd1.status == EXP_CSTAT) && (rbd2.status == EXP_CSTAT) &&
        (backwards == TESTVALUE) && (forwards == TESTVALUE))
            ctctype = CTC_8254;
got_type:

/* Now we know what it is.  If it's an 8254, we can restore channel 2 to its
   previous mode, although we cannot restore the original divisor, because
   we can't tell what it was.  If it's not an 8254, we can't fix anything */

    if (ctctype == CTC_8254) {
        outportb(0x43, 0x80 + (ch2rbd.status & 0x3F));
        outportb(0x42, 0);
        outportb(0x42, 0);
        }

    outportb(0x61, port61);    /* Restore speaker and timer 2 control bits */

    asm popf;
    return ctctype;
    }

unsigned int test_delta(unsigned int latchv, unsigned int cport) {
    unsigned int nreads, startcount, count, diff, hbdiff, lbdiff;
    asm pushf;
    asm cli;
    outportb(0x43, latchv);            /* Read count to startcnt */
    startcount = inportb(cport);
    startcount += inportb(cport) << 8;
    for (nreads = 0; nreads < 20; ++nreads) {
        outportb(0x43, latchv);        /* Latch count again */
        count = inportb(cport);
        count += inportb(cport) << 8;
        diff = startcount ^ count;    /* Get difference */
        hbdiff = ((diff & 0xFF00) != 0);
        lbdiff = ((diff & 0x00FF) != 0);
        if (lbdiff == hbdiff)        /* Both or neither changed */
            continue;        /* Wait for difference */
        if (lbdiff) {            /* Lobyte changed */
            asm popf;
            return LHF_INSYNC;    /* Flag is in sync */
            }
        if (hbdiff) {            /* Hibyte changed */
            asm popf;
            return LHF_OUTSYNC;    /* Flag is out of sync */
            }
        } /* for nreads */
    asm popf;
    return LHF_UNKNOWN;            /* Couldn't determine */
    }

/* The following function infer_lobyte_hibyte_flag() attempts to determine the
   state of the lobyte/hibyte flag for a specified CTC channel, assuming that
   that channel has been programmed for lobyte/hibyte access (i.e. bits 5 and 4
   of the control register were 1,1 at initialisation).  It should work for
   both the 8253 and 8254.  The lobyte/hibyte flag toggles every time the
   latched (or unlatched) count is read from the counter data register.  The
   function returns LHF_INSYNC, LHF_OUTSYNC, or LHF_UNKNOWN.  This function
   seems to be reliable on fast machines but does not seem to work well on
   slow machines or XTs (I don't know why), so don't rely on its accuracy!  */

unsigned int infer_lobyte_hibyte_flag(int channum) {
    unsigned int latchv, cport, result;
    unsigned int progress[3];

    if (channum > 2)
        return LHF_UNKNOWN;

    latchv = channum << 6;
    cport = 0x40 + channum;

    progress[LHF_INSYNC] = 0;
    progress[LHF_OUTSYNC] = 0;
    progress[LHF_UNKNOWN] = 0;

    do
        result = test_delta(latchv, cport);
    while (++progress[result] < 10);
    return result;
    }

void main(void) {
    unsigned char machtype;            /* Machine type byte */
    readback_data rbd[3];            /* Readback data structures */
    unsigned int lhf[3];            /* Lobyte/hibyte flag values */
    unsigned int ch;            /* Channel number */
    unsigned int port61;            /* Port 61h value */

    static char machname[4][31] = {
        "an AT class machine (8254 CTC)",    /* 0xFC */
        "a PCjr (8253 CTC)",            /* 0xFD */
        "a PC/XT (8253 CTC)",
        "an IBM-PC (8253 CTC)"
        };

    printf("Sample program #7 - Reports CTC type, modes, and output states\n");
    printf("Part of the PC Timing FAQ / Application notes\n");
    printf("By K. Heidenstrom ([email protected])\n\n");

    machtype = *(unsigned char far *)MK_FP(0xF000, 0xFFFE);
    if (machtype < 0xFC)
        printf("The BIOS Machine Type byte has a non-standard value\n\n");
    else
        printf("The BIOS Machine Type byte says this machine is %s\n\n", machname[machtype - 0xFC]);

    switch (detect_ctc_type()) {
    case CTC_EMUL:
        printf("CTC appears to be faulty, non-standard, or emulated by operating system\n\n");
        printf("Cannot determine operating parameters\n");
        break;
    case CTC_8253:
        printf("CTC is an 8253\n\nCannot determine operating modes; attempting to determine\n");
        printf("lobyte/hibyte flag state assuming lobyte/hibyte access and mode 2 or 3\n\n");
        for (ch = 0; ch < 3; ++ch) {
            switch (infer_lobyte_hibyte_flag(ch)) {
            case LHF_INSYNC:
                printf("Channel %d lobyte/hibyte flag sync:\tCorrect\n", ch);
                break;
            case LHF_OUTSYNC:
                printf("Channel %d lobyte/hibyte flag sync:\tReversed\n", ch);
                break;
            default:
                printf("Channel %d lobyte/hibyte flag sync:\tCannot be determined\n", ch);
                }
            } /* for ch */
        break;
    case CTC_8254:
        printf("CTC is an 8254; all information is available\n\n");
        port61 = inportb(0x61);
        outportb(0x61, (port61 & 0xFC) | 0x01);    /* Enable timer 2 gate */
        for (ch = 0; ch < 3; ++ch) {
            readback_channel(ch, &rbd[ch]);
            lhf[ch] = infer_lobyte_hibyte_flag(ch);
            }
        printf("Parameter\t\tChannel 0\tChannel 1\tChannel 2\n\n");
        printf("Access sequence:");
        for (ch = 0; ch < 3; ++ch) {
            switch (rbd[ch].status & 0x30) {
            case 0x00:
                printf("\tUninitialised");
                rbd[ch].count = 0;
                break;
            case 0x10:
                printf("\tLobyte only");
                rbd[ch].count &= 0xFF;
                break;
            case 0x20:
                printf("\tHibyte only");
                rbd[ch].count &= 0xFF00;
                break;
            case 0x30:
                printf("\tLobyte/hibyte");
                } /* switch */
            } /* for ch */
        printf("\n");
        printf("Operating mode:\t\t%d\t\t%d\t\t%d\n",
            (rbd[0].status >> 1) & 0x07,
            (rbd[1].status >> 1) & 0x07,
            (rbd[2].status >> 1) & 0x07);
        printf("BCD/binary mode:");
        for (ch = 0; ch < 3; ++ch)
            printf(rbd[ch].status & 1 ? "\tBCD\t" : "\tBinary\t");
        printf("\n");
        printf("Output pin state:");
        for (ch = 0; ch < 3; ++ch)
            printf(rbd[ch].status & 0x80 ? "\tHigh\t" : "\tLow\t");
        printf("\n");
        printf("Null Count flag:");
        for (ch = 0; ch < 3; ++ch)
            printf(rbd[ch].status & 0x40 ? "\tSet\t" : "\tClear\t");
        printf("\n");
        printf("Current raw count:\t0x%04X\t\t0x%04X\t\t0x%04X\n",
            rbd[0].count, rbd[1].count, rbd[2].count);
        printf("Lobyte/hibyte flag:");
        for (ch = 0; ch < 3; ++ch) {
            if ((rbd[ch].status & 0x30) == 0x30) {
                switch (lhf[ch]) {
                case LHF_INSYNC:
                    printf("\tCorrect\t");
                    break;
                case LHF_OUTSYNC:
                    printf("\tReversed");
                    break;
                default:
                    printf("\tUnknown\t");
                    }
                }
            else
                printf("\tN/A\t");
            } /* for */
        printf("\n");
        asm cli;
        outportb(0x61, (inportb(0x61) & 0xFC) | (port61 & 0x03));
                /* Restore timer 2 gate and speaker control bits */
        asm sti;
        break;
        } /* switch ctctype */

    exit(0);
    }
7.28 CTC ACCESS UNDER OS/2
Native OS/2 applications do not need to access the CTC directly. This section is concerned with DOS applications that can be run under OS/2 in a VDM (Virtual DOS Machine).
The HW_TIMER option for the DOS session determines whether the DOS application is given access to the real CTC, or whether it uses the virtual CTC driver, VTIMER.SYS. Manipulating the CTC with the HW_TIMER option set ON may cause interference with other DOS tasks, though I think it does not affect OS/2 because OS/2 uses the Real Time Clock for its timekeeping. I believe that OS/2 does not use CTC channel zero itself; it is only required for DOS tasks.
OS/2’s VTIMER.SYS (virtual CTC emulator, used if HW_TIMER is OFF) is rather interesting. I have paraphrased some information from the OS/2 red book (OS/2 Version 2.0 Volume 2: DOS and Windows Environment), if anyone has more detailed or newer information I’d like to see it. (*)
7.28.1 OS/2 VTIMER.SYS: CTC CHANNEL ZERO
VTIMER.SYS is able to generate virtual (emulated) interrupts at 54.9254 ms intervals, or 13.7314 ms intervals (four times faster). If the DOS session reprograms the divisor of channel zero, it gets its ticks at 13.7314 ms intervals, regardless of the actual divisor value it programmed (presumably unless it programmed a divisor of 65536). VTIMER.SYS runs the real CTC channel zero at 54.9254 ms, or 13.7314 ms if one or more DOS sessions are running at this rate. The 13.7314 ms interrupt capability is required for GW-BASIC which uses a four times faster interrupt for its PLAY command (music).
Latching channel zero causes a “random value derived from the system time” to be loaded into the emulated Latch register, which can then be read. This design decision was based on the fact that the count register is often used to provide a random number seed, and this approach supposedly gives the DOS application a “sense of elapsed time”. The documentation does not say whether read-back is supported, but I suspect it is not.
In other words, it is not possible to use channel zero for timing in a DOS session under OS/2, unless HW_TIMER is set to ON. Stick to the tick count variable and/or timer interrupts, at the normal rate, if you want your program to run properly under OS/2.
7.28.2 OS/2 VTIMER.SYS: CTC CHANNEL ONE
Apparently this channel only supports read accesses, which presumably return a random number or a number derived from the system time. All other accesses are ignored. At a guess, I would say that each read of the data register will yield a random or time-derived value.
7.28.3 OS/2 VTIMER.SYS: CTC CHANNEL TWO
This is interesting. Channel two is linked up with the emulated Port B (see section 7.5) and OS/2 “serialises” speaker access from different tasks. When we generate a speaker tone, we program the divisor into channel two (which will determine the tone frequency), and then enable the speaker by means of the bottom two bits in Port B. VTIMER.SYS remembers the divisor value, and when the bits are set in Port B, it calls the OS/2 “kernel beep”, which may block if it is already beeping on behalf of a different process. After completion of any beep in progress, the kernel beep function programs the correct value into the real channel two, and programs the real Port B to start the beep. When the DOS session turns off the bits in Port B, the beep is stopped and the kernel beep becomes available for use by other sessions.
The “serialisation” can be pre-empted by an “interrupt time beep service” which is somehow used if the beep is issued by the keyboard scancode interrupt handler, to support the “keyboard buffer full” beep issued by the BIOS in a DOS session. Interesting!
7.29 GENERATING AUDIO TONES ON THE SPEAKER
Although this is unrelated to timing…
The PC speaker interface circuitry is thoroughly documented in section 7.5.
CTC channel two is used for generating audio. It is normally operated in mode three, to produce a square wave signal. It can be used in different ways, though - see section 10.7.1 for the PWM audio generation technique. The speaker interface is controlled by two bits in the read/write register at I/O address 61 hex:
    7 6 5 4 3 2 1 0
    * * * * * * . .  Not applicable to speaker control - do not modify!
    . . . . . . * .  Speaker data
    . . . . . . . *  Timer 2 Gate
The Timer 2 Gate signal is directly connected to the ‘gate’ input of timer channel two. This signal must be high in order for the counter to decrement. When the gate signal goes low, the timer output goes high immediately, and counting ceases. The count register is reloaded from the divisor register on the next 1.193182 MHz clock pulse, and when the gate input goes high again, counting resumes starting at the divisor value, thus synchronising the counter.
The Speaker data output is logical-ANDed with the output from timer two, to drive the speaker. Thus, to generate a tone using timer 2, Speaker data should be set to ‘1’ and Timer 2 gate should also be set to ‘1’. The frequency of the tone will be 1193181.6666… divided by the divisor value programmed into CTC channel two.
To generate audio by bit manipulation, Timer 2 gate should be set to zero. This disables timer two and forces its output high. The speaker can then be directly controlled via Speaker data. Setting this bit high allows current to flow in the speaker coil, causing the cone to move outwards (or inwards, depending on which way the speaker is wired - it doesn’t matter really). Setting the bit low causes the cone to return to its normal position. Toggling the bit at rate of n toggles per second gives a frequency of n/2 Hz.
7.30 SAMPLE PROGRAM: GENERATING A TONE USING CTC CHANNEL TWO
The following program generates a tone at approximately 1KHz for approximately one second, using CTC channel two.
See section 6.22 for the explanation of the pushf/cli/popf technique.
/*
Sample program #8
Demonstrates generating a tone using timer channel two
Part of the PC Timing FAQ / Application notes
By K. Heidenstrom ([email protected])

Save this file to SAMPLE8.C and compile with:
    bcc -I<inc_path> -L<lib_path> -ms sample8.c
Where inc_path is the path to your C header files and your startup modules
C0x.OBJ, and lib_path is the path to your C libraries Cx.LIB.
*/

#pragma inline;        /* Required for asm pushf, popf, and cli */

#include <stdio.h>    /* Needed for printf() */
#include <stdlib.h>    /* Needed for exit() */

#define FALSE 0
#define TRUE 1

#define BIOS_TICK_COUNT_P ((volatile unsigned long far *) 0x0040006CL)

#define DIVISOR(frequency) ((unsigned int) ((1193181.6666 / frequency) + 0.5))

#define FREQUENCY 1000            /* Tone frequency in Hz */

unsigned long read_bios_tick_count(void) {
    unsigned long ct;
    asm pushf;
    asm cli;
    ct = * BIOS_TICK_COUNT_P;
    asm popf;
    return ct;
    }

int has_tick_occurred(void) {
    static unsigned long old_tick_count = 0xFFFFFFFFL;
    if (read_bios_tick_count() != old_tick_count) {
        old_tick_count = read_bios_tick_count();
        return TRUE;
        }
    return FALSE;
    }

void init_channel(unsigned int channum, unsigned int accessmode,
    unsigned int mode, unsigned int reload) {
    if (channum > 2 || accessmode < 1 || accessmode > 3)
        return;
    asm pushf;
    asm cli;
    outportb(0x43, (channum << 6) + (accessmode << 4) + ((mode & 0x07) << 1)); /* Mode */
    outportb(0x40 + channum, reload & 0xFF);    /* Reload reg lobyte */
    outportb(0x40 + channum, (reload >> 8) & 0xFF); /* Reload reg hibyte */
    asm popf;
    return;
    }

void turn_tone_on(unsigned int divisor) {
    init_channel(2, 3, 3, divisor);        /* Channel 2, 16-bit, mode 3 */
    asm pushf;                /* Preserve interrupt flag */
    asm cli;
    outportb(0x61, inportb(0x61) | 0x03);    /* Enable timer and speaker */
    asm popf;                /* Restore interrupt flag */
    return;
    }

void turn_tone_off(void) {
    asm pushf;                /* Preserve interrupt flag */
    asm cli;
    outportb(0x61, inportb(0x61) & 0xFC);    /* Disable speaker */
    asm popf;                /* Restore interrupt flag */
    return;
    }

void main(void) {
    unsigned int n = 0;

    printf("Sample program #8 - Demonstrates generating a tone using CTC channel two\n");
    printf("Part of the PC Timing FAQ / Application notes\n");
    printf("By K. Heidenstrom ([email protected])\n\n");
    printf("Tone frequency is %d Hz\n", FREQUENCY);

    has_tick_occurred();        /* Init has_tick_occurred() */
    while (has_tick_occurred() == FALSE)
        ;            /* Wait for a tick to occur */
    turn_tone_on(DIVISOR(FREQUENCY));
    while (n < 18)            /* Stop after one second */
        if (has_tick_occurred())
            ++n;
    turn_tone_off();
    exit(0);
    }
7.31 TIMING SHORT PERIODS USING CTC CHANNEL TWO
{JAM} The ideas and code example in this section are largely from Prof. John Mertus’s document.
Reading a CTC channel requires three I/O accesses, and I/O accesses are notoriously slow by comparison to memory accesses, particularly on fast machines. Referring to section 7.5, CTC channel two’s output is readable on bit 5 of Port C at I/O address 62h (PC and XT) or bit 5 of Port B at I/O address 61h (AT and later), and this port can be read in a single I/O access. This can be useful when a short (microsecond-level) delay must be timed especially accurately.
With this approach, CTC channel two is used in mode zero (see section 7.8.2), the ‘interrupt on terminal count’ mode. In this mode, we can write a count value to the CTC, then watch the Timer 2 Output signal and wait for it to go high, signalling that the time period has expired.
When using this technique, you must ensure that the Timer 2 Gate output on bit 0 of Port B at I/O address 61h is high (CTC channel two will not count if this signal is low) and that the Speaker Data signal on bit 1 of the same register is low, to avoid sending horrible noises to the speaker!
The following code fragment shows how to produce a short (five microseconds plus overhead) pulse on the strobe output of a parallel port, using this approach. It will not work on the old PC and XT - see the comment by the WaitCTC: label.
See section 6.22 for the explanation of the pushf/cli/popf technique.
You could also time longer periods, up to 54.9 ms, but in this case you would remove the PUSHF/CLI and STI around the delay code and set and clear the bit in the parallel port register in a different way - to clear it, use PUSHF/CLI, read the port, AND the value, write it back, and POPF, and same to set the bit (but use OR instead of AND, of course). This leaves the body of the delay loop operating with interrupts enabled, which is desirable to avoid problems with interrupt latency, etc, but could cause problems for example if the keyboard buffer filled up and a beep was issued, because this would result in Port B and CTC channel 2 being reprogrammed part-way through the delay loop. A pop-up TSR could also issue a beep, causing the same problem. This would require intercepting int 10h (BIOS video output, generates a beep) and int 9 (keystroke interrupt) or int 15h keystroke intercept, and even then, this would not prevent some interrupt-triggered code from reprogramming CTC channel 2. In other words, I can’t see any safe way to implement longer delays with interrupts enabled using this technique (except in a controlled environment).
NCTCClocks    EQU    6        ; Six CTC clocks (5us) for the delay
LPTPortBase    DW    3BCh        ; Set to your LPT port base address

; Somewhere in the initialisation code, set up Timer 2 Gate and Speaker Data:

        pushf
        cli            ; No interrupts
        in    al,61h        ; Get Port B
        and    al,11111101b    ; Turn off Speaker Data
        or    al,00000001b    ; Turn on Timer 2 Gate
        out    61h,al        ; Write it back
        popf            ; Restore interrupt flag

; ...

; Then produce the short pulse:

        mov    dx,LPTPortBase    ; Get parallel port base I/O address
        inc    dx
        inc    dx        ; Point to control register
        mov    al,090h        ; Timer 2, lobyte only, mode 0, binary
        pushf
        cli            ; No interrupts
        out    43h,al        ; Send command byte - prepare the CTC
        in    al,dx        ; Get parallel port value
        and    al,11111110b    ; Clear bit 0 (set pin 1, -STROBE, high)
        mov    ah,al        ; To AH for later
        inc    ax        ; Set bit 0 (set pin 1, -STROBE, low)
        out    dx,al        ; Set the I/O register
        ; At this point the -STROBE pin goes low
        mov    al,NCTCClocks    ; Number of CTC clocks to wait
        out    42h,al        ; Start the timer
        in    al,61h        ;!! Use 62h for PC and XT!!
WaitCTC:    in    al,61h        ;!! Use 62h for PC and XT!!
        test    al,20h        ; Test bit 5 - has the time expired?
        jz    WaitCTC        ; If not, loop
        mov    al,ah        ; Get value with bit 0 off
        out    dx,al        ; Write it
        ; At this point the -STROBE pin returns high
        popf            ; Restore interrupt flag
Note that CTC channel two is being used in lobyte-only mode for maximum access speed; if you need to delay more than 255 CTC clocks, use the timer in the lobyte-hibyte mode and write a two-byte reload register value.
You would want to avoid using CTC channel 2 for audio generation, including the standard BIOS beep, if you were using this technique inside an interrupt handler, because any beep in progress will be cut off when this code executes.
{JAM} says: “On reasonably fast machines, timer 2 can be used to create delays from 5 to 54,000 microseconds with 1 to 2 microsecond accuracy”.
7.32 TIMING SHORT PERIODS USING MODE THREE
For timing short periods, where an absolute timestamp is not required, a simplified technique can be used, using CTC channel zero in mode three.
Traditionally the BIOS programmed CTC channel zero to operate in mode three with a Reload value of zero. Modern BIOSes seem to prefer to use mode two. See section 7.4.2 for details.
Referring to sections 7.8.5, 7.15.2 and 7.20, in mode three, the raw value read from the count register decrements in steps of two, each step corresponding to one 0.8381 us CTC clock period. Therefore, periods of time comfortably less than about 27 ms can be measured by reading the counter, storing the value read, then repeatedly reading the counter, calculating the difference, and waiting for this difference to exceed the desired number, which will be twice the number of 0.8381 us periods (because the timer decrements in steps of two).
This technique is demonstrated in the sample program in section 7.34.
7.33 VERTICAL RETRACE
A video monitor display is created by the electron beam in the monitor (colour monitors have three) which scans the screen in a ‘raster’ fashion similar to the way you read a book (though a lot quicker :-) The beam starts at the top left corner and draws one line from left to right, then returns to the left and scans the line below, and so on until the entire screen has been scanned. Each of these horizontal scans is called a line, and at least 15000 lines are scanned each second (depending on the screen resolution and timing parameters).
Each time the electron beam reaches the right side of the screen, it returns very quickly to the left side of the screen, ready to scan the next line. This short ‘return’ time is called the horizontal retrace. The horizontal retrace interval is very short (a few microseconds) and is significant on some old CGA cards because a ‘snow’ effect was produced unless the video buffer was only accessed during the horizontal retrace interval.
After the full screen has been scanned, the beam turns off and returns to the top of the screen. This is the vertical retrace interval, which occupies a length of time in the order of one or two milliseconds (depends on video mode timing parameters), and occurs about 50 to 70 times per second (equal to the field rate, or vertical scan rate, sometimes called the ‘refresh’ rate).
LCD displays are not physically scanned in the same way, but they usually get their display information from a signal which is raster oriented. In any case, vertical retrace is emulated on LCD machines, for compatibility.
Vertical retrace is indicated by a status bit in the video status register at I/O location 3BA hex (MDA, Hercules, and EGA and VGA in monochrome modes) or 3DA hex (CGA, MCGA, and EGA and VGA in colour modes).
For CGA, MCGA, EGA, and VGA cards, bit 3 indicates vertical retrace, and is set during the retrace interval (i.e. clear during the display period) except for the MCGA card in 640x480 monochrome mode, when the bit has the opposite polarity (although the status register appears at 3DA, the colour address!).
The MDA card does not have a vertical retrace indication, though the Hercules card does indicate vertical sync on bit 7 of the register at 3BA, with opposite polarity, i.e. the bit is clear during retrace).
Some video cards are also able to generate IRQ2/9 on vertical retrace but standard VGA cards do not have this facility, so I will not describe it here. This interrupt can be simulated fairly successfully using CTC channel 0. This technique is described in section 10.16.
The word at low memory address 0040:0063 (or 0000:0463) contains the I/O address of the CRTC which can be used to determine whether the video system is colour or monochrome. A value of 3B4 hex indicates monochrome. In this case vertical retrace detection is unreliable, as the MDA does not have any vertical retrace indication. A value of 3D4 hex indicates colour, in which case vertical retrace is indicated by bit 3 in the register at I/O address 3DA hex.
7.34 SAMPLE PROGRAM: TIMING SHORT PERIODS USING MODE THREE
The following program uses CTC channel 0 in mode three to measure short durations to provide a striped background colour on a VGA adapter. It uses the VGA vertical retrace signal to synchronise the time periods with the start of each screen update.
The effect of turning the computer’s turbo switch on and off is minimal, and is not cumulative; this demonstrates that the program is correctly using the CTC to measure the time delay.
See section 6.22 for the explanation of the pushf/cli/popf technique.
/*
Sample program #9
Demonstrates timing short periods using mode three
Part of the PC Timing FAQ / Application notes
By K. Heidenstrom ([email protected])

Save this file to SAMPLE9.C and compile with:
    bcc -I<inc_path> -L<lib_path> -ms sample9.c
Where inc_path is the path to your C header files and your startup modules
C0x.OBJ, and lib_path is the path to your C libraries Cx.LIB.
*/

#pragma inline;        /* Required for asm pushf, popf, and cli */

#include <bios.h>    /* Needed for bioskey() */
#include <dos.h>    /* Needed for MK_FP() */
#include <stdio.h>    /* Needed for printf() */
#include <stdlib.h>    /* Needed for exit() */

#define FALSE 0
#define TRUE 1

#define DELAY 1790            /* Delay 1790 x 0.8381 us = 1.5 ms */

#define DAC_ADDR    0x3C8        /* VGA DAC address register */
#define DAC_DATA    0x3C9        /* VGA DAC data register (write) */

#define BIOSSHIFT (*((unsigned char far *)MK_FP(0x40, 0x17)))

unsigned int read_timer0_mode3_raw(void) {
    asm pushf;
    asm xor al,al;
    asm cli;
    asm out 43h,al;
    asm in al,40h;
    asm mov ah,al
    asm in al,40h
    asm popf;
    asm xchg al,ah;
    return _AX;            /* Return raw value */
    }

void main(void) {
    unsigned int video_status;    /* I/O address of video status reg */
    unsigned int colour[3];        /* Background colour - R, G, and B */
    unsigned int rgbsel;        /* Selects which colour to change */
    unsigned int ctcval, newctc;    /* Raw mode three values */

    printf("Sample program #9 - Demonstrates timing short periods using mode three\n");
    printf("Part of the PC Timing FAQ / Application notes\n");
    printf("By K. Heidenstrom ([email protected])\n\n");
    printf("Press the Ctrl key to exit\n");

    video_status = *((unsigned int far *)MK_FP(0x40, 0x63)) + 6;

/* First, make sure it's in mode three! */

    asm cli;
    outportb(0x43, 0x36);
    outportb(0x40, 0);
    outportb(0x40, 0);
    asm sti;

/* Wait for vertical retrace to start */

    while ((inportb(video_status) & 0x08) == 0)
        ;

/* Start of retrace - reset colours */

newscr:
    colour[0] = colour[1] = colour[2] = 0;
    rgbsel = 0;

    asm cli;
    outportb(DAC_ADDR, 0);
    outportb(DAC_DATA, 0);
    outportb(DAC_DATA, 0);
    outportb(DAC_DATA, 0);
    asm sti;

/* Check for CTRL pressed and terminate if so */

    if (BIOSSHIFT & 0x04) {
        while (bioskey(1))
            bioskey(0);        /* Flush buffer */
        exit(0);
        }

/* Wait for start of display */

    while ((inportb(video_status) & 0x08) != 0)
        ;

/* Get the time now */

    ctcval = read_timer0_mode3_raw();

/* Loop waiting for nominated time period to elapse, check for end of display */

    while (1) {
        do {
            if ((inportb(video_status) & 0x08) != 0)
                goto newscr;    /* If retrace has started */
            newctc = read_timer0_mode3_raw(); /* Sample the time */
            newctc = ctcval - newctc; /* Get CTC clocks elapsed x2 */
            }
        while (newctc < (DELAY * 2));    /* Loop until desired time */

/* Time has elapsed - bump time reference and change the background colour */

        ctcval -= (DELAY * 2);        /* Use * 2 because of mode 3 */

        colour[rgbsel] += 22;        /* Increase R/G/B component */
        if (++rgbsel > 2)        /* Change R/G/B selector */
            rgbsel = 0;

        asm cli;
        outportb(DAC_ADDR, 0);
        outportb(DAC_DATA, colour[0]);
        outportb(DAC_DATA, colour[1]);
        outportb(DAC_DATA, colour[2]);
        asm sti;
        } /* for */
    } /* main() */
7.35 THE REAL TIME CLOCK (RTC)
The RTC/RAM chip is a Motorola MC146818A chip or workalike. It is not present in the original PC and XT and may not be present in non-hardware-compatible machines. It is often implemented as part of an ASIC, or in a hybrid module such as the DS1287, which contains the RTC/RAM chip, crystal, and backup battery.
It is a CMOS device, containing a crystal oscillator and divider with interrupt and alarm logic, a non-volatile CMOS RAM array which stores the BIOS parameter settings, and a processor interface based on the CMOS RAM register file (which contains 64 or sometimes 128 registers).
The crystal oscillator normally operates at 32768 Hz, using a small watch type crystal. The RTC has an interrupt output, which is wired to IRQ8 (normally mapped to int 70h). The RTC is accessed at I/O addresses 70 hex and 71 hex. Both ports are 8-bit and should only be accessed using 8-bit I/O instructions.
The port at 70h is the address select port, which selects which of the 64 or 128 internal registers will be addressed by an access to I/O address 71h. The original MC146818 chip is bus-addressable, and this address/data system may be implemented in logic on the motherboard, not on the RTC/RAM chip itself. After the register has been specified by writing a register number to port 70h, the selected register’s contents can then be read or written via the port at I/O address 71 hex. This address register and data register technique reduces the amount of I/O space required by the RTC, and is not actually part of the MC146818, but is implemented on the motherboard or in the ASIC. The same technique is used in the CRT Controller chip and other chips on video cards.
Always disable interrupts around the access sequence, otherwise an interrupt routine could select a different RTC register, causing your code to read or write the wrong register. Also, note that the address select register at I/O address 70h is write-only. Reading the register will yield an undefined value.
7.35.1 READING AND WRITING RTC REGISTERS
Here are functions to read and write RTC registers. Inline assembler is required for pushf and popf. See section 6.22 for the explanation of the pushf/cli/popf technique. The cli could be replaced by the disable() pseudofunction. Change inportb() and outportb() to inp() and outp() for Microsoft C, I think.
unsigned char read_rtc_register(unsigned char reg_num) {
    unsigned char rv;
    asm pushf;
    asm cli;
    outportb(0x70, reg_num);
    asm jmp SHORT $+2
    asm jmp SHORT $+2
    asm jmp SHORT $+2
    rv = inportb(0x71);
    asm popf;
    return rv;
    }

void write_rtc_register(unsigned char reg_num, unsigned char value) {
    asm pushf;
    asm cli;
    outportb(0x70, reg_num);
    asm jmp SHORT $+2
    asm jmp SHORT $+2
    asm jmp SHORT $+2
    outportb(0x71, value);
    asm popf;
    return;
    }
7.35.2 ALLOCATION OF THE RTC REGISTERS
The first 10 registers (registers 0 to 9) are the date and time registers (including the alarm settings). These registers cannot be accessed during the update period, which is approximately two milliseconds long and occurs every second (details are given later). Registers 10 to 13 are control registers. The remaining registers (14-63 on a standard MC146818 which has 64 registers, or 14-127 on an enhanced version) are general purpose CMOS RAM locations, which are used by the BIOS to store setup information, and do not relate to timing.
The time and date values are configurable for either packed BCD or binary data format, but the BIOS uses the packed BCD format, and some workalike chips do not support binary format, so for practical purposes, packed BCD format is mandatory. See the glossary for a description of packed BCD.
Important! The date and time registers (registers 0 to 9) will yield correct values only if no update is in progress. See notes on Register A for details. These registers should not be written unless the ‘Set’ bit in Register B is set. See notes on Register B for details.
The registers are as follows:
Reg    Function        Format                    Range
---    --------        ------                    -----

0    Seconds            Two digit packed BCD    0 to 59
1    Seconds alarm    Two digit packed BCD    0 to 59
2    Minutes            Two digit packed BCD    0 to 59
3    Minutes alarm    Two digit packed BCD    0 to 59
4    Hours            See below
5    Hours alarm        See below
6    Day of week        BCD                        1 to 7 (see below)
7    Date of month    Two digit packed BCD    1 to 31
8    Month            Two digit packed BCD    1 to 12
9    Year            Two digit packed BCD    0 to 99
10    Register A        See below
11    Register B        See below
12    Register C        See below
13    Register D        See below
The hours and hours alarm registers (registers 4 and 5) are formatted in 12-hour or 24-hour mode, depending on the setting of bit 1 of Register B (see the description for this bit). In 12-hour mode, bits 6-0 of the hours registers are the hours value, in the range 1 to 12, and bit 7 is the PM indicator (set indicates PM). In 24-hour mode, bits 7-0 of the hours registers are in 24-hour format (range 0 to 23).
The seconds alarm, minutes alarm, and hours alarm registers may be set to a value from 0C0 hex to 0FF hex to indicate ‘don’t care’. For example if the seconds alarm value is zero, the minutes alarm value is 30 (stored in packed BCD form, of course), and the hours alarm value is 0FF hex, the alarm will be signalled at half past every hour. Note that this ‘don’t care’ function may not be implemented in all ASIC workalikes.
The day of week register (register 6) simply counts 1, 2, 3, 4, 5, 6, 7, 1, 2… where 1 means Sunday, 2 means Monday, etc. The RTC does not calculate the day of the week from the date. This register must be set by software. It is not used by the BIOS RTC functions or by DOS and will not necessarily be set correctly. Software normally calculates the day of week from the other date information rather than using this register. The RTC uses this register to switch between standard time and daylight saving time if daylight saving is enabled, but the daylight saving function is not used in PCs so there is no need to make sure that this register is set correctly.
7.35.3 RTC REGISTER A
Register A is register number 10. It is read/write except bit 7, which is read-only:
    7 6 5 4 3 2 1 0
    * . . . . . . .  Update In Progress (UIP) flag
    . * * * . . . .  Prescaler control bits
    . . . . * * * *  Periodic Interrupt rate control
The UIP flag, if set, indicates that an update is in progress or is imminent. An update occurs once every second and takes approximately two milliseconds. During the update period, the values read from the date and time registers (though not the alarm registers) are changing and are not valid, because the RTC chip operates quite slowly internally (being low power CMOS) and it takes a while for an update to ‘ripple through’ from the seconds register all the way up to the year register.
If the UIP flag is set, the date and time registers (registers 0-9) should not be accessed. Software must wait until the UIP flag becomes clear before reading any time or date related registers. The UIP flag becomes active approximately 244 us prior to the start of the update cycle, therefore the read or write operation must take less than 244 us to ensure that it completes before the update cycle begins.
The Prescaler control bits determine what crystal frequency the RTC expects, and allow the prescaler and divider to be held reset. The values are:
    bit  6 5 4

         0 0 0    Operation with 4.194304 MHz crystal
         0 0 1    Operation with 1.048576 MHz crystal
         0 1 0    Operation with 32768 Hz crystal (default)
         0 1 1    Undefined
         1 0 x    Undefined
         1 1 x    Hold prescaler and divider reset (stops counting)
(x means don’t-care)
While the prescaler and divider are held reset, counting and updating ceases. The first update will occur half a second after this condition is removed.
The Periodic Interrupt rate control bits determine the periodic interrupt rate (d’oh :-) Here are the values:
    bit  3 2 1 0    Period                  Ints per second

         0 0 0 0    No periodic interrupt
         0 0 0 1    3.90625 ms              256 (see note below)
         0 0 1 0    7.8125 ms              128 (see note below)
         0 0 1 1    122.0703125 us          8192
         0 1 0 0    244.140625 us          4096
         0 1 0 1    488.28125 us          2048
         0 1 1 0    976.5625 us              1024 (BIOS default)
         0 1 1 1    1.1953125 ms          512
         1 0 0 0    3.90625 ms              256
         1 0 0 1    7.8125 ms              128
         1 0 1 0    15.625 ms              64
         1 0 1 1    31.25 ms              32
         1 1 0 0    62.5 ms                  16
         1 1 0 1    125 ms                  8
         1 1 1 0    250 ms                  4
         1 1 1 1    500 ms                  2
Note: Combinations 0001 and 0010 duplicate 1000 and 1001 respectively. If the RTC is operating from a 1MHz or 4MHz crystal (prescaler control bits are 00x), combinations 0001 and 0010 give interrupt rates of 30.517578125 us (32768 interrupts per second) and 61.03515625 us (16384 interrupts per second) respectively. 1MHz and 4MHz crystals are not used with RTCs in PCs because of the increased power consumption.
7.35.4 RTC REGISTER B
Register B is register number 11. It is fully read/write:
    7 6 5 4 3 2 1 0
    * . . . . . . .  Set flag (1 = set mode)
    . * . . . . . .  PIE, Periodic Interrupt Enable (1 = enable)
    . . * . . . . .  AIE, Alarm Interrupt Enable (1 = enable)
    . . . * . . . .  UIE, Update Interrupt Enable (1 = enable)
    . . . . * . . .  SQWE, Square wave enable, not used in PCs
    . . . . . * . .  DM, BCD/binary mode (1 = binary)
    . . . . . . * .  12/24-hour mode (0 = 12-hour, 1 = 24-hour)
    . . . . . . . *  DSE, Daylight Saving Enable (1 = enable)
The Set flag must be set by software before any real-time registers (current date and time) are modified. When the bit is set, any real-time register update in progress is aborted, and while the bit is set, updates are prevented and the UIP bit in Register A remains clear. After setting the real-time registers, the SET bit must be cleared to resume normal operation.
The PIE, AIE, and UIE enable the periodic, alarm, and update interrupts respectively, if set. The periodic interrupt occurs regularly as defined by bits 0-3 of Register A. The update interrupt, if enabled, occurs every second, immediately following an update. The alarm interrupt occurs whenever the hours, minutes and seconds registers match the time programmed into the alarm registers. See the note after the register list for alarm register details.
The SQWE bit enables the square wave output at the frequency set by bits 0-3 of Register A. This pin is not used in PC applications.
If the 12/24-hour mode is changed, the hours register should be reprogrammed.
Daylight Saving mode, if enabled, causes the time to jump forward from 01:59:59 to 03:00:00 on the morning of the last Sunday in April, and backward from 01:59:59 to 01:00:00 on the last Sunday in October. The day of week register must be set correctly for this to work properly. The PC does not use this function.
7.35.5 RTC REGISTER C
Register C is register number 12. It is read-only; writes are ignored. It contains three interrupt source flags and the combined interrupt flag.
    7 6 5 4 3 2 1 0
    * . . . . . . .  IRQF (combined interrupt flag)
    . * . . . . . .  PF (periodic flag)
    . . * . . . . .  AF (alarm flag)
    . . . * . . . .  UF (update flag)
    . . . . * * * *  Unused; zero, read-only
The three interrupt source flags are set if the condition that would generate the interrupt has occurred, regardless of whether the interrupt source is enabled (via Register B). These can be used to permit software polling of these conditions, if generating an actual interrupt is not justified.
Any active interrupt source flags are cleared immediately after reading this register; thus if several interrupt sources are active, the software must be careful to check for each possible interrupt flag after every read of this register, otherwise a signal may be missed.
The IRQF flag (combined interrupt flag) is set if the interrupt output from the RTC chip is active. This will be true if any of the interrupt source flags in this register are set in conjunction with that interrupt source being enabled via Register B.
7.35.6 RTC REGISTER D
Register D is register number 13. Only bit 7 is meaningful, and this bit is read-only.
    7 6 5 4 3 2 1 0
    * . . . . . . .  VRT, Valid Ram and Time flag
    . * * * * * * *  Unused; zero, read-only
The VRT flag indicates whether a power-up has occurred. It is cleared during loss of supply voltage, and is set immediately after a read of Register D.
7.35.7 READING THE RTC
When reading the RTC’s real-time registers it is necessary to avoid reading them during the update period, during which time they cannot be accessed by the processor (reading registers will yield undefined values, and writes will be ignored). Registers A, B, C, and D can be accessed at any time.
Your software can use the UIP flag bit in Register A to determine whether an update is in progress or imminent. If this flag is clear, your software then has up to 244 us in which to perform the desired register access(es), and may then re-check the UIP flag and make more accesses if appropriate.
If the UIP flag is set, the software may have to wait up to approximately 2.25 ms before the UIP flag is clear. If such a long delay in a read-RTC function is undesirable, a possible solution in some cases could be to store the time each time the RTC is read, and if the RTC is not available due to an update cycle being in progress, return the most recently read RTC value instead.
Alternatively, the Update Interrupt and/or the Update Flag in Register C can be used to schedule reads of the RTC so they occur immediately after an update, either under interrupt (if the RTC interrupt is not required for any other purpose), or by polling the Update Flag and reading the real-time registers as soon as the flag reads as ‘1’ (assuming no long background processes are active, this gives the code almost a whole second to make its RTC accesses before the next update cycle will begin.
7.35.8 SAMPLE PROGRAM: A TSR CLOCK USING INT 8 AND THE RTC
This program is a TSR which hooks interrupt 8 and uses the RTC to display a persistent HH:MM:SS format time in the top right corner of the screen.
        NAME    SAMPLE10

; Sample program #10
; Demonstrates a TSR clock using int 8 and reading the RTC directly
; Part of the PC Timing FAQ / Application notes
; By K. Heidenstrom ([email protected])
;
; This program assembles into SAMPLE10.COM, a TSR program which displays the
; current time in the top right corner of the screen in text modes.  It uses
; int 8 to get execution 18.2065 times per second, reads the RTC time directly
; from the RTC chip, and updates the screen every second.  This program does
; not attempt to ascertain that an RTC is present.  Also, it has no uninstall
; facility.
;
; If a non-standard video mode (i.e. mode 14 hex or higher) is in use, this
; program will assume that it is a text mode.  This will probably result in
; disturbance to the display in high resolution graphics modes.  This program
; is intended to be instructional only.
;
; Save this file to SAMPLE10.ASM and assemble with:
;    masm SAMPLE10;
;    link SAMPLE10;
;    exe2bin SAMPLE10.exe SAMPLE10.com
; or
;    tasm SAMPLE10;
;    tlink /t SAMPLE10;
;

ComFile        SEGMENT
        ASSUME    cs:ComFile,ds:ComFile,es:nothing,ss:nothing

        ORG    100h        ; COM-type file

Main        PROC    near
        jmp    Main2
Main        ENDP

Hours        DB    0FFh        ; Hours (BCD) of last update
Minutes        DB    0FFh        ; Minutes (BCD) of last update
Seconds        DB    0FFh        ; Seconds (BCD) of last update

        ASSUME    ds:nothing

; The following function handles int 8, the timer tick interrupt.  It reads
; Register A and checks for an update in progress, and skips if so.  It
; then reads the seconds register and checks to see whether he seconds have
; changed.  If they have, it reads the hours and minutes registers also, and
; then displays the current time in HH:MM:SS format in the top right hand
; corner of the screen if the screen is currently in text mode.
;
; This procedure calls no DOS or BIOS functions.
;
; Note that the whole routine, and also the DisplayTime subroutine which is
; called by this routine, and its subroutines, run with interrupts disabled.

NewInt08    PROC    far        ; Int 8 intercepter
        pushf            ; Preserve flags
        push    ax        ; Keep register
        cli            ; Just in case
        mov    al,0Ah        ; Register number for register A
        out    70h,al        ; Set it
        jmp    SHORT $+2    ; Delay
        in    al,71h        ; Read register
        and    al,80h        ; Test update-in-progress flag
        jnz    Chain08        ; If busy, do it next time
        jmp    SHORT $+2    ; Delay
        out    70h,al        ; Select register zero - seconds
        jmp    SHORT $+2    ; Delay
        in    al,71h        ; Read seconds
        cmp    al,Seconds    ; Did seconds change?
        je    Chain08        ; If not, do nothing on this interrupt
        mov    Seconds,al    ; Store new seconds
        mov    al,2        ; Minutes register
        jmp    SHORT $+2    ; Delay
        out    70h,al        ; Set it
        jmp    SHORT $+2    ; Delay
        in    al,71h        ; Get minutes
        mov    Minutes,al    ; Store
        mov    al,4        ; Hours register
        jmp    SHORT $+2    ; Delay
        out    70h,al        ; Set it
        jmp    SHORT $+2    ; Delay
        in    al,71h        ; Get hours
        mov    Hours,al    ; Store
        call    DisplayTime    ; Display the time
Chain08:    pop    ax        ; Restore
        popf            ; Restore
        DB    0EAh        ; JMP xxxx:yyyy
Old08Ofs    DW    0        ; Vector to original handler - Offset
Old08Seg    DW    0        ; Segment
NewInt08    ENDP

; This procedure uses the time values stored in Hours, Minutes, and Seconds to
; create a time value in the form HH:MM:SS and stores this to the top right
; corner of the screen.  It checks the current video mode to avoid overwriting
; video memory incorrectly when a graphics mode is active, and also supports
; non-standard screen resolutions.  It does not support Hercules graphics mode,
; because there is no standard video mode number for this mode as it is not
; officially recognised by IBM.

DisplayTime    PROC    near        ; Display the current time
        push    ds        ; Need DS
        xor    ax,ax        ; Zero
        mov    ds,ax        ; Address BIOS vars using DS
        mov    al,ds:[449h]    ; Get video mode
        cmp    al,4        ; Check for modes 0-3 (text)
        jb    TextMode    ; If so
        cmp    al,7        ; Check for MDA text mode
        je    TextMode    ; If so
        cmp    al,14h        ; Check for last standard graphics mode
        jb    GraphMode    ; If graphics, otherwise assume text
TextMode:    push    bx        ; Keep BX
        mov    al,ds:[484h]    ; Get number of lines minus one
        inc    ax        ; Get number of lines (not minus one)
        mov    ah,ds:[462h]    ; Get active page
        mul    ah        ; Get starting line number
        add    ax,ds:[44Ah]    ; Add number of columns
        shl    ax,1        ; Get offset of end of line
        sub    ax,18        ; Back up to 9 chars back from end
        xchg    ax,bx        ; To BX
        cmp    BYTE PTR ds:[463h],0B4h ; Check for monochrome
        mov    ax,0B000h    ; Prepare for monochrome
        je    HaveRegen    ; If so
        mov    ah,0B8h        ; If not, use CGA regen buffer
HaveRegen:    mov    ds,ax        ; Address regen buffer with DS
        mov    WORD PTR ds:[bx-2],720h ; Space before time
        mov    al,Hours    ; Get hours
        and    al,7Fh        ; Mask off AM/PM bit
        call    StoreBCD    ; Convert BCD to ASCII and store
        mov    al,Minutes    ; Get minutes
        call    StoreColonBCD    ; Convert BCD to ASCII and store
        mov    al,Seconds    ; Get seconds
        call    StoreColonBCD    ; Convert BCD to ASCII and store
        mov    WORD PTR ds:[bx],720h ; Space after time
        pop    bx        ; Restore BX
GraphMode:    pop    ds        ; Fix up
        ret            ; Done
DisplayTime    ENDP

StoreColonBCD    PROC    near
        mov    WORD PTR ds:[bx],":"+700h ; Colon (with attribute)
        inc    bx
        inc    bx        ; Bump pointer
StoreBCD    PROC    near
        push    ax        ; Keep
        shr    al,1
        shr    al,1
        shr    al,1
        shr    al,1
        call    StoreBCDChar
        pop    ax
        and    al,0Fh
StoreBCDChar    PROC    near
        add    al,"0"
        mov    ah,7
        mov    ds:[bx],ax
        inc    bx
        inc    bx        ; Bump pointer
        ret
StoreBCDChar    ENDP
StoreBCD    ENDP
StoreColonBCD    ENDP

Discard        EQU    $        ; Discard point
TSRParas    =    (OFFSET (Discard-@curseg+15) SHR 4)

        ASSUME    ds:ComFile

SignOnMsg    DB    "Sample program #10 - TSR clock using int 8 and direct RTC access",13,10
        DB    "Part of the PC Timing FAQ / Application notes",13,10
        DB    "By K. Heidenstrom ([email protected])",13,10
        DB    "Installed",13,10,13,10,"$"

; Check DOS version

Main2        PROC    near
        mov    ah,30h
        int    21h
        cmp    al,2        ; Expect DOS 2.0 or later
        jae    DOS_Ok
        int    20h

; Intercept int 8

DOS_Ok:        mov    ax,3508h
        int    21h        ; Get vector for int 8
        mov    [Old08Ofs],bx
        mov    [Old08Seg],es    ; Store it

        mov    dx,OFFSET NewInt08
        mov    ax,2508h
        int    21h        ; Set new vector

        mov    es,ds:[2Ch]    ; Get segment of environment block
        mov    ah,49h
        int    21h        ; Deallocate our copy of environment

        mov    dx,OFFSET SignOnMsg
        mov    ah,9
        int    21h        ; Display message

        mov    dx,TSRParas    ; Number of paragraphs to leave resident
        mov    ax,3100h
        int    21h        ; Go resident
Main2        ENDP

ComFile        ENDS
        END    Main
This program demonstrates why interrupts must be locked out during manipulation of hardware devices such as the RTC, because this TSR’s int 8 handler explicitly changes the address register in the RTC on each timer tick. If some foreground code set the address register then made an access to the data register, without disabling interrupts around the sequence, very occasionally an int 8 could be signalled between the address register access and the data register access, causing an incorrect value to be read or causing the time to change to a random or meaningless value. This type of bug could be almost impossible to track down. This is why it is important to follow these guidelines, though programs that do not follow these guidelines often appear to work correctly.
This is also a good example of a TSR which lengthens processing of int 8 and also lengthens this processing unevenly; most int 8 calls will be lengthened only slightly, but every time the seconds change, the int 8 invocation will be lengthened by a much greater amount. See section 6.16.1.
7.36 THE RTC INTERRUPT AND RELATED BIOS FUNCTIONS
The RTC interrupt is IRQ8, which maps to int 70 hex. It does not exist on the PC and XT. This interrupt is invoked when any enabled interrupt source in the RTC issues an interrupt, providing that IRQ8 is enabled in the secondary PIC’s Interrupt Mask Register (section 6.10) and IRQ2, the cascade interrupt, is enabled in the primary PIC’s IMR. See section 7.35.4 for info on how to enable and disable the four interrupt sources in the RTC.
Usually, only the Alarm and the Periodic Interrupt triggers on the RTC are ever used. The RTC interrupt is used in three ways:
- The 24-hour Alarm signal from the RTC (see section 3.4),
- The Event Wait and Delay functions of the BIOS (section 7.36.1),
- User programs (e.g. slow-down programs or programs that measure the execution time of other programs).
The Alarm signal uses the Alarm function of the RTC (obviously), and this interrupt source is only enabled if the appropriate BIOS function has been called to enable the alarm function.
The other two uses of int 70h involve the periodic interrupt from the RTC, which is operated at 1024 interrupts per second (see section 7.35.3), giving an interrupt every 976.5625 microseconds. This interrupt source on the RTC is only enabled when the BIOS Event Wait or Delay functions are requested, unless explicitly enabled by a foreground program or TSR directly accessing the RTC registers.
IRQ8 (int 70h) must also be enabled in the PIC IMR. Often it will be left enabled, and the various interrupt sources will be controlled at the RTC, but some BIOSes may also disable the interrupt level when it is no longer required.
7.36.1 THE BIOS EVENT WAIT AND DELAY FUNCTIONS
On AT and later machines, the BIOS provides an ‘event wait’ function and a delay function, that use the RTC interrupt for timing.
The ‘event wait’ and delay functions use nine bytes of RAM in the BIOS data area, which are defined as follows:
Address     Type         Description

0040:0098   Far ptr     Pointer to byte to be set to 80h when event
                        wait completes
0040:009C   DWord       Counter (down-counter, microseconds)
0040:00A0   Byte        Status:
                        00h = Idle
                        01h = Event Wait or Delay in progress
                        80h = Delay time elapsed (transitional)
The functions are as follows.
Set Event Wait :    int 15h
    Call with:      AX = 8300 hex
                    CX = Time to wait (microseconds) hiword
                    DX = Time to wait (microseconds) loword
                    ES:BX = Pointer to flag to be set when complete
    Returns:        CF = Error indication (see below)
This function sets up control information in the BIOS data area, and starts an ‘event wait’ timeout by enabling IRQ8 (int 70h) in the PIC and enabling the periodic interrupt via the RTC. It returns to the caller while the event wait is in progress. The event wait is counted down in the background, by the BIOS’s IRQ8 (int 70h) handler. When the specified time elapses, the interrupt handler sets the byte that was pointed to by ES:BX when the function was invoked, to 80h, and the wait is complete.
If this function is called when an event wait or delay function (described later) is in progress, it will return with carry set and ignore the request. If the function is not supported by the BIOS, it will return with carry set and AH set to 80h or 86h.
Cancel Event Wait : int 15h
    Call with:      AX = 8301 hex
    Returns:        CF = Error indication
This function cancels the event wait currently in progress. It disables the periodic interrupt in the RTC and resets the event wait status byte at 0040:00A0 to zero.
Delay : int 15h
    Call with:  AH = 86 hex
                CX = Time to delay (microseconds) hiword
                DX = Time to delay (microseconds) loword
    Returns:    CF = Error indication
This function delays for the number of microseconds specified in CX and DX, and returns with carry clear when the delay is complete. It returns with carry set and AH set to 80h or 86h if the function is unsupported. It returns with carry set if the delay function was called while an Event Wait or another Delay was in progress.
This function uses the same data structure as the Event Wait function, but sets the pointer that determines the byte to be set to 80h when the wait completes, to point to the status byte.
The time for these functions is specified in microseconds, but the resolution is only 977 us, since timing is done using the RTC interrupt. The periodic interrupt in the RTC is not resynchronised by the function, so there is also a 977 us uncertainty at the start of the time period, which limits accuracy of short delays. Also, IRQ8 (int 70h) occurs every 976.5625 us but the handler subtracts 977 from the count each time. This is an error of 0.0448% (448 ppm, 38.71 seconds per day). This error is cumulative and could become significant on long delays (it will make the delay shorter than expected).
If any software locks out interrupts for more than 977 us at a time, interrupts will be missed and the time period will be extended. The BIOS joystick reading function (section 10.4.2) and the joystick position reading function given in section 10.4.4 may cause this problem.
I have heard that the Event Wait function is used by the hard disk and floppy disk BIOS code, but I don’t know the details. Info is welcomed. (*)
7.36.2 THE BIOS RTC INTERRUPT HANDLER
The BIOS has its own IRQ8 (int 70h) handler, which counts down the Event Wait or Delay time value and sets the flag byte to 80h when the time expires (see section 7.36.1 for the gory details). The handler makes use of the three variables in the BIOS data area which are described in section 7.36.1. The exact behaviour may vary from one BIOS to another but is something like:
First, check whether an alarm interrupt occurred (using Register C of the RTC, see section 7.35.5). If so, invoke int 4Ah (see section 3.4). Then check whether a periodic interrupt occurred. If so, subtract 977 from the unsigned long microsecond counter (see section 7.36.1). If this resulted in the long variable borrowing (i.e. wrapping around from a small positive number to a negative number), zero the status flag (see section 7.36.1), disable the regular interrupt source in the RTC, then set to 80 hex the byte pointed to by the far pointer in the BIOS data area (see section 7.36.1 again).
The RTC interrupt handler in some BIOSes may unconditionally turn off the periodic interrupt enable in the RTC if the status flag (see section 7.36.1 again) is zero, to avoid unnecessary processor overhead (1024 interrupts per second can be significant).
7.36.3 USING THE RTC INTERRUPT
The RTC interrupt is int 70h (IRQ8). When a program uses the RTC interrupt, it should chain to the original handler, because the BIOS may be in the middle of a Delay or Event Wait. The BIOS’s int 70h handler may interfere with your program, by turning off the periodic interrupt enable in the RTC, so your int 70h handler must re-enable it after calling the BIOS’s handler.
The BIOS’s handler will also count down the microseconds counter (see sections 7.36.1 and 7.36.2) and when it borrows, will set a memory variable at the address pointed to by the pointer in the BIOS data area, to 80 hex. This may not be desirable, as this pointer may be uninitialised, or may point to a variable in a program that is no longer running, etc. Therefore your program should be careful to prevent the BIOS’s handler from doing this. This is demonstrated in the sample program in section 7.36.4.
7.36.4 SAMPLE PROGRAM: USING THE RTC INTERRUPT
/*
Sample program #11
Demonstrates using the RTC periodic interrupt
Part of the PC Timing FAQ / Application notes
By K. Heidenstrom ([email protected])

Save and assemble the critical error module CRIT_ERR
Save this sample code to SAMPLE11.C
Compile this module with:
    bcc -c -I<inc_path> -ms sample11.c
Link the modules with:
    tlink /c /x <c0_path>\c0s.obj sample11.obj crit_err.obj,
        sample11, nul, <lib_path>\cs
Where inc_path is the path to your C header files, c0_path is the path to your
startup modules C0x.OBJ and lib_path is the path to your C libraries Cx.LIB.
*/

#pragma inline;        /* Required for asm pushf, popf, and cli */

#include <bios.h>    /* Needed for bioskey() */
#include <dos.h>    /* Needed for inportb(), outportb(), etc */
#include <io.h>        /* Needed for _write() */
#include <stdio.h>    /* Needed for printf() */
#include <stdlib.h>    /* Needed for exit() */

#define FALSE 0
#define TRUE 1

#define STDERR 2    /* DOS handle for standard error */

static unsigned long rtcticks;        /* Counter for RTC interrupts */

void crit_err_intercept(void);        /* Provided in CRIT_ERR.OBJ */
unsigned int is_at_crit_prompt(void);    /* Provided in CRIT_ERR.OBJ */

typedef void interrupt (far *intfuncp)();    /* Pointer to an int handler */

intfuncp old_int70 = (intfuncp)0xFFFFFFFFL;

unsigned char read_rtc_register(unsigned char reg_num) {
    unsigned char rv;
    asm pushf;
    asm cli;
    outportb(0x70, reg_num);
    asm jmp SHORT $+2
    asm jmp SHORT $+2
    asm jmp SHORT $+2
    rv = inportb(0x71);
    asm popf;
    return rv;
    }

void write_rtc_register(unsigned char reg_num, unsigned char value) {
    asm pushf;
    asm cli;
    outportb(0x70, reg_num);
    asm jmp SHORT $+2
    asm jmp SHORT $+2
    asm jmp SHORT $+2
    outportb(0x71, value);
    asm popf;
    return;
    }

void enable_rtc_int(void) {
    asm pushf;
    asm cli;
    write_rtc_register(0x0B, read_rtc_register(0x0B) | 0x40);
    outportb(0xA1, inportb(0xA1) & 0xFE);
    outportb(0x21, inportb(0x21) & 0xFB);
    asm popf;
    return;
    }

void interrupt int70_handler(void) {
    if (read_rtc_register(0x0C) & 0x40)
        ++rtcticks;    /* Increment RTC tick counter */
    (old_int70)();    /* Chain to BIOS int 70h handler */
    enable_rtc_int(); /* Make sure RTC int is still enabled */
    if (* ((unsigned int far *)MK_FP(0x40, 0x9E)) > 0xFFFD)
    * (unsigned int far *)MK_FP(0x40, 0x9E) = 0xFFFF;
    return;            /* From interrupt */
    }

void abort_cleanup(int dos_is_safe) {
    if (dos_is_safe) {
        if (old_int70 != (intfuncp)0xFFFFFFFFL) {
            setvect(0x70, old_int70);
            old_int70 = (void far *)0xFFFFFFFFL;
            }
        }
    else {
        if (old_int70 != (intfuncp)0xFFFFFFFFL) {
            *((intfuncp far *)MK_FP(0, 0x70 << 2)) = old_int70;
            old_int70 = (void far *)0xFFFFFFFFL;
            }
        }
    return;
    }

void interrupt ctrl_c_handler(void) {
    static char message[] = "\r\nProgram terminated by Ctrl-Break or Ctrl-C\r\n";
    if (is_at_crit_prompt())
        abort_cleanup(FALSE);
    else {
        abort_cleanup(TRUE);
        _write(STDERR, &message, sizeof(message));
        }
    exit(255);
    }

void main(void) {
    unsigned long msecs, secs;
    unsigned int partial;

    printf("Sample program #11 - Demonstrates using the RTC interrupt\n");
    printf("Part of the PC Timing FAQ / Application notes\n");
    printf("By K. Heidenstrom ([email protected])\n\n");
    printf("Press <Esc> to exit\n\n");

    crit_err_intercept();        /* Trap critical errors */
    setvect(0x23, ctrl_c_handler);    /* Trap Ctrl-C interrupt */
* (unsigned int far *)MK_FP(0x40, 0x9E) = 0xFFFF;
    old_int70 = getvect(0x70);
    setvect(0x70, int70_handler);

    asm cli;        /* 1024 interrupts per second */
    write_rtc_register(0x0A, (read_rtc_register(0x0A) & 0xF0) | 0x06);
    asm sti;
    enable_rtc_int();

    while (1) {
        asm cli;
        msecs = rtcticks;
        asm sti;
        msecs *= 125;        /* Calculate * 125 / 128 */
        msecs >>= 6;
        if (msecs & 1)
            ++msecs;    /* Round up */
        msecs >>= 1;
        secs = msecs / 1000;
        partial = msecs % 1000;
        printf("%ld.%03d seconds\r", secs, partial);
        if (bioskey(1))
            if ((bioskey(0) & 0xFF) == 27)
                break;
        }

    setvect(0x70, old_int70);
    old_int70 = (void far *)0xFFFFFFFFL;

    exit(0);
    }
The int70_handler() function first checks that this int 70h is caused by the periodic interrupt, and if so, it increments its counter. It then calls the BIOS int 70h handler unconditionally. The BIOS handler will send the EOI to both PICs and will probably turn off the periodic interrupt enable flag in the RTC, so this handler turns the periodic interrupt back on. It also tries to ensure that no problems will occur with the timeout detection of the BIOS’s handler. When the long microseconds counter at 0040:009C is decremented below zero by the BIOS handler, the BIOS handler writes to a memory variable pointed to by the pointer at 0040:0098, and this pointer may not have been initialised. By keeping the microsecond count at 0xFFFFxxxx, this routine prevents this problem. The mainline also sets the microsecond counter to 0xFFFFxxxx. This should allow the Delay and Event Wait functions to be used without interference from this program.
7.37 USING CTC CHANNEL ONE AND REFRESH DETECT
My thanks to William Luitje ([email protected]) for introducing me to this technique. William reports that it is used by the AMI BIOS during floppy disk operations.
As shown in section 7.5, bit 4 of Port B at I/O address 61 hex on an AT and later machine is a read-only bit carrying a signal called Refresh Detect. This signal comes from a ‘T’ (toggle) flip-flop which is clocked by the refresh trigger signal, which comes from CTC channel one. I assume it is used by the BIOS POST (Power-on self-test) to check that CTC channel one is functioning correctly (IBM’s paranoid self-test code has to test every single logic gate on the entire motherboard - this from the people who created the error message “Keyboard error or no keyboard present - press F1 to continue” :-)
Assuming that the RAM refresh rate has not been changed (see section 7.4.3), this bit will toggle (change from 0 to 1 or from 1 to 0) once every 15.0857 microseconds (the exact value is 216/14.31818), and Port B can be polled in a loop to implement a delay of any length. For short delays, with interrupts locked out, this gives an accurate and very convenient relative delay mechanism. However, for long delays, it would be naughty to leave interrupts locked out for the entire delay period, and interrupts will cause gaps in the polling process, slightly lengthening the delay (it will wait longer than expected).
There are several caveats. This method will not work on PCs and XTs. Also it will not work in an environment where Port B is emulated (for example, under OS/2 and probably any other virtual DOS machine). Finally, if the DRAM refresh period has been changed, the timing will be changed proportionately.
7.37.1 SAMPLE PROGRAM: TIMING THE REFRESH DETECT SIGNAL
This program uses CTC channel 2 to measure a sampling period of half a second with interrupts locked out, and counts the number of transitions on the Refresh Detect signal during this period. It displays the value after each half-second sample, and repeats the sample continuously until Ctrl-C is pressed.
Warnings about using this program: It will not work on an emulated machine, i.e. under OS/2 or any other multi-tasking operating system that gives it a virtual DOS machine. The program will not run on an old PC or XT; an AT or later machine is required. The program will disrupt the DOS time of day, so the machine should be rebooted after running this program if that is a problem. Also, it does not check the absolute accuracy of the Refresh Detect signal; the signal being measured and the sample timer are both derived from the same clock source.
The joystick reading sample program in section 10.4.4 also demonstrates the Refresh Detect signal used as a timing reference.
        NAME    SAMPLE12

; Sample program #12
; Demonstrates timing the Refresh Detect signal
; Part of the PC Timing FAQ / Application notes
; By K. Heidenstrom ([email protected])
;
; This program assembles into SAMPLE12.COM, a small program which measures the
; number of DRAM refreshes in a half-second interval.  It uses CTC channel 2
; in mode 3 to measure half-second sample periods, and counts the number of
; transitions on the Refresh Detect signal on Port B bit 4.  After each
; half-second sample, the value is displayed, and the program repeats itself.
; To terminate the program, press any key and wait.
;
; Save this file to SAMPLE12.ASM and assemble with:
;    masm sample12;
;    link sample12;
;    exe2bin sample12.exe sample12.com
; or
;    tasm sample12;
;    tlink /t sample12;
;

CTC2Divisor    =    47727        ; 40ms
CTC2Toggles    =    25        ; Number of CTC channel 2 toggles
                    ;   expected in half a second
ComFile        SEGMENT
        ASSUME    cs:ComFile,ds:ComFile,es:nothing,ss:nothing

        ORG    100h        ; Com-type file

Main        PROC    near
        jmp    Main2        ; Skip
Main        ENDP

InitialMsg    DB    "Sample program #12 - Demonstrates timing the Refresh Detect signal",13,10
        DB    "Part of the PC Timing FAQ / Application notes",13,10
        DB    "By K. Heidenstrom ([email protected])",13,10,13,10,"$"
NotATMsg    DB    "Refresh Detect is supported on ATs and later machines; this machine appears",13,10
        DB    "to be a PC or XT.  The PC and XT do not support Refresh Detect.",13,10,"$"
ExplanationMsg    DB    "The numbers displayed are the counts of DRAM refreshes in a 1/2-second sample",13,10
        DB    "period.  For the standard DRAM refresh rate of 15.0857us, this number should",13,10
        DB    "be about 33144.  If you have run a program to slow down the DRAM refresh, the",13,10
        DB    "numbers will be lower.",13,10,13,10
        DB    "To terminate this program, press any key and wait",13,10
NewlineMsg    DB    13,10,"$"

Main2        PROC    near
        mov    dx,OFFSET InitialMsg ; Opening message
        mov    ah,9
        int    21h        ; Display it

; Determine machine type (code from section  7.5)

        pushf            ; Keep interrupt flag
        mov    cx,400h        ; Six attempts (top bits of CH)
        cli            ; Lock out interrupts during this stuff
        in    al,61h        ; Get Port B contents
        jmp    SHORT $+2    ; Short delay
        mov    ah,al        ; Original value to AH
Flip61Loop:    xor    ah,10000000b    ; Flip top bit
        mov    al,ah        ; Get value to AL
        out    61h,al        ; Write value to port
        jmp    SHORT $+2    ; Short delay
        jmp    SHORT $+2    ; Short delay
        in    al,61h        ; Read it back
        xor    al,ah        ; Set bit 7 if value didn't stay
        shl    al,1        ; Shift bit into carry
        rcl    cx,1        ; Shift bit into bottom of CX
        jnc    Flip61Loop    ; Loop if more flips (six in total).
        popf            ; Restore interrupt flag
        test    cl,cl        ; Was port read/write?    Zero if so.
        jnz    MachineAT    ; If it's an AT, continue

        mov    dx,OFFSET NotATMsg
        mov    ah,9
        int    21h
        mov    al,1        ; Errorlevel
        jmp    SHORT Terminate

MachineAT:    mov    dx,OFFSET ExplanationMsg
        mov    ah,9
        int    21h

        in    al,61h        ; Get Port B
        and    al,11111101b    ; Turn off speaker enable
        or    al,00000001b    ; Turn on Timer 2 Gate
        out    61h,al

        mov    al,0B6h        ; Set CTC channel 2 for mode 3,
        out    43h,al        ;   divisor of 47727, giving 20ms
        jmp    short $+2    ;   high, 20ms low
        mov    al,LOW CTC2Divisor
        out    42h,al
        jmp    short $+2
        mov    al,HIGH CTC2Divisor
        out    42h,al
        jmp    short $+2

MainLoop:    mov    cl,3        ; Set up shift count for later
        mov    bx,CTC2Toggles    ; Number of channel 2 transitions
        xor    dx,dx        ; Counter for refreshes

        cli            ; Lock out interrupts during sample

Loop1:        in    al,61h        ; Read Port B
        test    al,00100000b    ; Test CTC channel 2 readback
        jz    Loop1        ; Wait until high
Loop2:        in    al,61h        ; Read Port B
        test    al,00100000b    ; Test CTC channel 2 readback
        jnz    Loop2        ; Wait until low

        mov    ah,al        ; Keep old value in AH

Loop3:        in    al,61h        ; Read Port B
        xor    al,ah        ; Find different bits
        test    al,00110000b    ; Either bit changed?
        jz    Loop3        ; If not, loop
        xor    ah,al        ; Keep new value
        shl    al,cl        ; Bit 5 into carry
        sbb    bx,0        ; Decrement BX if T2 output changed
        jz    Done        ; If waited the full sample time
        shl    al,1        ; Bit 4 into carry
        adc    dx,0        ; Increment DX if refresh occurred
        jmp    SHORT Loop3    ; Loop

Done:        sti            ; Interrupts back on
        mov    ax,dx        ; Get refresh counter
        call    Mach16_DecASC    ; Convert to decimal and display
        mov    dx,OFFSET NewlineMsg ; CR/LF message
        mov    ah,9
        int    21h        ; Display it
        mov    ah,1        ; Test for keypress pending
        int    16h
        jz    MainLoop    ; If no key pending
        xor    ah,ah        ; Zero
        int    16h        ; Clear out the key
        xor    al,al        ; Errorlevel 0
Terminate:    mov    ah,4Ch        ; Terminate with errorlevel
        int    21h        ; Call DOS
        int    20h        ; In case DOS-1 (!)
Main2        ENDP

Mach16_DecASC    PROC    near
;                Func:    Convert machine 16-bit unsigned value
;                    to ASCII decimal representation and
;                    output via DOS function 2
;                In:    AX = Value to output
;                Out:    None
;                Lost:    AX BX CX DX
        xor    cx,cx        ; Zero digit counter
Mach16_DecASC1:    xor    dx,dx        ; Clear high word of value in DX|AX
        mov    bx,10        ; Base
        div    bx        ; Divide by 10
        add    dl,"0"        ; DL is remainder, convert to ASCII
        push    dx        ; Store on stack
        inc    cx        ; Increment char counter
        test    ax,ax        ; Any more digits left?
        jnz    Mach16_DecASC1    ; If so, loop
Mach16_DecASC2:    pop    dx        ; Get char back
        mov    ah,2        ; Print char
        int    21h        ; Call DOS
        loop    Mach16_DecASC2    ; Loop for all chars
        ret            ; Done
Mach16_DecASC    ENDP

ComFile        ENDS
        END    Main
7.37.2 SAMPLE CODE: DELAY(MILLISECONDS) FUNCTION USING REFRESH DETECT
This function uses the Refresh Detect signal to provide a delay(milliseconds) function. This function does not check that the refresh channel is operating with the correct divisor. It also does not check that it is running on an AT or later machine with the required Port B hardware. If required, these checks should be done at the start of the program that will use this function.
Params        =    4        ; USE 6 FOR FAR CODE MODELS!

_delay        PROC    near
        push    bp        ; Preserve BP
        mov    bp,sp        ; Address stacked parameters
        mov    cx,[bp+Params]    ; Get loword of number of milliseconds
        mov    dx,[bp+Params+2] ; Get hiword
        mov    bx,61714    ; Initialise negative count register
        in    al,61h        ; Read Port B initially
        mov    ah,al        ; To AH
        jmp    SHORT DelayDecr    ; Decrement count and loop if nonzero
DelayLoop:    in    al,61h        ; Read Port B
        xor    al,ah        ; Get different bits
        test    al,00100000b    ; Did Refresh Detect toggle?
        jz    DelayLoop    ; If not, keep waiting
        xor    ah,00100000b    ; Toggle last known state flag
        sub    bx,931        ; Approximating the number of Refresh
        jnb    DelayLoop    ;   of Refresh Detect toggles per
        add    bx,61714    ;   millisecond as 61714 / 931
DelayDecr:    sub    cx,1        ; One millisecond has elapsed
        sbb    dx,0        ; Borrow into hiword
        jnb    DelayLoop    ; If more milliseconds remaining
        pop    bp        ; Restore BP from caller
        ret
_delay        ENDP
The declaration for the above function is:
void delay(unsigned long milliseconds)
The actual number of Refresh Detect toggles per millisecond is 14318.18/216, or about 66.3. The above function approximates this ratio to be 61714/931, which contributes an error of 0.085767 ppm, less than 1/100th typical crystal error. The longest delay that can be generated (milliseconds = 0xFFFFFFFF) is 49 days, 17 hours, 2 minutes, and 47.295 seconds. For this duration, the error contributed by the approximation is about 0.368 seconds.
The delay(milliseconds) function may be called with interrupts enabled or with interrupts disabled. It does not modify the state of the interrupt flag during its execution.
If it runs with interrupts enabled, the actual length of the delay will normally be longer than specified, due to gaps in processing caused by the timer tick interrupt and any other active interrupts (keyboard interrupt, serial port interrupt, network card interrupt, etc).
If it runs with interrupts locked out, it will give an accurate delay, but it may disrupt the normal operation of the machine by preventing interrupts from being processed for an excessive length of time - see sections 6.15 to 6.19 for more information on this problem.
The uncertainty is one refresh period, or about 15.0857 microseconds. The overhead is a few microseconds on a fast machine, longer on a slow machine.
8 SPEEDING UP THE TIMER TICK
Note: This section makes many references to earlier sections. I recommend that if you are not familiar with the normal operation of the CTC, the timer tick interrupt, general interrupt considerations, and interrupt chaining, you should first read the related sections and any other sections that seem relevant.
Increasing the timer tick rate involves the following steps:
- Intercept int 8, redirecting it to your new int 8 handler
- Intercept and handle the Ctrl-C and Critical Error interrupts so that the int 8 vector can be restored if the program is terminated due to a Ctrl-C or a critical error
- Reprogram the CTC channel zero divisor for the new interrupt rate
- Maintain a counter within your int 8 handler to schedule chaining to the original int 8 handler
- Restore int 8 and restore the normal divisor upon termination
See section 6.3 for details of how to intercept an interrupt. See section 6.31 for information on chaining to the old interrupt handler, and section 5 and subsections for information about the Ctrl-C and Critical Error interrupts and how to handle them. See section 7.10 for how to program the divisor. See section 6.31 for details on how to chain to the original int 8 handler, and sections 6.28 and 6.28.1 for information on ending interrupt routines when they are not chained. The comments in section 6.15 and section 6.16 and subsections regarding interrupt jitter also apply when the timer tick is operated at a faster rate, because the maximum period for which interrupts can be locked out without loss of a timer interrupt becomes shorter as the timer interrupt rate is increased. Changing the divisor and/or operating mode of CTC channel 0 may also break the BIOS’s joystick reading functions (see section 10.4.2). Also see section 8.4.
The technique of speeding up the timer tick should not be used in TSRs because foreground programs are at liberty to use and reprogram the CTC chip for their own purposes.
8.1 THE FAST TICK INT 8 HANDLER
Having reprogrammed the timer tick interrupt to operate at a higher speed, you must ensure that other software that uses int 8 (see section 6.1) is called at the correct rate, i.e. 18.2065 times per second. This is achieved with a counter variable, which duplicates the behaviour of CTC channel zero when it is operating with the normal divisor of 65536 (see section 7.4 and subsections).
This operates by maintaining a 16-bit variable which accumulates CTC clock periods and will overflow after 65536 CTC clocks, indicating that another 54.9254 ms have elapsed. This variable is maintained by the new int 8 handler. Every time int 8 is signalled, the new channel zero divisor value (which represents the number of CTC clocks since the last int 8) is added into this variable, and if the variable carries (i.e. exceeds 65535 and wraps around), the old int 8 handler is called (i.e. is scheduled). If the variable does not wrap around, then the old int 8 handler is not called.
For example, assume CTC channel zero is operating with a divisor of 1234 (decimal). This will give a fast tick rate of 1193181.66666… / 1234, or about 967 ticks per second. Each time the new int 8 handler is triggered, 1234 CTC clocks have elapsed (since the last time it was triggered), so we add 1234 into the scheduler variable, representing the number of CTC clocks that have just elapsed.
When the variable wraps around (i.e. the processor’s carry flag is set after the addition), another 65536 CTC clocks have elapsed, so it is time to chain to the original int 8 handler, which expects to be called every 65536 CTC clocks (the “slow tick” rate, if you like). Thus the variable mimics the CTC channel zero counting register when programmed for a divisor of 65536.
Of course the slow ticks (calls to the old int 8 handler) will not be perfectly evenly spaced, but in almost all applications, variations are acceptable as long as they are not cumulative, and they will not be cumulative (unless fast ticks are missed, see section 6.16 and subsections), and if the new tick rate is high (like the example above) they will be fairly even. The worst slow tick jitter will occur with divisors near to 32768, where calls to the slow tick handler could be up to almost 32768 CTC clocks early or late. Even this will not be a problem under DOS, in most circumstances.
8.2 THE INTERFACE WITH THE MAINLINE
Generally the fast tick handler will have some sort of interface with the mainline (the foreground process) of your program. Typically this will be implemented via shared variables. These variables transfer control information from the mainline to the interrupt routine (as in the Morse code player example program described later), or may transfer status or time information from the interrupt routine to the mainline (as in the one millisecond timer program also described later), or a combination of both.
The shared variables can be put in either the code segment or the data segment. For a COM file (tiny model) the segments are the same, and this makes things quite convenient. See section 6.32.1 for more information.
8.3 WRITING A FAST TICK HANDLER
Fast tick handlers are often written in assembly language as it is more convenient and more efficient, though the latter advantage is largely mooted by the speed of modern processors.
Refer to section 6.32 and subsections for a discussion of guidelines that must be applied when writing an interrupt handler in assembly language. The fast tick handler must follow these guidelines.
After the housekeeping instructions, the fast tick interrupt handler should perform the function that it is required for, then before it exits, it should handle chaining to the slow tick interrupt handler. This involves adding the divisor value into the scheduler variable and deciding whether to chain to the slow tick handler or not.
If it decides to chain, it can use the JMP chaining method (see section 6.31 for details). If it does not chain, it must send an EOI signal to the PIC (see section 6.28) and return with an IRET. To support Microchannel machines, it may be necessary to acknowledge the int 8 - see section 6.28.1.
Here is an example fast tick interrupt handler written in assembler for tiny model (i.e. a COM file). It increments the FastTickCount variable on each fast tick. This variable is for use by the mainline.
FastTickRate    EQU    1234        ; This is the new fast tick rate

FastTickCount    DW    0        ; Counter variable for use by mainline
SlowTickSched    DW    0        ; Schedule control var for slow tick

        ASSUME    cs:_TEXT,ds:nothing,es:nothing,ss:nothing

NewInt8Handler    PROC    far
        pushf            ; Keep flags
        push    ax        ; Keep AX

        ; Push any other registers you will modify

        inc    FastTickCount    ; This is the 'action' in this example

        ; Pop any other registers you pushed, in
        ; reverse order, but do not pop AX or Flags

        add    SlowTickSched,FastTickRate ; Add ticks into variable
        jnc    NoSchedule    ; If it didn't carry

; Another 54.9254 ms has elapsed - chain to the slow tick handler

        pop    ax        ; Restore AX
        popf            ; Restore flags
        DB    0EAh        ; JMP xxxx:yyyy
Old08Ofs    DW    0        ; Vector to original handler - Offset
Old08Seg    DW    0        ; Segment

; Not time to chain yet - send EOI and return.    Note - may not support
; Microchannel machines which may require a hardware int 8 acknowledge
; signal to be issued.

NoSchedule:    mov    al,20h        ; EOI code for PIC
        out    20h,al        ; Send
        pop    ax        ; Restore AX
        popf            ; Restore flags
        iret
NewInt8Handler    ENDP
Of course to use this interrupt handler, you must have first intercepted int 8 and reprogrammed CTC channel zero with a divisor of 1234. Also for safety you must have intercepted the DOS Ctrl-C and Critical Error interrupts so that the original channel zero divisor, and original int 8 handler address, can be restored if the program terminates for either of these reasons.
8.4 COMMENTS ON FAST TIMER TICK INTERRUPTS
{JAM} makes some good comments about this (slightly paraphrased):
“Speeding up the timer tick interrupt presents two problems. The first is the increased load on the CPU, and the second is that any routine that disables interrupts for over twice the fast tick interrupt period will cause a missed interrupt. Masking for less then the interrupt period will cause interrupt delivery jitter and maybe the loss of a fast tick interrupt.
“In the days of 8 MHz ATs, the former problem was the dominant one; now with faster computers and more complicated operating systems and TSR programs, the more subtle second problem dominates.”
Klaus Hartnegg ([email protected]) tried using a fast timer interrupt at 4, 6, and 8 kHz, and reports “serious problems with interrupts generated by network and keyboard (especially bad with DOS’s KEYB.COM driver, a lot better with a freeware replacement). I have come to the conclusion that it’s probably not possible to rely on such a high frequency timer interrupt. There are too many periods of time with disabled interrupts that cause lost interrupts.”
8.5 SAMPLE PROGRAM: MORSE PLAYER USING FAST TIMER TICK
The following program demonstrates the techniques involved in operating the timer tick at a higher speed. The tickdiv variable contains the new divisor that is programmed into CTC channel zero. The int8sched variable controls chaining to the original handler. It duplicates the normal action of CTC channel zero when programmed with a divisor of 65536, as described in section 8.3.
A single queue interface is used to transfer control information from the mainline to the timer tick handler. The int 8 routine has full control of the speaker hardware, and generates beeps using CTC channel two in response to control words sent from the mainline via the queue.
Most of the code is fairly self-explanatory. The fast tick interrupt is chosen according to the speed selected via the command line parameter, which may be any number from 1 to 99. The speed doubles for each decade. There are ten divisors, contained in the tickdivs[] array. Within each decade of speed numbers, the tickdivs[] values give a smoothly increasing speed, then from one decade to the next, the number of interrupts per ‘dit’ or ‘dah’ goes up in powers of two, resulting in a smooth speed scale, with each decade giving a 2:1 increase in playback speed. For testing, a speed of 50 is reasonable.
By the way, when speaking Morse code, speak a ‘.’ as ‘dit’ and ‘-‘ as ‘dah’, and join a dit to any following dit or dah in the same letter code. So, for example, the Morse code for the letter C (“-.-.”) is spoken “dah-di-dah-dit”.
A proper Morse code player would be much more powerful, but this program is coming dangerously close to being useful. I will be more careful in future :-)
See section 6.22 for the explanation of the pushf/cli/popf technique.
/*
Sample program #13
Demonstrates fast timer tick
Part of the PC Timing FAQ / Application notes
By K. Heidenstrom ([email protected])

Save and assemble the critical error module CRIT_ERR
Save this sample code to SAMPLE13.C
Compile this module with:
    bcc -c -I<inc_path> -ms sample13.c
Link the modules with:
    tlink /c /x <c0_path>\c0s.obj sample13.obj crit_err.obj,
        sample13, nul, <lib_path>\cs
Where inc_path is the path to your C header files, c0_path is the path to your
startup modules C0x.OBJ and lib_path is the path to your C libraries Cx.LIB.
*/

#pragma inline;        /* Required for asm pushf, popf, and cli */

#include <bios.h>    /* Needed for bioskey() */
#include <dos.h>    /* Needed for MK_FP() */
#include <io.h>        /* Needed for _write() */
#include <stdio.h>    /* Needed for printf() */
#include <stdlib.h>    /* Needed for exit() */

#define FALSE 0
#define TRUE 1

#define STDERR 2    /* DOS handle for standard error */

#define MORSEBUFSIZE    128    /* Number of entries in morse data buffer */

#define BEEP_DIVISOR    2000    /* Freq = 1193182 / BEEP_DIVISOR */

#define DIT_LENGTH    1    /* Length of a dit */
#define DAH_LENGTH    3    /* Length of a dah */
#define DIT_SPACING    1    /* Spacing between dits/dahs within a letter */
#define LETTER_SPACING    3    /* Spacing between letter codes */
#define WORD_SPACING    6    /* Spacing between words */
#define STOP_SPACING    10    /* Spacing after a full stop (period) '.' */

#define ONOFF        0x8000    /* Top bit controls tone on or off */

static unsigned int tickdivs[10] = {
    16384, 15287, 14263, 13308, 12417,
    11585, 10809, 10086, 9410, 8780
    };

static unsigned int morsebuf[MORSEBUFSIZE];    /* Communication between
                           mainline and int 8 stuff */

/* Characters for morsecode array:

    ""        Ignore this code completely
    "w"        Word space - enforce a word spacing at this point
    "s"        Stop space - enforce a full stop spacing at this point
    ".--."        Actual code to send, using letter spacing at end */

static unsigned char morsecode[128][7] = {
    "", "", "", "", "", "", "", "w",                /* 0 to 7 */
    "", "w", "w", "", "w", "w", "", "",             /* 8 to 15 */
    "", "", "", "", "", "", "", "",                 /* 16 to 23 */
    "", "", "", "", "", "", "", "",                 /* 24 to 31 */
    "w", "", "", "", "", "", "", "",                /* ' ' to ''' */
    "", "", "", "", "", "", "s", "",                /* '(' to '/' */
    "-----", ".----", "..---", "...--", "....-",    /* 0 to 4 */
    ".....", "-....", "--...", "---..", "----.",    /* 5 to 9 */
    "w", "", "", "", "", "", "",                    /* ':' to '@' */
    ".-", "-...", "-.-.", "-..", ".",               /* 'A' to 'E' */
    "..-.", "--.", "....", "..", ".---",            /* 'F' to 'J' */
    "-.-", ".-..", "--", "-.", "---",               /* 'K' to 'O' */
    ".--.", "--.-", ".-.", "...", "-",              /* 'P' to 'T' */
    "..-", "...-", ".--", "-..-", "-.--", "--..",   /* 'U' to 'Z' */
    "", "", "", "", "", "",                         /* '[' to '`' */
    ".-", "-...", "-.-.", "-..", ".",               /* 'a' to 'e' */
    "..-.", "--.", "....", "..", ".---",            /* 'f' to 'j' */
    "-.-", ".-..", "--", "-.", "---",               /* 'k' to 'o' */
    ".--.", "--.-", ".-.", "...", "-",              /* 'p' to 't' */
    "..-", "...-", ".--", "-..-", "-.--", "--..",   /* 'u' to 'z' */
    "", "", "", "", ""                              /* '{' to Del */
    };

static unsigned int timescaler;            /* Time range scaler */

static unsigned int inptr;
static volatile unsigned int outptr;        /* Offsets into morsebuf */

static unsigned int tickdiv;            /* Actual chosen tick divisor */

void crit_err_intercept(void);            /* Provided in CRIT_ERR.OBJ */
unsigned int is_at_crit_prompt(void);        /* Provided in CRIT_ERR.OBJ */

typedef void interrupt (far *intfuncp)();    /* Pointer to interrupt handler */

intfuncp old_int8 = (intfuncp)0xFFFFFFFFL;

/* Communication between the mainline and the int 8 handler is via the morsebuf
   array, which is used as a queue.  Each entry in morsebuf is a 16-bit unsigned
   int.  The top bit determines whether the beeping sound should be turned on
   (if set) or off (if clear), and the remaining bits determine how many fast
   ticks the int 8 routine will wait after actioning the top bit, before it
   fetches the next word from morsebuf.  Access to morsebuf is controlled by
   the in and out pointers, which are actually offsets, not pointers.  When
   these are equal, the queue is empty. */

void interrupt int8_handler(void) {
    static unsigned int int8counter = 0;
    static unsigned int int8sched = 0;
    if (int8counter)
        --int8counter;
    if ((int8counter == 0) && (outptr != inptr)) {    /* Data there */
        int8counter = morsebuf[outptr];
        ++outptr;
        if (outptr >= MORSEBUFSIZE)        /* Bump out ptr */
            outptr = 0;
        if (int8counter & ONOFF) {    /* Turn sound on */
            outportb(0x43, 0xB6);    /* Ch 2, mode 3 */
            outportb(0x42, (BEEP_DIVISOR & 0xFF)); /* Lobyte */
            outportb(0x42, (BEEP_DIVISOR >> 8)); /* Hibyte */
            outportb(0x61, inportb(0x61) | 0x03); /* Speaker on */
            }
        else {                /* Turn sound off */
            outportb(0x61, inportb(0x61) & 0xFC); /* Speaker off */
            }
        int8counter &= (~ ONOFF);    /* Remove on/off bit */
        }
    int8sched += tickdiv;
    if (int8sched < tickdiv) {        /* If carried */
        (old_int8)();            /* Chain to BIOS */
        }
    else
        /** note - may not support Microchannel machines */
        outportb(0x20, 0x20);        /* Send EOI if not chaining */
    return;                    /* From interrupt */
    }

void restore_normal(void) {
    asm pushf;
    asm cli;
    outportb(0x43, 0x36);
    outportb(0x40, 0);
    outportb(0x40, 0);            /* Restore normal divisor */
    outportb(0x61, inportb(0x61) & 0xFC);    /* Speaker off */
    asm popf;
    return;
    }

void abort_cleanup(int dos_is_safe) {
    if (dos_is_safe) {
        if (old_int8 != (intfuncp)0xFFFFFFFFL) {
            setvect(0x08, old_int8);
            old_int8 = (intfuncp)0xFFFFFFFFL;
            }
        }
    else {
        if (old_int8 != (intfuncp)0xFFFFFFFFL) {
            *((intfuncp far *)MK_FP(0, 0x08 << 2)) = old_int8;
            old_int8 = (intfuncp)0xFFFFFFFFL;
            }
        }
    restore_normal();
    return;
    }

void interrupt ctrl_c_handler(void) {
    static char message[] = "\r\nProgram terminated by Ctrl-Break or Ctrl-C\r\n";
    if (is_at_crit_prompt())
        abort_cleanup(FALSE);
    else {
        abort_cleanup(TRUE);
        _write(STDERR, &message, sizeof(message));
        }
    exit(255);
    }

void poll_exit(void) {
    if (bioskey(1)) {
        if ((bioskey(0) & 0xFF) == 27) {
            setvect(0x08, old_int8);
            old_int8 = (intfuncp)0xFFFFFFFFL;
            restore_normal();
            exit(0);
            }
        }
    return;
    }

void putmorse(unsigned int codeval) {
    unsigned int tempptr;
    poll_exit();
    tempptr = inptr + 1;
    if (tempptr >= MORSEBUFSIZE)
        tempptr = 0;
    while (outptr == tempptr)
        poll_exit();        /* Wait for space in the queue */
    codeval = (((codeval & (~ONOFF)) << timescaler) | (codeval & ONOFF));
    morsebuf[inptr] = codeval;
    inptr = tempptr;
    return;
    }

void playmorse(char * str) {
    char ch;
    char * cp;
    unsigned int was_word;
    was_word = FALSE;
    cp = str;
    while ((ch = *cp++) != '<!JEKYLL@3780@80>') {
        switch (ch) {
        case 'w' :
            putmorse(WORD_SPACING);
            break;
        case 's' :
            putmorse(STOP_SPACING);
            break;
        case '.' :
            putmorse(DIT_LENGTH | ONOFF);
            putmorse(DIT_SPACING);
            was_word = TRUE;
            break;
        case '-' :
        case '_' :
            putmorse(DAH_LENGTH | ONOFF);
            putmorse(DIT_SPACING);
            was_word = TRUE;
            break;
            }
        }
    if (was_word)
        putmorse(LETTER_SPACING);
    return;
    }

void main(int argc, char * argv[]) {
    unsigned int speedrange;
    int ch;
    FILE * infile;

    printf("Sample program #13 - Morse code player demonstrating fast timer tick\n");
    printf("Part of the PC Timing FAQ / Application notes\n");
    printf("By K. Heidenstrom ([email protected])\n\n");

    if ((argc < 3) || (strlen(argv[1]) != 2)) {
        printf("Usage: SAMPLE13 speed filename\n\n");
        printf("\tspeed = 10 to 99, speed doubles each decade\n");
        printf("\tfilename = name of file to be played\n");
        exit(1);
        }

    timescaler = 8 - (argv[1][0] - '1');    /* Shift count for timings */
    speedrange = argv[1][1] - '0';        /* Fine speed, 0-9 */
    if ((timescaler > 8) || (speedrange > 9)) {
        printf("Speed out of range\n");
        exit(2);
        }

    tickdiv = tickdivs[9 - speedrange];

    infile = fopen(argv[2], "r");
    if (infile == NULL) {
        printf("Could not open input file '%s'\n", argv[2]);
        exit(4);
        }

    printf("Press <Esc> to exit\n");

    crit_err_intercept();        /* Trap critical errors */
    setvect(0x23, ctrl_c_handler);    /* Trap Ctrl-C interrupt */
    old_int8 = (intfuncp)getvect(0x08);
    setvect(0x08, int8_handler);

    asm cli;
    outportb(0x43, 0x36);
    outportb(0x40, tickdiv & 0xFF);
    outportb(0x40, tickdiv >> 8);
    asm sti;

    while ((ch = fgetc(infile)) != EOF)
        if (ch < 0x80)
            playmorse(morsecode[ch]);

    putmorse(1);            /* Make sure the speaker is off */
    while (inptr != outptr)
        ;            /* Wait for buffer to empty */

    setvect(0x08, old_int8);
    old_int8 = (intfuncp)0xFFFFFFFFL;
    restore_normal();

    exit(0);
    }
8.6 DYNAMIC FAST TICK PERIODS
In the Morse code player sample program, once the new fast tick rate has been chosen and programmed, it is not modified until the program terminates. The interrupt keeps occurring regularly at the fast tick rate. However, it is possible to dynamically change the fast tick rate on a per-interrupt basis.
There are several reasons why you might want to do this - I can think of four applications, there may be more:
- You might want to create a signal with an uneven or completely arbitrary duty cycle, such as 5 ms high, 40 ms low (this example could also be done using a constant fast tick at 5 ms intervals and counting eight interrupts to get the 40 ms delay),
- You might be using the timer interrupt to schedule things which happen at irregular intervals, with some long gaps, some short,
- You might want your background interrupt routine to be able to adjust its speed according to user actions, such as keypresses which control the program ‘speed’,
- You might want an exact number of interrupts per second, which is not possible with a fixed divisor - see section 8.7 for a sample program that does this.
All of these requirements can be handled in the same way. The technique involves the interrupt routine adjusting the value in the Reload register according to its requirements, to adjust the period between interrupts in a dynamic fashion.
When the fast timer tick interrupt handler reprograms the Reload register, the new Reload register value does not affect the current countdown in progress, i.e. the length of time until the next interrupt, it affects the length of time between the next interrupt and the interrupt after that. In other words, you could say there is a one interrupt delay before the new value takes effect.
8.7 SAMPLE PROGRAM: DYNAMIC FAST TICK INTERRUPT HANDLER
This sample program gives a fast tick rate of exactly 1000 fast ticks per second, using an effective divisor of 1193.18166666….
This cannot be achieved with a static divisor - the closest static divisors of 1193 and 1194 produce 1000.152277 and 999.3146287 interrupts per second respectively. To get exactly 1000 fast ticks per second, the divisor must be changed dynamically to give an effective divisor of 1193.181666… by cycling through the appropriate sequence of 1193 and 1194 divisors. Over a short period of time, the tick rate will rapidly approach exactly 1000 ticks per second (ignoring the error due to crystal inaccuracies, etc).
The sequence of divisors is determined as follows. For 1000 ticks per second the divisor is 1193.18166666… which is 1193 plus 9/50 (0.18) plus 1/600 (0.0016666…), which is also 1193 plus 1/5 minus 1/50, plus 1/600.
Count every fifth interrupt. On four out of every five interrupts, use a divisor of 1193, but on every fifth interrupt, when the divide-by-five counter carries, prepare to use 1194, and count a divide by 10 counter (which is really dividing by 50). If the counter doesn’t carry, use 1194. These two counters in combination add the 9/50. If the divide by 10 counter carries, prepare to use 1193, and count down a divide by 12 counter, which is actually counting 1/600ths; if it carries, use 1194.
A similar approach could be used to get 200 fast tick interrupts per second (i.e. a 5ms fast tick interval). The divisor is 5965.90833333333, which is 5965 plus 9/10 plus 1/120, so you would use 5966 for 9 of every 10 cycles and use 5965 on the tenth, except if it is the twelfth tenth cycle in which case use 5966.
Mode two must be used for this technique. See the description of behaviour with odd divisors in section 7.8.5 for the reasons.
See section 6.22 for the explanation of the pushf/cli/popf technique.
/*
Sample program #14
Demonstrates dynamic timer tick rates
Part of the PC Timing FAQ / Application notes
By K. Heidenstrom ([email protected])

Save and assemble the critical error module CRIT_ERR
Save this sample code to SAMPLE14.C
Compile this module with:
    bcc -c -I<inc_path> -ms sample14.c
Link the modules with:
    tlink /c /x <c0_path>\c0s.obj sample14.obj crit_err.obj,
        sample14, nul, <lib_path>\cs
Where inc_path is the path to your C header files, c0_path is the path to your
startup modules C0x.OBJ and lib_path is the path to your C libraries Cx.LIB.
*/

#pragma inline;        /* Required for asm pushf, popf, and cli */

#include <bios.h>    /* Needed for bioskey() */
#include <dos.h>    /* Needed for MK_FP() */
#include <io.h>        /* Needed for _write() */
#include <stdio.h>    /* Needed for printf() */
#include <stdlib.h>    /* Needed for exit() */

#define FALSE 0
#define TRUE 1

#define STDERR 2    /* DOS handle for standard error */

#define BASETICK 1193

void crit_err_intercept(void);            /* Provided in CRIT_ERR.OBJ */
unsigned int is_at_crit_prompt(void);        /* Provided in CRIT_ERR.OBJ */

typedef void interrupt (far *intfuncp)();    /* Pointer to interrupt handler */

intfuncp old_int8 = (intfuncp)0xFFFFFFFFL;

static volatile unsigned long milliseconds = 0;    /* Milliseconds counter */

/* The interrupt handler is responsible for updating the tick divisor to give
   exactly 1000 ticks per second.  It also increments a 32-bit counter which
   is used by the mainline.  */

void interrupt int8_handler(void) {
    static unsigned int div_5 = 2;
    static unsigned int div_5_10 = 5;
    static unsigned int div_5_10_12 = 6;
    static unsigned int int8sched = 0;
    static unsigned int fastdiv = 0;
    asm {
        mov    ax,1193        /* Prepare to use 1193 */
        dec    [div_5]        /* Count down divide by 5 */
        jns    GotNewDiv    /* If not reached one fifth yet */
        mov    [div_5],4    /* Reset dividing register */
        inc    ax        /* Prepare to use 1194 */
        dec    [div_5_10]    /* Count down nested divide by 10 */
        jns    GotNewDiv    /* If not reached 1/10 of 1/5 yet */
        mov    [div_5_10],9    /* Reset dividing register */
        dec    ax        /* Prepare to use 1193 */
        dec    [div_5_10_12]    /* Count down nested divide by 12 */
        jns    GotNewDiv    /* If not reached 1/12 of 1/10 of 1/5 */
        inc    ax        /* The 1/600th! */
        mov    [div_5_10_12],11 /* Reset dividing register */
        }
GotNewDiv:
    asm    {
        cmp    ax,[fastdiv]    /* Got divisor in AX - did it change? */
        je    SameDiv        /* If not, don't reprogram CTC 0 */
        mov    [fastdiv],ax    /* Store new value */
        out    40h,al        /* Write new lobyte */
        mov    al,ah        /* Get hibyte */
        out    40h,al        /* Write new hibyte */
        }
SameDiv:                /* End of inline assembly */
    ++milliseconds;            /* Increment millisecond count */
    int8sched += fastdiv;
    if (int8sched < fastdiv) {    /* If carried */
        (old_int8)();        /* Chain to BIOS */
        }
    else
        /** note - may not support Microchannel machines */
        outportb(0x20, 0x20);    /* Send EOI if not chaining */
    return;                /* From interrupt */
    }

void restore_normal(void) {
    asm pushf;
    asm cli;
    outportb(0x43, 0x36);
    outportb(0x40, 0);
    outportb(0x40, 0);        /* Restore normal divisor */
    asm popf;
    return;
    }

void abort_cleanup(int dos_is_safe) {
    if (dos_is_safe) {
        if (old_int8 != (intfuncp)0xFFFFFFFFL) {
            setvect(0x08, old_int8);
            old_int8 = (intfuncp)0xFFFFFFFFL;
            }
        }
    else {
        if (old_int8 != (intfuncp)0xFFFFFFFFL) {
            *((intfuncp far *)MK_FP(0, 0x08 << 2)) = old_int8;
            old_int8 = (intfuncp)0xFFFFFFFFL;
            }
        }
    restore_normal();
    return;
    }

void interrupt ctrl_c_handler(void) {
    static char message[] = "\r\nProgram terminated by Ctrl-Break or Ctrl-C\r\n";
    if (is_at_crit_prompt())
        abort_cleanup(FALSE);
    else {
        abort_cleanup(TRUE);
        _write(STDERR, &message, sizeof(message));
        }
    exit(255);
    }

void poll_exit(void) {
    if (bioskey(1)) {
        if ((bioskey(0) & 0xFF) == 27) {
            setvect(0x08, old_int8);
            old_int8 = (intfuncp)0xFFFFFFFFL;
            restore_normal();
            exit(0);
            }
        }
    return;
    }

void main(void) {
    unsigned long ms;

    printf("Sample program #14 - Millisecond timer demonstrating dynamic timer tick\n");
    printf("Part of the PC Timing FAQ / Application notes\n");
    printf("By K. Heidenstrom ([email protected])\n\n");
    printf("Press <Esc> to exit\n\n");

    crit_err_intercept();        /* Trap critical errors */
    setvect(0x23, ctrl_c_handler);    /* Trap Ctrl-C interrupt */
    old_int8 = (intfuncp)getvect(0x08);
    setvect(0x08, int8_handler);

    asm cli;
    outportb(0x43, 0x34);        /* Must use mode two! */
    outportb(0x40, BASETICK & 0xFF);
    outportb(0x40, BASETICK >> 8);
    asm sti;

    while (1) {
        asm cli;
        ms = milliseconds;
        asm sti;
        printf("%010ld ms\r", ms);
        poll_exit();
        }
    }
Note the order in which things are restored to normal in poll_exit(). The call to restore_normal() to set the tick rate back to normal, must appear after the fast tick handler has been disconnected. If the fast tick handler was still connected after the tick rate was set to normal, it could reprogram the CTC again, and the program would terminate with the tick running with a divisor of 1193 or 1194 (at roughly 1ms intervals)!
This program could be used to measure the execution time of another program with 1ms resolution, provided that the other program did not use CTC channel zero itself, and provided that the other program did not lock interrupts out for more than 1ms at a time.
9 READING AN ABSOLUTE TIMESTAMP
It is possible to read an absolute timestamp at any moment in time. This timestamp is comprised of the value read from the Counter Latch register in channel 0 of the CTC (see sections 7.14 and 7.15), which is 16 bits wide, and the BIOS Tick Count variable (see section 4) which is 32 bits wide, though only the bottom 21 bits are used.
Mode two is easiest to use for this purpose. BIOSes traditionally set up CTC channel zero to run in mode three, but recent BIOSes seem to be using mode two. See section 7.4.2 for details.
In order to be able to read an absolute timestamp, your program must first ensure that CTC channel zero is operating in mode two with a divisor of 65536 and that the lobyte/hibyte flag is in sync. This is most easily ensured by simply setting the mode and divisor in the initialisation section of your program. See section 7.10 and section 7.12 for details.
Reading the count in progress is described in sections 7.15, 7.15.1, and 7.16. Reading the BIOS tick count variable is described in sections 4.5 and 4.6.
To ensure that a correct value is read, it is necessary to read the BIOS tick count first, then read the count in progress in the CTC, then enable interrupts, then re-read the BIOS tick count, then work out whether the first or second BIOS tick count value is appropriate (if they are different). This is demonstrated in the sample program in section 9.1.
9.1 SAMPLE PROGRAM: ABSOLUTE TIME REFERENCE (TIMESTAMP) IN MODE TWO
This program demonstrates the initialisation required to set the timer to run
in mode two, and a function that will return an absolute timestamp, in units
of 0.8381 microseconds since midnight on the current day. Initially it will
display the timestamp every time a key is pressed. Once the
See section 6.22 for the explanation of the pushf/cli/popf technique.
/*
Sample program #15
Demonstrates absolute timestamping in mode two
Part of the PC Timing FAQ / Application notes
By K. Heidenstrom ([email protected])

Save this file to SAMPLE15.C and compile with:
    bcc -I<inc_path> -L<lib_path> -ms sample15.c
Where inc_path is the path to your C header files and your startup modules
C0x.OBJ, and lib_path is the path to your C libraries Cx.LIB.

*/

#pragma inline;        /* Required for asm pushf, popf, cli, and sti */

#include <bios.h>    /* Needed for bioskey() */
#include <stdio.h>    /* Needed for printf() */
#include <stdlib.h>    /* Needed for exit() */

#define FALSE 0
#define TRUE 1

typedef struct {
    unsigned int part;
    unsigned long ticks;
    } timestamp;

#define BIOS_TICK_COUNT_P ((volatile unsigned long far *) 0x0040006CL)

void set_mode2(void) {
    auto unsigned int tick_loword;
    tick_loword = * BIOS_TICK_COUNT_P;
    while ((unsigned int) * BIOS_TICK_COUNT_P == tick_loword)
        ;
    asm pushf;
    asm cli;
    outportb(0x43, 0x34);        /* Channel 0, mode 2 */
    outportb(0x40, 0x00);        /* Loword of divisor */
    outportb(0x40, 0x00);        /* Hiword of divisor */
    asm popf;
    return;
    }

void get_timestamp(timestamp * tsp) {
    auto unsigned long tickcount1, tickcount2;
    auto unsigned int ctcvalue;
    auto unsigned char ctclow, ctchigh;
    asm pushf;
    asm cli;
    tickcount1 = * BIOS_TICK_COUNT_P;
    outportb(0x43, 0);        /* Latch value */
    ctclow = inportb(0x40);
    ctchigh = inportb(0x40);    /* Read count in progress */
    asm sti;            /* Force interrupt ENABLE */
    ctcvalue = - ((ctchigh << 8) + ctclow);
    tickcount2 = * BIOS_TICK_COUNT_P;
    asm popf;
    if ((tickcount2 != tickcount1) && (ctcvalue & 0x8000))
        tsp->ticks = tickcount1;
    else
        tsp->ticks = tickcount2;
    tsp->part = ctcvalue;
    return;
    }

void main(void) {
    auto timestamp ts, ts1, ts2;
    auto unsigned int sched;
    auto unsigned int ch;
    printf("Sample program #15 - Demonstrates absolute timestamping\n");
    printf("Part of the PC Timing FAQ / Application notes\n");
    printf("By K. Heidenstrom ([email protected])\n\n");
    printf("Press any key to get timestamp; press <Esc> for continuous test\n\n");

    set_mode2();

    do {
        ch = bioskey(0);    /* Get a keypress */
        get_timestamp(&ts);    /* Get timestamp */
        printf("Absolute timestamp: 0x%04X%04X%04X units of 0.8381 us\n",
            (unsigned int) (ts.ticks >> 16),
            (unsigned int) (ts.ticks & 0xFFFF),
            ts.part);
        } while ((ch & 0xFF) != 27);

    printf("\nProgram is now performing continuous timestamp test\n\n");
    printf("Press <Esc> to exit\n\n");

    while (1) {
        ts2.ticks = ts1.ticks;
        ts2.part = ts1.part;
        ts1.ticks = ts.ticks;
        ts1.part = ts.part;
        get_timestamp(&ts);
        printf("0x%04X%04X%04X\r",
            (unsigned int) (ts.ticks >> 16),
            (unsigned int) (ts.ticks & 0xFFFF),
            ts.part);
        if ((ts.ticks < ts1.ticks) || ((ts.ticks == ts1.ticks) &&
            (ts.part < ts1.part))) {    /* Went backwards? */
            printf("Timestamp went backwards: 0x%04X%04X%04X, 0x%04X%04X%04X, then 0x%04X%04X%04X\n",
                (unsigned int) (ts2.ticks >> 16),
                (unsigned int) (ts2.ticks & 0xFFFF),
                ts2.part,
                (unsigned int) (ts1.ticks >> 16),
                (unsigned int) (ts1.ticks & 0xFFFF),
                ts1.part,
                (unsigned int) (ts.ticks >> 16),
                (unsigned int) (ts.ticks & 0xFFFF),
                ts.part);
            }
        ++sched;
        if (!(sched & 0xFF))
            if (bioskey(1))
                if ((bioskey(0) & 0xFF) == 27)
                    break;
        }
    exit(0);
    }
The interrupt flag is carefully controlled inside the get_timestamp() function. Interrupts must remain enabled during normal execution of the program, so that the tick interrupt can maintain the BIOS tick count variable which forms part of the timestamp value.
The state of the interrupt flag on entry to get_timestamp() is not important, but the function will enable interrupts during its operation.
This program can be modified to support mode 3 operation of CTC channel zero but this is not necessary as there are no disadvantages to operating the CTC in mode two.
{JAM} says that this technique gives an accurate timestamp with a resolution of few microseconds. On the computer he used, an Epson 20MH 386/SX, “Reasonable clock code is accurate to about 4 microseconds with a minimum read time of about 20 microseconds. The clock accuracy does not change much between machines and is never under 1 microseconds or over 4”.
{JAM} also points out that timer reads take in the region of three to eight CTC clock periods and therefore you cannot just wait for a particular time value to occur, because you probably will not sample the count at exactly the right time. You have to check for at least that length of time elapsed.
Finally, because the absolute timestamp value ranges from 0x000000000000 to 0x001800AFFFFF then wraps around to midnight, subtracting two timestsamp values will not give a correct indication of elapsed time if the period measured crossed a midnight boundary. See section 9.3 for details.
9.2 SAMPLE PROGRAM: ABSOLUTE TIMESTAMP IN MODE TWO - ASSEMBLER
This program implements the second section of the sample program from section 9.1 but is written in assembler and performs direct screen writes. The get_timestamp() function is much more carefully optimised. To get an idea of how often this program can read the timer, update the number in screen memory, and perform several other tasks, set your system time to 23:59:50 and run the program, and note how far apart the three reported numbers are. On my 486DX2-66, they are mostly between 16 and 32 CTC clocks, and the GetTimestamp function takes between 7 and 9 CTC clocks to read its timestamp.
For maximum speed, this program uses the BIOS Ctrl-Break flag at 0000:0471 to allow the program to be terminated, so you must press Ctrl-Break to terminate the program.
        NAME    SAMPLE16

; Sample program #16
; Demonstrates absolute timestamping using mode 2, in assembler
; Part of the PC Timing FAQ / Application notes
; By K. Heidenstrom ([email protected])
;
; This program assembles into SAMPLE16.COM, a small program which sets CTC
; channel 0 to mode 2 and repeatedly reads an absolute timestamp using the
; BIOS tick count variable and the count in progress in CTC channel 2, and
; displays the 48-bit timestamp (37 bits of which are actually used) as a
; 12-digit hex number in the bottom left hand corner of the screen.  It also
; checks for the timestamp going backwards, and if this occurs, displays a
; message giving the two timestamps prior to the timestamp going backwards,
; and the timestamp on which the error was detected.  If midnight passes,
; this message should be displayed, as the timestamp is only an offset into
; the current day.
;
; This program assumes it is running in text mode.  It supports colour and
; monochrome systems and 43-line and 50-line modes.
;
; Save this file to SAMPLE16.ASM and assemble with:
;    masm sample16;
;    link sample16;
;    exe2bin sample16.exe sample16.com
; or
;    tasm sample16;
;    tlink /t sample16;
;

ComFile        SEGMENT
        ASSUME    cs:ComFile,ds:ComFile,es:nothing,ss:nothing

        ORG    100h        ; Com-type file

Main        PROC    near
        jmp    Main2        ; Skip
Main        ENDP

InitialMsg    DB    13,44 DUP(10)
        DB    "Sample program #16 - Demonstrates absolute timestamping in mode 2",13,10
        DB    "Part of the PC Timing FAQ / Application notes",13,10
        DB    "By K. Heidenstrom ([email protected])",13,10,13,10
        DB    "Press Ctrl-Break to terminate program",13,10,13,10,"$"

BackwardsMsg    DB    13,"Timestamp went backwards: 0x"
Backwards1    DB    "xxxxxxxxxxxx, 0x"
Backwards2    DB    "xxxxxxxxxxxx, then 0x"
Backwards3    DB    "xxxxxxxxxxxx",13,10,13,10,"$"

HexBuffer    DB    "xxxxxxxxxxxx"

TimeL        DW    0        ; Time loword (CTC count)
TimeM        DW    0        ; Time midword (loword of tick count)
TimeH        DW    0        ; Time hiword (hiword of tick count)
Time1L        DW    0        ; Old time loword
Time1M        DW    0        ; Old time midword
Time1H        DW    0        ; Old time rock 'n' roll
Time2L        DW    0        ; Old old time loword
Time2M        DW    0        ; Old old time midword
Time2H        DW    0        ; Old old time hiword
RegenSeg    DW    0B800h        ; Regen buffer segment
BotLine        DW    0        ; Regen offset of bottom line

Main2        PROC    near
        cld
        xor    ax,ax        ; Zero
        mov    es,ax
        cmp    WORD PTR es:[463h],3D4h ; Check for colour mode
        je    GotRegenSeg
        mov    RegenSeg,0B000h
GotRegenSeg:    xchg    ax,bx        ; BX = 0 (page number)
        mov    ah,3
        int    10h        ; Get cursor position - DH = line
        mov    ah,0Fh
        int    10h        ; Get video mode
        mov    al,ah        ; Get screen width
        mul    dh        ; Calculate offset of bottom line
        shl    ax,1        ; Shift for char/attrib
        mov    BotLine,ax    ; Store
        mov    dx,OFFSET InitialMsg
        mov    ah,9
        int    21h        ; Display initial message

        call    InitCTC0Mode2    ; Init CTC chan 0 to mode 2, reload 0

MainLoop:
        mov    ax,Time1L    ; Copy Time1 to Time2
        mov    Time2L,ax
        mov    ax,Time1M
        mov    Time2M,ax
        mov    ax,Time1H
        mov    Time2H,ax

        mov    ax,TimeL    ; Copy Time to Time1
        mov    Time1L,ax
        mov    ax,TimeM
        mov    Time1M,ax
        mov    ax,TimeH
        mov    Time1H,ax

        call    GetTimestamp    ; Get timestamp
        mov    TimeL,ax    ; Store it
        mov    TimeM,dx
        mov    TimeH,bx

        sub    ax,Time1L    ; Subtract lowords
        sbb    dx,Time1M    ; Subtract midwords with borrow
        sbb    bx,Time1H    ; Subtract hiwords with borrow
        jnb    Alright        ; If no borrow, time didn't go backwards

        mov    si,OFFSET Time2L ; Oldest time
        mov    di,OFFSET Backwards1 ; First string position
        call    ToASCII        ; Convert to ASCII
        mov    si,OFFSET Time1L ; Second-oldest time
        mov    di,OFFSET Backwards2 ; Second string position
        call    ToASCII        ; Convert to ASCII
        mov    si,OFFSET TimeL    ; New time
        mov    di,OFFSET Backwards3 ; Third string position
        call    ToASCII        ; Convert to ASCII

        mov    dx,OFFSET BackwardsMsg
        mov    ah,9
        int    21h        ; Display went-backwards message

Alright:    mov    si,OFFSET TimeL    ; New time
        mov    di,OFFSET HexBuffer ; Hex text buffer
        call    ToASCII        ; Convert to ASCII
        mov    si,OFFSET HexBuffer ; ASCII hex text
        mov    di,BotLine    ; Offset of bottom line of screen
        mov    es,RegenSeg    ; Regen buffer segment
        mov    cx,12        ; Characters to copy
ScrLoop:    movsb            ; Copy character
        inc    di        ; Skip attribute
        loop    ScrLoop        ; Loop

        xor    ax,ax
        mov    es,ax
        xchg    al,BYTE PTR es:[471h]
        test    al,al
        js    Finish

        jmp    MainLoop

Finish:        mov    ax,4C00h
        int    21h        ; Terminate with errorlevel 0
        int    20h        ; In case DOS-1 (!)
Main2        ENDP

InitCTC0Mode2    PROC    near
;                Func:    Initialise CTC channel 0 to operate in
;                    mode 2 with reload value of 0 (divisor
;                    of 65536, 18.2065 interrupts/second).
;                    Wait for a tick to occur before setting
;                    mode (should minimise disturbance to
;                    system time).
;                In:    None
;                Out:    None
;                Lost:    AX (preserves interrupt flag)
        pushf
        push    ds
        sti            ; Ensure interrupts are enabled
        xor    ax,ax
        mov    ds,ax        ; Address low memory with DS
        mov    ax,ds:[46Ch]    ; Get loword of tick count
WaitTick:    cmp    ax,ds:[46Ch]    ; Changed?
        je    WaitTick    ; If not, loop
        pop    ds
        mov    al,00110100b    ; Channel 0, mode 2
        cli
        out    43h,al        ; Set mode
        xor    ax,ax        ; Zero
        jmp    SHORT $+2    ; Delay
        out    40h,al        ; Loword of divisor
        jmp    SHORT $+2    ; Delay
        out    40h,al        ; Hiword of divisor
        popf            ; Restore interrupt flag
        ret
InitCTC0Mode2    ENDP

PROC    GetTimestamp    near
;                Func:    Return absolute timestamp (48-bit) in
;                    units of 0.83809534452us since midnight
;                    in the current day (range 000000000000h
;                    to 001800AFFFFFh) using BIOS tick count
;                    variable and CTC channel zero count in
;                    progress, assuming CTC channel 0 is
;                    operating in mode 2 with a reload value
;                    of 0 (65536 divisor).
;                In:    None
;                Out:    AX = Count loword (b0..15) (0000-FFFF)
;                    DX = Count midword (b16..31) (0000-FFFF)
;                    BX = Count hiword (b32..47) (0000-0018)
;                Lost:    AX BX DX
;                Note:    This routine briefly disables then
;                    enables then disables interrupts
;                    regardless of the state of the
;                    interrupt flag on entry.
;                    It restores the original interrupt
;                    flag state on exit.
        push    ds        ; Preserve register
        push    di
        push    si
        pushf            ; Preserve interrupt flag
        xor    ax,ax        ; Zero
        mov    ds,ax        ; Address low memory with DS
        ASSUME    ds:nothing    ; Not addressing ComFile any more
        cli
        mov    si,ds:[46Ch]    ; Loword of tick count
        mov    di,ds:[46Eh]    ; Hiword of tick count
        mov    al,00000000b    ; Latch count for CTC channel 0
        out    43h,al        ; Send it
        jmp    SHORT $+2    ; Delay
        in    al,40h        ; Get lobyte of count
        mov    ah,al        ; Save in AH
        jmp    SHORT $+2    ; Delay
        in    al,40h        ; Get hibyte of count
        sti            ; Make sure interrupts are enabled now
        xchg    al,ah        ; Get bytes the right way round
        nop            ; Sniff for interrupt
        neg    ax        ; Convert to ascending count
        cli            ; No interrupts again for reading count
        mov    dx,ds:[46Ch]    ; Loword of tick count again
        mov    bx,ds:[46Eh]    ; Hiword of tick count again
        popf            ; Restore original interrupt flag
        cmp    dx,si        ; Did tick count change?
        je    GotTimestamp    ; If not, just return second tick count
        test    ax,ax        ; Is tick count low or high?
        jns    GotTimestamp    ; If low, read was just past interrupt
        mov    dx,si        ; If high, previous tick count is right
        mov    bx,di        ; Get hiword of tick count too
GotTimestamp:    pop    si        ; Restore working registers
        pop    di
        pop    ds        ; Restore DS
        ASSUME    ds:ComFile    ; Back to ComFile
        ret
GetTimestamp    ENDP

ToASCII        PROC    near
;                Func:    Convert a three-word time structure to
;                    12-digit printable hex representation
;                In:    SI -> Structure
;                    DI -> ASCII buffer in this segment
;                Out:    DI -> Past characters stored
;                Lost:    AX DI ES
        push    cs
        pop    es        ; ES to ComFile
        mov    ax,ds:[si+4]    ; Get hiword
        call    Mach16ToHexAsc    ; Convert to hex ASCII representation
        mov    ax,ds:[si+2]    ; Get hiword
        call    Mach16ToHexAsc    ; Convert to hex ASCII representation
        mov    ax,ds:[si+0]    ; Get hiword
Mach16ToHexAsc    PROC    near
        push    ax
        mov    al,ah
        call    Mach8ToHexAsc
        pop    ax
Mach8ToHexAsc    PROC    near
        push    ax
        shr    al,1
        shr    al,1
        shr    al,1
        shr    al,1
        call    Mach4ToHexAsc
        pop    ax
        and    al,0Fh
Mach4ToHexAsc    PROC    near
        add    al,90h
        daa
        adc    al,40h
        daa
        stosb
        ret
Mach4ToHexAsc    ENDP
Mach8ToHexAsc    ENDP
Mach16ToHexAsc    ENDP
ToASCII        ENDP

ComFile        ENDS
        END    Main
See all the comments in section 9.1 relating to the C program; these comments also apply to this program.
9.3 HANDLING THE MIDNIGHT BOUNDARY
The absolute timestamp value returned by the functions in the above programs will be in the range 0x000000000000 to 0x001800AFFFFF inclusive. Calculating the time difference between two of these timestamps by subtracting the first from the second will only give a correct result if the time period did not span a midnight boundary. To handle this case, you must check that the second timestamp is greater than the first, and if not, add 0x001800B00000 to the second timestamp before subtracting them. This will give a correct result, provided that no more than about 24 hours has elapsed between the two timestamps being taken! (The timestamp value does not include a date).
typedef struct {            /* As defined in the sample program */
    unsigned int part;
    unsigned long ticks;
    } timestamp;

/* The following function takes two timestamps in startts and stopts, and
   calculates the time difference and stores them in diffts.  The difference
   is in units of 0.8381 us, the same units as the timestamp values.  */

void calc_elapsed(timestamp * startts, timestamp * stopts, timestamp * diffts) {
    if (startts->ticks <= stopts->ticks)        /* No change of day */
        diffts->ticks = stopts->ticks - startts->ticks;
    else                        /* Change of day */
        diffts->ticks = stopts->ticks + 0x001800B0L - startts->ticks;
    diffts->part = stopts->part - startts->part;
    if (stopts->part < startts->part)
        --(diffts->ticks);
    return;
    }
10 OTHER TOPICS
10.1 THE 586 TIME STAMP COUNTER
In a message in comp.sys.intel and comp.lang.asm.x86 in mid-December 1994, Gordon Burditt ([email protected]) describes a partly undocumented instruction available on the Intel 586 (but not guaranteed to be available on future Intel processors). The instruction is RDTSC - Read Time Stamp Counter. Opcode encoding is 0F 31. It is “unprivileged if bit 2 of CR4 is clear, Ring 0 or real mode only if it is set” (whatever that means :-).
This instruction loads the 64-bit Time Stamp Counter register contents into EDX:EAX. The Time Stamp Counter is zeroed on power-up and is incremented on each CPU clock cycle (e.g. 90 times per microsecond for a 90 MHz CPU - for clock doubled or clock tripled processors, does this mean the external clock or the internal clock? (*)). This level of resolution is useful for performance measurement and CPU usage billing.
The unit of time is system-dependent, and also depends on the accuracy of the processor clock, which may not be very good.
Use the CPUID instruction to determine if RDTSC exists on this CPU. EDX “feature bits” bit 4 is set if it does.
The Time Stamp Counter register can be written via the documented 586 instruction WRMSR - Write Model-Specific Register, coding 0F 30. The privilege level for this instruction is ring 0 or real mode only. Set ECX to the register number (10 hex for the TSC register) and EDX:EAX to the new value and execute the instruction.
Use CPUID to determine if WRMSR exists on this CPU. EDX “feature bits” bit 5 is set if it does. Also, if you are running DOS with EMM386 (i.e. V86 mode), you cannot use the privileged instructions.
Thank you Gordon for this information.
Quoting from an article dated Apr 27 1995 in comp.lang.asm.x86 by Philip O’Carroll ([email protected]) with his permission:
I can’t execute the RDTSC instruction… Is there someone who knows why?
1) The RDTSC instruction cannot be executed from V86 mode. It gives a GPF. I do not know why this is and I have only tested RDTSC from within protected mode.
2) If you are executing it from 16-bit code you will need to use the ADRSIZE prefix to access the upper 16 bits of the EAX and EDX registers.
3) It is possible that the instruction has been disabled by setting the TSD (timestamp disable) bit in CR4. This is unlikely because the Pentium powers up with it clear and I cannot see why an OS would disable it.
Terje Mathisen ([email protected]) adds, in an article in April 1995 in comp.lang.asm.x86:
RDTSC is by default available for all rings/modes, except V86.
The V86 fault was an Intel internal error, i.e. it wasn’t supposed to be like that.
The RDTSC instruction causes a GPF if executed in V86 mode. Terje says that though this is the documented behaviour, according to an Intel technician the RDTSC instruction should have worked in V86 mode too. Terje says that the Intel technician also said at the time that RDTSC would work in V86 mode on the P6.
The Time Stamp Disable (TSD) bit in CR4 must be changed (set) to restrict RDTSC to ring 0, so (almost?) all operating systems will let you use the time stamps from ring 3 code.
Philip also sent me the following macro for VC++ 1.5 16-bit (protected mode Ring 3 code):
#define TIMESTAMP(var) __asm
{
_asm emit 0x0F
_asm emit 0x31
_asm emit 0x66
_asm mov word ptr var, ax
_asm emit 0x66
_asm mov word ptr var[+4], dx
}Usage:
DWORD timest[2];
TIMESTAMP(timestamp);
Philip also told me he has written a Windows VxD for accessing the profiling counters from Ring 3 code, but I don’t know where, or when, it will be available.
My VxD allows Windows apps to access the Pentium profiling registers detailed in Byte July 1994. Specifically there are two counters which can count various different processor events such as instructions executed, data cache hits/misses etc.
The TSC can be used by Windows apps without recourse to a VxD.
Thanks guys.
10.2 SERIAL PORT REGULAR INTERRUPT
If your application will have a spare serial port to play with, it can generate a regular interrupt using the Transmit interrupt facility on the serial chip (known as a UART, for Universal Asynchronous Receiver/Transmitter). There are other ways to make the UART generate interrupts, but the Transmit interrupt is easiest to use.
UARTs usually drive IRQ4 and IRQ3. These interrupts are reserved for COM1 and COM2 respectively. When COM3 and COM4 are present, they sometimes ‘share’ IRQ4 and IRQ3 respectively, with COM1 and COM2, but this ‘sharing’ only works if the ports are not used simultaneously (except on MicroChannel machines and possibly on EISA machines, where proper interrupt sharing is possible with the right software support). In some cases, the otherwise spare interrupt lines, such as IRQ5 and IRQ2/9, are used for COM3 and COM4.
10.2.1 SERIAL PORT (UART) DOCUMENTATION
This information is brief and incomplete. There are many books and electronic documents which describe the UART much more thoroughly, such as Chris Blum’s “The Serial Port” FAQ which is posted periodically in the Internet newsgroup comp.os.msdos.programmer.
There are several types of UARTs. The basic device is the INS8250 which was originally developed by National Semiconductor. It is not an Intel device, despite the number. Descendants such as the 8250A, 16C450, and 16C550 add features, improve performance, and/or correct design errors in previous versions of the chip.
The UART occupies eight consecutive I/O addresses starting at the I/O Base address. The I/O Base address of a nominated UART (e.g. COM1) can be found in the table in the BIOS data area in low memory, starting at 0040:0000 (aka 0000:0400). The table has four entries, at 0, 2, 4, and 6, which correspond to COM1, COM2, COM3, and COM4 respectively. If the value is zero, there is no such port. If nonzero, it specifies the I/O Base address of that port.
The registers in the UART are as follows.
I/O address     Access      Name    Description
-----------     ------      ----    -----------

IOBase+0        Read        RDR     Received data                (DLAB=0)
                Write       TDR     Transmit data (write)        (DLAB=0)
                Read/write  BRDL    Divisor register lobyte      (DLAB=1)
IOBase+1        Read/write  IER     Interrupt Enable Register    (DLAB=0)
                Read/write  BRDH    Divisor register hibyte      (DLAB=1)
IOBase+2        Read-only   IIR     Interrupt Identification Register
                Write-only  FCR     FIFO control register (FIFO UARTs only)
IOBase+3        Read/write  LCR     Line Control Register
IOBase+4        Read/write  MCR     Modem Control Register
IOBase+5        Read-only   LSR     Line Status Register
IOBase+6        Read-only   MSR     Modem Status Register
IOBase+7        Read/write          Scratch register (on some UARTs only)
The ‘DLAB’ above is the Divisor Latch Access Bit, which is bit 7 of the Line Control Register (LCR) at IOBase+3. This bit controls access to the divisor register (hence the name). The divisor register is a 16-bit register which acts as a divisor to determine the baud rate. It is accessible at IOBase+0 (lobyte) and IOBase+1 (hibyte) when the DLAB is set. When the DLAB is clear, the transmit and receive data register and the IIR appear at these I/O locations.
The relevant registers are now described briefly.
IER    7 6 5 4 3 2 1 0        IOBase+1, read/write
    * * . * . . . .  Not used; zero
    . . * . . . . .  Special function enable (some UARTs)
    . . . . * . . .  Modem Status Change Interrupt Enable (1=enable)
    . . . . . * . .  Line Status Change Interrupt Enable (1=enable)
    . . . . . . * .  Transmit Ready Interrupt Enable (1=enable)
    . . . . . . . *  Received Data Interrupt Enable (1=enable)

IIR    7 6 5 4 3 2 1 0        IOBase+2, read-only
    * * . . . . . .  FIFOs Enabled flags (FIFO UARTs only)
    . . * * . . . .  Special function status (some UARTs)
    . . . . * * * .  Interrupt Identification bits 2, 1, and 0
    . . . . . . . *  Interrupt output active (0=active, 1=inactive)

LCR    7 6 5 4 3 2 1 0        IOBase+3, read/write
    * . . . . . . .  Divisor Latch Access Bit (DLAB)
    . * . . . . . .  Set Break (1=break, 0=normal)
    . . * . . . . .  Stick Parity (1=stick, 0=normal parity, if enabled)
    . . . * . . . .  Even Parity (1=even, 0=odd, if enabled)
    . . . . * . . .  Parity Enable (1=enable, 0=disable)
    . . . . . * . .  Stop bits (1=1.5/2, 0=1 stop bits)
    . . . . . . * *  Word length (00=5, 01=6, 10=7, 11=8 data bits)

LSR    7 6 5 4 3 2 1 0        IOBase+5, read-only
    * . . . . . . .  Not used; 0
    . * . . . . . .  TSRE - Transmit Shift Register Empty
    . . * . . . . .  THRE - Transmit Holding Register Empty
    . . . * . . . .  BI - Break interrupt (break received)
    . . . . * . . .  FE - Framing Error
    . . . . . * . .  PE - Parity Error
    . . . . . . * .  OR - Overrun error
    . . . . . . . *  DR - Data Ready (received a data byte)

MCR    7 6 5 4 3 2 1 0        IOBase+4, read/write
    * . . . . . . .  Special function enable (some UARTs)
    . * * . . . . .  Not used; zero
    . . . * . . . .  Loopback enable (1=enable)
    . . . . * . . .  OUT2 (interrupt buffer control) (1=active)
    . . . . . * . .  OUT1 (1=active)
    . . . . . . * .  RTS - Request To Send (1=active)
    . . . . . . . *  DTR - Data Terminal Ready (1=active)

MSR    7 6 5 4 3 2 1 0        IOBase+6, read-only
    * . . . . . . .  DCD - Data Carrier Detect (0=inactive, 1=active)
    . * . . . . . .  RI - Ring Indicator (0=inactive, 1=active)
    . . * . . . . .  DSR - Data Set Ready (0=inactive, 1=active)
    . . . * . . . .  CTS - Clear To Send (0=inactive, 1=active)
    . . . . * . . .  DDCD - Delta DCD (0=no change, 1=changed)
    . . . . . * . .  TERI - Trailing Edge Ring Indicator (1=edge)
    . . . . . . * .  DDSR - Delta DSR (0=no change, 1=changed)
    . . . . . . . *  DCTS - Delta CTS (0=no change, 1=changed)
Bit 2 of the LCR controls the number of stop bits. If this bit is 0, one stop bit is used. If this bit is 1, two stop bits are used, except when the word length bits are both zero (i.e. 5-bit word length), in which case 1.5 stop bits are used.
Bit 3 of the MCR (OUT2) controls the tristate buffer that drives the interrupt line. When the port is in use, and the interrupt facility is required, this bit must be set, to enable the buffer to drive the IRQ line on the slot bus.
The baud rate divisor is chosen as 115200 divided by the baud rate. For example if a baud rate of 9600 bits per second is required, the divisor value is 115200/9600, which is 12. Both lobyte and hibyte must be programmed. The DLAB must be set prior to writing the divisor, and turned off afterwards.
For a ten-bit character length (e.g. 8-bit data with no parity, or 7-bit data with parity), the transmitter will generate a transmit ready interrupt ten times slower than the bit rate, e.g. 960 times per second in the above example.
The serial port interrupt must be enabled on the PIC for interrupt driven operation (see section 6.10 for details).
There are four independently controllable interrupt sources in the UART. They correspond to bits 3-0 of the IER. When handling interrupts from the UART when more than one interrupt source is enabled in the IER, particularly if the modem status change interrupt is enabled, your software must take care to ensure that all interrupt sources are acknowledged before sending the EOI command to the PIC. This condition can be detected by checking bit 0 of the Interrupt Identification Register (IIR) - if this bit is zero, then an unacknowledged interrupt source is still pending. This will be one of the interrupt sources that are enabled via the IER. This condition must be cleared before the EOI is sent.
The Received Data interrupt is cleared when the character is read from the Received Data register. The Transmit Ready interrupt is cleared when any character is written to the Transmit Data register. The Line Status Change and Modem Status Change interrupts are cleared by a read of the LSR and the MSR, respectively.
The program in section 10.2.2 demonstrates how to use a serial port as a regular interrupt source.
10.2.2 SAMPLE PROGRAM: REGULAR INTERRUPT USING THE SERIAL PORT
This program uses a serial port (COM1 in this case) to generate a regular (periodic) interrupt. The UART divisor is set to 96, giving a baud rate of 1200 bps. At ten bits per character, the UART will transmit a character 120 times per second, and generate the Transmit Ready interrupt at the same rate.
This program has the IRQ and interrupt numbers, and the serial port’s I/O Base address, hard-coded via #defines. These could be set by command line options and/or determined via the table of addresses at 0000:0400 described earlier.
Note that while this program is running, it will be transmitting characters out the serial port at 1200 baud. If a serial printer, or any other device, is connected to the serial port, you might want to remove it before running this program!
See section 10.2.3 for a method of incorporating this timing technique into a program that is already using the serial port, to implement delays in a transmitted data stream.
See section 6.22 for the explanation of the pushf/cli/popf technique.
/*
Sample program #17
Demonstrates regular interrupts using the serial port
Part of the PC Timing FAQ / Application notes
By K. Heidenstrom ([email protected])

Save and assemble the critical error module CRIT_ERR
Save this sample code to SAMPLE17.C
Compile this module with:
    bcc -c -I<inc_path> -ms sample17.c
Link the modules with:
    tlink /c /x <c0_path>\c0s.obj sample17.obj crit_err.obj,
        sample17, nul, <lib_path>\cs
Where inc_path is the path to your C header files, c0_path is the path to your
startup modules C0x.OBJ and lib_path is the path to your C libraries Cx.LIB.
*/

#pragma inline;        /* Required for asm pushf, popf, and cli */

#include <bios.h>    /* Needed for bioskey() */
#include <dos.h>    /* Needed for MK_FP */
#include <io.h>        /* Needed for _write() */
#include <stdio.h>    /* Needed for printf() */
#include <stdlib.h>    /* Needed for exit() */

#define FALSE 0
#define TRUE 1

#define STDERR 2        /* DOS handle for standard error */

#define BAUDDIV 96        /* Interrupt rate = 11520 / BAUDDIV */

#define IOBASE 0x3F8        /* COM1 standard I/O base address */
#define COMIRQ 4        /* IRQ number for COM1 (standard) */
#define COMINT 0x0C        /* Corresponding interrupt number */
#define PICMASK (1 << COMIRQ)    /* Bitmask for interrupt in PIC IMR */

void crit_err_intercept(void);            /* Provided in CRIT_ERR.OBJ */
unsigned int is_at_crit_prompt(void);        /* Provided in CRIT_ERR.OBJ */

typedef void interrupt (far *intfuncp)();    /* Pointer to interrupt handler */

intfuncp old_com_int = (intfuncp)0xFFFFFFFFL;

static unsigned int onetwentieths = 0;        /* 120ths of seconds */
static unsigned int seconds = 0;        /* Seconds */
static unsigned char old_brdl, old_brdh;    /* Old baud rate divisor */
static unsigned char old_lcr, old_mcr, old_ier;    /* Old LCR, MCR, IER contents */

/* The interrupt handler is invoked when the UART is transmit ready.  It must
   feed the UART to shut it up.  When the UART is hungry again, it will issue
   another interrupt.  This handler increments a counter variable.  */

void interrupt com_int_handler(void) {
    outportb(IOBASE, 0x00);        /* "Feeeed me Seymour" */
    if (++onetwentieths >= 120) {    /* Increment 120ths count */
        onetwentieths = 0;
        ++seconds;
        }
    outportb(0x20, 0x20);        /* Send EOI */
    return;                /* From interrupt */
    }

void restore_normal(void) {
    asm pushf;
    asm cli;
    outportb(0x21, inportb(0x21) | PICMASK); /* Disable int in PIC */
    outportb(IOBASE + 3, old_lcr & 0x7F);    /* Clear DLAB */
    outportb(IOBASE + 1, old_ier);        /* Restore IER */
    outportb(IOBASE + 3, old_lcr | 0x80);    /* Set DLAB */
    outportb(IOBASE + 0, old_brdl);        /* Lobyte of divisor */
    outportb(IOBASE + 1, old_brdh);        /* Hibyte of divisor */
    outportb(IOBASE + 3, old_lcr);        /* Restore LCR */
    outportb(IOBASE + 4, old_mcr);        /* Restore MCR */
    asm popf;
    return;
    }

void abort_cleanup(int dos_is_safe) {
    if (dos_is_safe) {
        if (old_com_int != (intfuncp)0xFFFFFFFFL) {
            setvect(COMINT, old_com_int);
            old_com_int = (void far *)0xFFFFFFFFL;
            }
        }
    else {
        if (old_com_int != (intfuncp)0xFFFFFFFFL) {
            *((intfuncp far *)MK_FP(0, COMINT << 2)) = old_com_int;
            old_com_int = (void far *)0xFFFFFFFFL;
            }
        }
    restore_normal();
    return;
    }

void interrupt ctrl_c_handler(void) {
    static char message[] = "\r\nProgram terminated by Ctrl-Break or Ctrl-C\r\n";
    if (is_at_crit_prompt())
        abort_cleanup(FALSE);
    else {
        abort_cleanup(TRUE);
        _write(STDERR, &message, sizeof(message));
        }
    exit(255);
    }

void poll_exit(void) {
    if (bioskey(1)) {
        if ((bioskey(0) & 0xFF) == 27) {
            setvect(COMINT, old_com_int);
            old_com_int = (void far *)0xFFFFFFFFL;
            restore_normal();
            exit(0);
            }
        }
    return;
    }

void main(void) {
    unsigned int main_onetwentieths, main_seconds, old_onetwentieths;

    printf("Sample program #17 - Demonstrates regular interrupts using the serial port\n");
    printf("Part of the PC Timing FAQ / Application notes\n");
    printf("By K. Heidenstrom ([email protected])\n\n");
    printf("Press <Esc> to exit\n\n");

    crit_err_intercept();        /* Trap critical errors */
    setvect(0x23, ctrl_c_handler);    /* Trap Ctrl-C interrupt */
    old_com_int = getvect(COMINT);
    setvect(COMINT, com_int_handler);

    asm cli;
    old_lcr = inportb(IOBASE + 3);        /* Get old LCR value */
    old_mcr = inportb(IOBASE + 4);        /* Get old MCR value */
    outportb(IOBASE + 3, 0x83);        /* Set DLAB */
    old_brdl = inportb(IOBASE + 0);        /* Get divisor lobyte */
    old_brdh = inportb(IOBASE + 1);        /* Get divisor hibyte */
    outportb(IOBASE + 0, BAUDDIV & 0xFF);    /* Set up divisor lobyte */
    outportb(IOBASE + 1, BAUDDIV >> 8);    /* Set up divisor hibyte */
    outportb(IOBASE + 3, 0x03);        /* Clear DLAB */
    old_ier = inportb(IOBASE + 1);        /* Get old IER value */

    outportb(IOBASE + 4, 0x08);        /* Enable interrupt buffer */
        /* Use 0x18 instead of 0x08 above to set loopback mode so
           data is not transmitted out the serial port connector */
    outportb(IOBASE + 1, 0x00);        /* No interrupts yet */
    outportb(0x21, inportb(0x21) & (~PICMASK)); /* Enable int in PIC */
    outportb(IOBASE + 1, 0x02);        /* Enable Tx interrupt */

    asm sti;

    printf("Seconds   120ths\n");

    while (1) {
        asm cli;
        main_onetwentieths = onetwentieths;
        main_seconds = seconds;
        asm sti;
        if (main_onetwentieths != old_onetwentieths) {
            printf("%5d     %3d\r",
                main_seconds, main_onetwentieths);
            old_onetwentieths = main_onetwentieths;
            }
        poll_exit();
        }
    }
10.2.3 INSERTING DELAYS INTO SERIAL PORT TRANSMITTED DATA
The information and code given in this section is untested.
In controller applications, it is sometimes necessary to insert delays into a serial transmission. This may be required as part of a communication protocol, or for other reasons. For example, certain types of modems used in medium speed data communication cannot accept data to be transmitted immediately when the transmit enable flow control line is driven active by the computer, so the computer must raise flow control and delay for a certain time (usually in the order of 5-20 milliseconds) before starting to transmit data.
These delays can be created using the transmit interrupt method, using the same serial port which transmits the data, via the loopback enable bit, bit 4 of the MCR (see section 10.2.1). Setting this bit forces the UART’s data output in the idle (marking) state, and loops its transmitted data back to its receiver, internally to the UART chip. In this state, the transmit ready interrupt can be used to time the delay period as per the sample program in section 10.2.2. When the required number of interrupts have occurred, i.e. the required delay time has elapsed, wait for the last byte to be serialised (by waiting for TSRE in the LSR to go true) and then turn off loopback mode. Your program can then begin transmitting.
This method cannot be used if your program must be able to receive characters during the delay period, because in loopback mode, the UART ignores the receive data signal, but this method can be used in half duplex applications. Also, the granularity of the delay is one character length. Reprogramming the baud rate during the delay period might allow finer delay timing, but this would be very technical, if not impossible, to implement correctly.
If your program transmits under interrupt, I would suggest using some flags to communicate between the mainline and the interrupt handler. For example, the mainline could signal the start of a transmission by enabling outgoing flow control, selecting loopback mode, sending one or two characters to the UART, setting an ‘idle-leader’ flag to be used by the interrupt routine, and enabling transmit interrupts. The interrupt routine would check the interrupt source (if more than one source is enabled on the UART) and if the interrupt is due to transmit ready, first check whether the idle-leader flag is set, and if so, send any character to the port (e.g. 0FF hex), decrement the idle leader counter, and return. If the idle leader timer counts down to zero, either the mainline or the interrupt routine would have to wait for TSRE to go active, turn off loopback mode, and start transmitting data.
If your program is doing nothing while it waits during the transmit idle period, and does not otherwise transmit under interrupt, you can use the transmit ready interrupt signal without actual interrupts, in a polled fashion. Fast response to a transmit ready signal is not necessary, as there is a window of about two character lengths between when the THRE (Transmit Holding Register Empty) signal goes true, and when the transmit data register must be filled, due to the double buffering provided by the transmit holding register and transmit shift register.
Here is a crude, untested function to transmit a string of data bytes without using interrupts. It asserts outgoing flow control (DTR and RTS), and waits for a number of character-periods determined by the leader_len parameter, then transmits the message pointed to by the msg parameter for the number of bytes specified by the msg_length parameter, waits for the last character to be fully serialised plus nearly one character length, and drops the RTS line.
A similar method can be used with an interrupt handler, with quite a lot of extra mucking around.
void wait_tx_string(unsigned leader_len, char * msg, unsigned msg_length) {
    while ((inportb(IOBASE+5) & 0x60) != 0x60)
        ;        /* Wait for last char to be serialised */
    asm pushf;
    asm cli;
    outportb(IOBASE+4, inportb(IOBASE+4) | 0x13);    /* DTR, RTS, loopback */
    asm popf;
    while (leader_len--) {
        outportb(IOBASE, 0xFF);        /* Dummy byte */
        while ((inportb(IOBASE+5) & 0x20) == 0)
            ;            /* Wait for THRE again */
        }
    while ((inportb(IOBASE+5) & 0x40) == 0)
        ;                /* Wait for TSRE */
    asm pushf;
    asm cli;
    outportb(IOBASE+4, inportb(IOBASE+4) & 0xEF);    /* Loopback off */
    asm popf;
    while (msg_length--) {
        outportb(IOBASE, *(msg++));
        while ((inportb(IOBASE+5) & 0x20) == 0)
            ;            /* Wait for THRE between chars */
        }
    while ((inportb(IOBASE+5) & 0x40) == 0)
        ;                /* Wait for last char sent */
    asm pushf;
    asm cli;
    outportb(IOBASE+4, inportb(IOBASE+4) | 0x10);    /* Loopback back on */
    asm popf;
    outportb(IOBASE, 0xFF);        /* Dummy byte */
    while ((inportb(IOBASE+5) & 0x60) != 0x60)
        ;        /* Wait for dummy char to be serialised */
    asm pushf;
    asm cli;
    outportb(IOBASE+4, inportb(IOBASE+4) & 0xED); /* RTS, loopback off */
    asm popf;
    return;
    }
This is only an outline of this technique. If you are implementing this system, I would strongly recommend a thorough read of a technical document on the serial port, such as Chris Blum’s article (see section 10.2.1) or manufacturers’ data sheets for the serial chips, so you can determine all the implications of your code’s actions. This is particularly important if timing is very critical, as there are timing subtleties and interactions between the transmit holding register and the transmit shift register that must be taken into account.
There is also a problem caused by the fact that a transmit ready interrupt is acknowledged by a read of the LSR. This has serious implications relating to when the LSR may be interrogated. If the mainline accesses the LSR, it may clear a pending interrupt condition, causing transmit interrupts to cease. I have not investigated this properly, but be warned! (*)
10.3 EXTERNAL INTERRUPT SOURCES
An external interrupt source can be used for many things, including timekeeping. External hardware of some sort will normally be required to drive the interrupt in the desired way. Usually the external interrupt source will use the parallel port or the serial port to get access to an interrupt level (IRQ) on the slot bus.
The parallel or serial port input can be driven by an external source at the desired rate. If only a slow interrupt rate is required, you can clock the input at 300 Hz, which can be derived using a PLL (Phase Locked Loop) from the mains frequency. 300 Hz is a good choice because it can be generated from both 50Hz (Europe) and 60Hz (America) mains frequencies. Thanks to John Stockton for suggesting this technique (though he points out that he has not tested it).
You may have noticed how you never have to adjust clocks that are mains powered (except after power loss, of course). This is because the mains frequency is usually regulated very carefully by power supply authorities and, though it may vary slightly in the short term, its long term accuracy should be very high. A frequency derived from the mains in this way could be a good clock source for timing applications which require high long-term accuracy.
10.3.1 EXTERNAL INTERRUPT THROUGH PARALLEL PORT
The parallel port interrupt is normally connected to IRQ7 although some cards are jumper-selectable to IRQ5 and maybe other IRQs. The parallel port interrupt was intended to be used in the normal course of sending data to a parallel printer, but DOS and BIOS do not use the interrupt facility. Versions of OS/2 prior to Warp (3.0) did require the interrupt for printing, but from Warp onwards the interrupt is not required (though it can be used if the /IRQ switch is provided on the line in CONFIG.SYS, i.e. BASEDEV=PRINT0x.SYS /IRQ).
The basic parallel port consists of three registers at consecutive I/O locations starting at the I/O Base address. The I/O Base address of a nominated LPT port (e.g. LPT1) can be found in the table in the BIOS data area in low memory, starting at 0040:0008 (aka 0000:0408). The table has three entries, at 8, 0A, and 0C, which correspond to LPT1, LPT2, and LPT3. If the value is zero, there is no such port. Some BIOSes may support a fourth port base entry at 0E, but other BIOSes use this location for an unrelated function.
The register at IOBase+2 is the Control register. Bit 4 of this register controls the tristate buffer that drives the IRQ line, and the buffer is enabled if the bit is set. In this state, a falling edge (high to low transition) on the Ack signal (pin 10 of the 25-pin connector) will cause an interrupt (providing that the interrupt is enabled in the PIC’s IMR; see section 6.10).
10.3.2 EXTERNAL INTERRUPT THROUGH SERIAL PORT
In addition to the Transmit Ready interrupt (which can provide a regular interrupt source, see section 10.2 and subsections), the serial port can issue an interrupt when received data is available, when the receiver line status changes, and/or when the receiver ‘modem status’ changes. The ‘modem status’ refers to the four incoming flow control lines on the serial connector which indicate the modem status when the port is connected to a modem. These inputs are as follows.
Name    Full name           Pin (9-pin) Pin (25-pin)

CTS     Clear To Send       8           5
DSR     Data Set Ready      6           6
RI      Ring Indicator      9           22
DCD     Data Carrier Detect 1           8
The modem status change interrupt is enabled by bit 3 of the Interrupt Enable Register (IER) (see section 10.2.1 for details). When this interrupt is enabled, and the interrupt buffer is enabled via the OUT2 line in the Modem Control Register (MCR) (also see section 10.2.1) and the appropriate IRQ is enabled via the IMR in the PIC (see section 6.10), every transition on any of these four incoming lines will cause an interrupt request.
The current states of the four incoming lines can be read on the Modem Status Register (see section 10.2.1) which also contains the ‘delta’ signals, which indicate whether the corresponding line has changed state since the last time the MSR was read. When using these signals, remember that they clear when your program reads the MSR, so read the MSR once only, and test the delta bits in this value - don’t re-read the MSR to check for any other delta bits, as they will all have cleared just after the MSR was read the first time.
See the notes in section 10.2.1 about ensuring that all interrupt sources are acknowledged before leaving the interrupt routine.
10.3.3 EXTERNAL INTERRUPT THROUGH SOUND CARD
Sound cards such as the Sound Blaster can most probably generate periodic interrupts, though these are usually used for some purpose related to sound generation, not for timing in the general sense. I haven’t investigated this one. Get a technical reference such as the Sound Blaster Freedom project if you want to try this.
10.3.4 EXTERNAL INTERRUPT THROUGH CUSTOM I/O CARD
There are many third party I/O cards that are able to generate periodic interrupts for various purposes, and for one-off dedicated applications or for experimenting, you may wish to use these. I have no references, but you could try looking through advertisements in computer experimenters’ magazines for sources.
Alternatively, if you have the time, money, experience, and inclination, you can make your own I/O card. Interrupt lines on the ISA bus are all rising edge triggered. Just generate the rising edge, and if there is no other card driving that line, and the interrupt is enabled in the mask register of the appropriate PIC, the appropriate interrupt will be invoked. On ISA cards it seems to be standard practice to drive IRQ lines with a buffer that can be put into high impedance mode (tri-stated) or driving mode, under software control. While this is doesn’t allow for interrupt sharing, or have any other great purpose, it is in general not a bad idea.
The EIDE, MCA, and PCI busses will be different. Get a good technical book if you intend to try this.
10.4 THE JOYSTICK PORT
The joystick port, or game port, is accessed via a single I/O location, which is normally at I/O address 201h (may be jumper-settable to 301h on some cards). The joystick standard joystick hardware interface circuit is given in Figure 4. It supports four pushbutton-type inputs without hardware debouncing, and four variable resistors (potentiometers, abbreviated ‘pot’) for position sensing, to support two joysticks, each with two buttons and two pots (for the X and Y axes). Some cards support only the first joystick (see later).
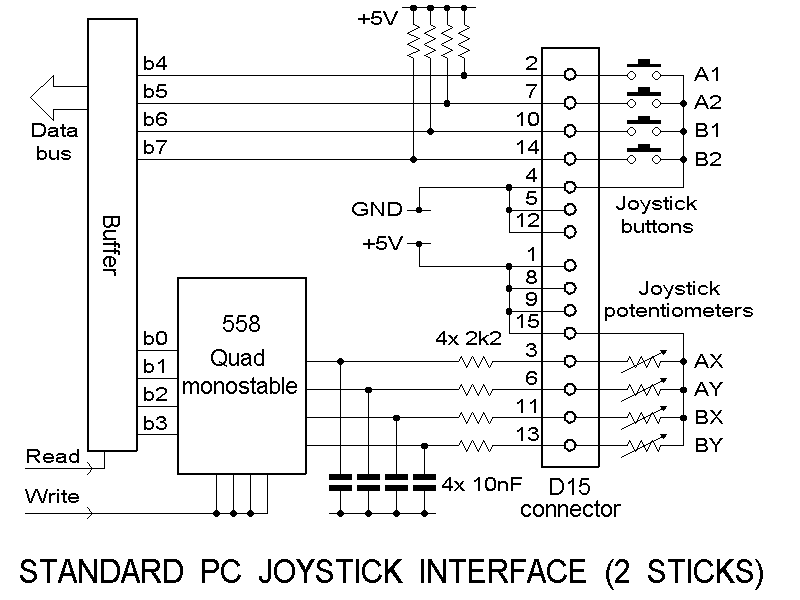 Figure 4
10.4.1 JOYSTICK PORT HARDWARE
The joystick hardware cannot generate an interrupt, and has no outputs, though it does provide a +5V supply which can be used externally, which the parallel port does not have. It is really only useful as a general purpose input port.
The pots are read using four independent monostable or ‘one-shot’ circuits. The monostable circuits are triggered by a signal from the processor, and each one charges or discharges a capacitor at a rate determined by the resistance of the associated pot. When triggered, the monostable’s output goes high. When the capacitor reaches a certain voltage, the output returns low, and remains low until the monostable is next triggered by the processor. Thus the name, ‘one-shot’. The processor triggers the monostable, then measures the length of time taken for the monostable’s output to go low, to determine the resistance, and thus the position, of the pot. The formula relating resistance to time is supposedly: T = 24.2 + (0.011 x R) where T is the time in microseconds and R is the resistance of the pot in ohms, but the capacitors are usually inaccurate (+/- 20% or worse) ceramic components, and are influenced by temperature, so the above formula is ‘nominal’ only. In practice the relationship will vary from one input to the next, and depend on temperature.
The nominal pot end-to-end resistance is 100 kilohms (100000 ohms), giving a nominal maximum timeout of about 1125 us. Times in this range can be measured accurately using CTC channel zero or two in either mode 3 or mode 2, or using Refresh Detect. A sample program to read the joystick position is given in section 10.4.2.
The joystick connector is a 15-pin female D-sub connector. The pinout is:
    Pin     Dir     Type    Stick   Button  Axis    Return to

    1       Out                                     +5V
    2       In      Btn     A               1       Gnd
    3       In      Pot     A       X               +5V
    4       -                                       Gnd
    5       -                                       Gnd
    6       In      Pot     A       Y               +5V
    7       In      Btn     A               2       Gnd
    8       Out                                     +5V
    9       Out                                     +5V
    10      In      Btn     B               1       Gnd
    11      In      Pot     B       X               +5V
    12      -                                       Gnd
    13      In      Pot     B       Y               +5V
    14      In      Btn     B               2       Gnd
    15      Out                                     +5V
Writing any value to the I/O port (201h or 301h) causes all four monostables to start timing. Their outputs go high immediately, and go low a certain length of time later, depending on the resistance of the associated potentiometer. Reading the I/O port yields the following:
    7 6 5 4 3 2 1 0
    * . . . . . . .  Button B2 (pin 14), 0=closed, 1=open (default)
    . * . . . . . .  Button B1 (pin 10), 0=closed, 1=open (default)
    . . * . . . . .  Button A2 (pin 7), 0=closed, 1=open (default)
    . . . * . . . .  Button A1 (pin 2), 0=closed, 1=open (default)
    . . . . * . . .  Monostable BY (from pin 13), 1=timing, 0=timed-out
    . . . . . * . .  Monostable BX (from pin 11), 1=timing, 0=timed-out
    . . . . . . * .  Monostable AY (from pin 6), 1=timing, 0=timed-out
    . . . . . . . *  Monostable AX (from pin 3), 1=timing, 0=timed-out
Some cards only support one joystick. You may be able to tell by looking for a 14-pin chip with ‘556’ in its part number (single joystick), or a 16-pin chip with ‘558’ in its part number (two joysticks), usually located near the 15-pin connector. Some cards implement the joystick interface in an ASIC, in which case you may be able to follow tracks to find how many joysticks are supported.
10.4.2 READING THE JOYSTICK BUTTONS AND POSITION
Most BIOSes apart from very early ones provide functions to read the buttons and positions of the joystick, accessed via int 15h. If the function is not supported, carry is set on return and AH may be set to 80h or 86h. Steve McGowan and Mark Feldman in their PC-GPE article say that many machines do not support the BIOS functions properly, and that the first function (read buttons) may be supported, while the second function (read positions) may not.
Read Joystick Buttons : int 15h
    Call with:    AH = 84 hex
                 DX = 0000 hex
    Returns:    AL = Button states in bits 7-4, as read from input port
Bits 7-4 are valid in the returned value, and they default to ‘1’ and are ‘0’ if the corresponding button is currently depressed. This function does not perform any debouncing on the joystick button inputs. This means that the bit may ‘bounce’ (i.e. alternate randomly, one or more times) at the instant that it makes or breaks contact, because of the mechanical nature of the switch.
Read Joystick Positions : int 15h
    Call with:    AH = 84 hex
                DX = 0001 hex
    Returns:    AX = Joystick A, axis X (0-511, 0 if timed-out)
                BX = Joystick A, axis Y (0-511, 0 if timed-out)
                CX = Joystick B, axis X (0-511, 0 if timed-out)
                DX = Joystick B, axis Y (0-511, 0 if timed-out)
This function reads each of the four inputs separately, disabling interrupts for a few milliseconds each time. It may use CTC channel 0 for timing, and if so, its calculations will be affected if CTC channel 0 is operating in a different mode from the mode that the BIOS is expecting (e.g. if the BIOS POST set CTC channel 0 to mode 3, and a program has subsequently reprogrammed it for mode 2, or vice versa) or if CTC channel 0 is operating with a non-standard divisor. Inputs which have no joystick connected will time out and be reported as zero.
10.4.3 NOTES FROM THE PC-GPE ARTICLE
In the joystick article in the PC Games Programmer’s Encyclopedia (PC-GPE), Steve McGowan and Mark Feldman give some useful information.
All joysticks they tested returned non-linear values, i.e. the value returned at centre-position is not half way between the values returned at corner positions, so most joystick setup programs require the user to set up the centre position as well as the corner positions. (This is not surprising, as joysticks apparently use logarithmic, not linear, potentiometers!) They suggest a 10% ‘dead zone’ around the centre, as joysticks do not always centre repeatably. Joysticks are not high quality devices, and some smoothing (e.g. 1/4 new plus 3/4 old, or 1/8 new + 7/8 old) on the position values may help.
10.4.4 SAMPLE PROGRAM: READING THE JOYSTICK POSITION
The following program demonstrates three methods of reading the joystick pot positions.
The first method, ctc2_read_joystick(), uses CTC channel 2 in mode 0 for timing the pulse produced by the joystick hardware, and also detecting timeout. Timeout occurs when more than MAXCTCCLOCKS CTC clocks pass and the monostable output is still active. This method reads one joystick input at a time.
The second method, refd_read_joystick(), uses the Refresh Detect signal (see section 7.37) as the timing source, and reads all four inputs simultaneously.
The third method uses the BIOS function call.
The first method has two caveats: (1) the ctc2_read_joystick() function will cut off any audio being generated using CTC channel 2, and (2) T2PORT is 0x62 on PCs and XTs with the old 8255 chip (see section 7.30) so if you wish to support these machines, you will have to detect the machine type (code for this is included in section 7.37.1 but is in assembler) and select the port address accordingly. It may work under OS/2. HW_TIMER should be set ON.
The ctc2_read_joystick() function uses a similar technique to the equivalent BIOS function, though I wrote it before I disassembled the BIOS version. It has several advantages over the BIOS function - it doesn’t rely on the mode and divisor of CTC channel zero, so it will work if CTC channel zero has been programmed with a different mode and/or a different divisor, it has much more consistent and more accurate timeout detection, it reads one input at a time (so only the relevant inputs need be read), it will often be quicker than the BIOS function, and it has higher resolution. Its major disadvantage is that because it uses CTC channel 2, it will stop any speaker sound that may be in progress when the function is called (sound cards are not affected, of course).
In a practical application, the values returned from ctc2_read_joystick() could be averaged (using a 3/4-old-averaged-value plus 1/4-new, or 7/8-old-averaged- value plus 1/8-new, or similar algorithm, or average of last n samples) to reduce jitter, though this will slow the response.
The second method, using Refresh Detect, will not work on a PC or XT, as they do not have a Refresh Detect signal. Also, it assumes that the refresh rate is as configured by the BIOS, i.e. a divisor of 18 in CTC channel 1, giving one refresh every 15.0857 microseconds. It has a much lower resolution than the first method, but has the advantage that it reads all four inputs at once, so in most cases will be the quickest method, and it does not make any use of CTC channels 0 and 2, so it does not rely on the programmed mode and divisor in CTC channel 0, and does not disrupt speaker sound being generated via CTC channel 2.
This sample program also reads the joystick using the BIOS function described in the previous section, and displays the values read directly and the values read via the BIOS.
See section 6.22 for the explanation of the pushf/cli/popf technique.
/*
Sample program #18
Demonstrates three ways of reading the joystick
Part of the PC Timing FAQ / Application notes
By K. Heidenstrom ([email protected])

Save this file to SAMPLE18.C and compile with:
    bcc -I<inc_path> -L<lib_path> -ms sample18.c
Where inc_path is the path to your C header files and your startup modules
C0x.OBJ, and lib_path is the path to your C libraries Cx.LIB.

*/

#pragma inline;        /* Required for asm pushf, popf, cli, and sti */

#include <bios.h>    /* Needed for bioskey() */
#include <dos.h>    /* Needed for inportb() and outportb() */
#include <stdio.h>    /* Needed for printf() */
#include <stdlib.h>    /* Needed for exit() */

#define BIOS_TICK_COUNT_P ((volatile unsigned long far *) 0x0040006CL)

#define JOYPORT 0x201        /* Joystick port I/O address */
#define MONOS 0x0F        /* Bottom four bits are monostable outputs */

#define    T2PORT 0x61        /* Use 0x62 for PC and XT! */
#define T2OUT 0x20        /* Bit 5 is timer 2 output readback */

#define PORTB 0x61        /* For Refresh Detect - AT only! */
#define REFDET 0x10        /* Bit 4 is Refresh Detect */

#define MAXCTCCLOCKS 1800    /* Max CTC clocks for timeout */
#define WAITCTCCLOCKS 10    /* CTC clocks for monostable recovery (<255) */
#define    MAXREFRESH 100        /* Maximum refresh detect counts for timeout */

typedef struct {
    int ax;
    int ay;
    int bx;
    int by;
    } joyvals;

/* The following function should preferably be called with interrupts enabled.
   It preserves the state of the interrupt flag, and explicitly disables
   interrupts at several places, including disabling interrupts for up to 1.5
   ms during the read operation.  It returns -1 if an error occurred (i.e. bad
   input number specified, or timeout), otherwise it returns the number of CTC
   clocks measured.  It reads a single joystick pot input.  */

unsigned int ctc2_read_joystick(unsigned int inputnum) {
    unsigned char joymask;        /* Bitmask for input */
    unsigned int endtime;        /* Count in timer 2 at end of pulse */
    if (inputnum > 3)
        return -1;        /* Invalid input number */
    joymask = 1 << inputnum;
    asm pushf;
    asm cli;
    outportb(PORTB, (inportb(PORTB) & 0xFC) | 0x01); /* Enable Timer 2 */
    asm popf;
    if (inportb(JOYPORT) & joymask) {    /* Check for still timing out */
        asm pushf;
        asm cli;
        outportb(0x43, 0xB0);        /* Chan. 2, two-byte, mode 0 */
        outportb(0x42, MAXCTCCLOCKS & 0xFF);
        outportb(0x42, MAXCTCCLOCKS >> 8);
        while (inportb(JOYPORT) & joymask) {
            if (inportb(T2PORT) & T2OUT) {
                asm popf;
                return -1;
                }
            }
        asm popf;
        }
    asm jmp SHORT $+2
    asm jmp SHORT $+2        /* Sniff for pending interrupts */
    asm pushf;
    asm cli;
    outportb(0x43, 0x90);        /* Channel 2, lobyte-only, mode 0 */
    outportb(0x42, WAITCTCCLOCKS);
    while ((inportb(T2PORT) & T2OUT) == 0)
        ;            /* Wait for a short time */
    asm popf;
    asm jmp SHORT $+2
    asm jmp SHORT $+2        /* Sniff for pending interrupts */
    asm pushf;
    asm cli;
    outportb(0x43, 0xB0);        /* Chan. 2, two-byte, mode 0 */
    outportb(0x42, MAXCTCCLOCKS & 0xFF);
    outportb(0x42, MAXCTCCLOCKS >> 8); /* Start channel 2 */
    outportb(JOYPORT, 0);        /* Start monostables */
    while (inportb(JOYPORT) & joymask) {
        if (inportb(T2PORT) & T2OUT) {    /* Timed out */
            asm popf;
            return -1;
            }
        }
    outportb(0x43, 0x80);        /* Latch timer 2 */
    endtime = inportb(0x42);
    endtime += inportb(0x42) << 8;
    asm popf;
    return MAXCTCCLOCKS - endtime;
    }

/* The following function should be called with interrupts enabled.  It will
   lock out interrupts for up to about 1.5 ms during the main timing cycle.
   It reads all four joystick positions. */

void refd_read_joystick(joyvals * jv) {
    unsigned char counts[16];    /* Counts per input combination */
    unsigned char refcount;        /* Counter for refreshes */
    register unsigned char portbval; /* Value from port B, and counter */
    register unsigned char inlast, inthis;    /* Joystick port input values */
    unsigned char timedout;        /* Inputs that timed out either phase */
    unsigned char changed;        /* Inputs that changed */
/* Check for any monostables still timing out */
    portbval = inportb(PORTB);
    for (refcount = 1; refcount < MAXREFRESH; ++refcount) {
        inthis = inportb(JOYPORT) & MONOS;
        if (!inthis)
            break;        /* All monostables finished */
        while (((inportb(PORTB) ^ portbval) & REFDET) == 0)
            ;
        portbval ^= 0xFF;
        }
    timedout = inthis;    /* Set bits for inputs that timed out */
/* Initialise counts and wait sixteen refreshes for monostables to stabilise */
    for (inthis = 0; inthis < 16; ++inthis) {
        counts[inthis] = 0;
        while (((inportb(PORTB) ^ portbval) & REFDET) == 0)
            ;
        portbval ^= 0xFF;
        }
    inlast = MONOS;            /* Initialise most recent input value */
/* Timing critical stuff - could be optimised to assembly language */
    asm pushf;
    asm cli;            /* Lock ints for timing critical stuff */
    portbval = inportb(PORTB);
    while (((inportb(PORTB) ^ portbval) & REFDET) == 0)
        ;            /* Wait for refresh detect to change */
    portbval ^= 0xFF;
    outportb(JOYPORT, 0);        /* Start the monostables */
    for (refcount = 1; refcount < MAXREFRESH; ++refcount) {
        inthis = inportb(JOYPORT) & MONOS;
        if (inthis < inlast)
            counts[inlast = inthis] = refcount;
        if (!inthis)
            break;        /* All monostables finished */
        while (((inportb(PORTB) ^ portbval) & REFDET) == 0)
            ;        /* Wait for it to change */
        portbval ^= 0xFF;
        }
    asm popf;
    timedout |= inthis;        /* Any that timed out this time */
/* Now figure out what happened */
    jv->ax = jv->ay = jv->bx = jv->by = -1;
    inlast = 0;
    for (inthis = 0; inthis <= MONOS; ++inthis) {
        if ((refcount = counts[MONOS - inthis]) != 0) {
            changed = (inthis - inlast) & (timedout ^ 0xFF);
            inlast = inthis;
            if (changed & 1)
                jv->ax = refcount;
            if (changed & 2)
                jv->ay = refcount;
            if (changed & 4)
                jv->bx = refcount;
            if (changed & 8)
                jv->by = refcount;
            }
        }
    return;
    }

void bios_read_joystick(joyvals * jv) {
    unsigned int jax, jay, jbx, jby;
    _AX = 0x8400;
    _DX = 0x0001;
    geninterrupt(0x15);
    jax = _AX;
    jay = _BX;
    jbx = _CX;
    jby = _DX;
    jv->ax = jax;
    jv->ay = jay;
    jv->bx = jbx;
    jv->by = jby;
    return;
    }

void main(void) {
    joyvals refdvals, biosvals;
    printf("Sample program #18 - Demonstrates reading joystick positions\n"
        "Part of the PC Timing FAQ / Application notes\n"
        "By K. Heidenstrom ([email protected])\n\n"
        "Timeout (input not connected) is indicated by 65535 for the CTC2\n"
        "\tand RefDet methods, and 00000 for the BIOS function method\n\n"
        "Press <Esc> to exit\n\n"
        "----- CTC2 method -----     ---- RefDet method ----"
        "     ----- BIOS method -----\n\n");

    while (1) {
        refd_read_joystick(&refdvals);
        bios_read_joystick(&biosvals);
        printf("%05u,%05u,%05u,%05u     %05u,%05u,%05u,%05u     %05u,%05u,%05u,%05u\r",
            ctc2_read_joystick(0), ctc2_read_joystick(1),
            ctc2_read_joystick(2), ctc2_read_joystick(3),
            refdvals.ax, refdvals.ay, refdvals.bx, refdvals.by,
            biosvals.ax, biosvals.ay, biosvals.bx, biosvals.by);
        if (bioskey(1))
            if ((bioskey(0) & 0xFF) == 27)
                break;
        }
    exit(0);
    }
The logic of ctc2_read_joystick() is not obvious so I will explain. The function only measures one joystick input, and it may have been called recently, so the input it is about to measure may still be timing out from an earlier call to ctc2_read_joystick(). The function tests explicitly for this, and if this is the case, it performs a timeout detection in the first while() loop, waiting for the monostable output to go low. If the monostable output does not go low within the timeout period, the function returns -1.
If the monostable output is, or already was, low, then a short delay of about 16 CTC clocks plus overhead is inserted, to give a minimum recovery time for the monostable circuitry which must discharge or recharge the capacitor fully. If the monostable is triggered too quickly after it has timed out, the capacitor might not be fully discharged or recharged, resulting in an unusually short pulse, because the capacitor doesn’t have to charge or discharge so far to reach the monostable threshold.
Then, CTC channel 2 is programmed with a count of MAXCTCCLOCKS and the joystick monostables are triggered. This section of code operates with interrupts locked out. It continually checks the joystick status, and checks whether a timeout has occurred. A timeout is indicated by the Timer 2 Output signal on the I/O port at I/O address 61h (62h on the PC and XT). If a timeout occurs, the function returns -1. If the monostable times out and its status line goes low within the timeout period, the count in CTC channel 2 is latched, and the number of elapsed CTC clocks is calculated and returned. The function will always return within about 2 x MAXCTCCLOCKS CTC clocks (units of 0.838 us) plus interrupt overhead, unless the CTC is faulty.
See section 7.30 for a detailed explanation of the timing method using CTC channel 2 in this way.
The logic of refd_read_joystick is similar, but it watches for transitions on the Refresh Detect signal to measure elapsed time. Whenever the monostable bits in the joystick port value change, the counts[] array is updated with the Refresh Detect count for the appropriate input pattern. This means that if more than one monostable times out within the same sample period, the code does not have to potentially update up to four variables, possibly missing a Refresh Detect transition. The four returned values are calculated after the timing critical section has completed. The code also keeps flags for inputs which have timed out, either in the initial checking phase, or the main timing phase, and always returns -1 for these inputs.
10.4.5 USING THE JOYSTICK PORT FOR GENERAL PURPOSE INPUT
The joystick button inputs can be used as general purpose button or switch inputs, and can also be driven by logic level signals or by open collector or open drain logic outputs. If used with a signal direct from a mechanical contact (e.g. a switch, microswitch, contact, or pushbutton), remember that the joystick port does not perform hardware debouncing, so this must be provided by external hardware or provided by software.
Provided that you can tolerate poor accuracy, poor repeatability, poor matching between channels, and poor temperature stability, you can use the joystick position inputs as general purpose analogue inputs, but don’t fart too close to them. The inputs should not be voltage-driven, they should be driven from a variable resistor from a positive supply rail such as the 5V rail (the way the joystick itself works), or from a positive variable current source. This gives a roughly linear relationship between resistance and time measured, which means an inverse (reciprocal) relationship between current and time measured.
A voltage signal can be converted into a variable current signal, and a circuit to do this is given in Figure 5. This circuit converts a positive, ground-referenced voltage into a positive current source that can be fed into one joystick position input. The relationship between input voltage and output current is linear. 1V on the input produces an output current of 1mA. The circuit requires a 9-12V supply, which is unfortunately not available on the joystick port, though you could use a switched capacitor voltage booster (e.g. the Linear Technology LT1054) or a switching supply (e.g. the Motorola MC34063 or the National Semiconductor LM2574 series) to produce a higher voltage rail from the 5V output on the joystick port, but be aware that switching power supplies can create a lot of electrical noise.
Figure 5
Because the relationship between input voltage and time measured is reciprocal, a zero input voltage will give an infinite timeout. Obviously this should be avoided, as it will prevent software from reading the inputs within a reasonable period of time. This can be prevented by ensuring that the input voltage never falls below a certain threshold, or it could be prevented by incorporating an offset in the voltage to current converter. In the very unlikely event that you are interested in pursuing this, I may be able to help so please drop me an email message.
10.4.6 JOYSTICK LEFT/RIGHT AND UP/DOWN DETECTION
If you simply want to detect whether the joystick is left or right of centre, or above or below centre, and don’t want the overhead of locking interrupts for several milliseconds at regular intervals, you could use a fast tick interrupt to poll the joystick port. I would suggest using an interrupt at about 500 us and working cyclically through three states. On one interrupt, trigger the joysticks. On the next interrupt, read the monostable states. On the next interrupt, do nothing. On the next interrupt, you’re back to the first interrupt again, so trigger the monostables again. This will give a left/right and up/down indication every 1.5 ms, with a fairly low overhead.
10.5 THE MOUSE AND MOUSE DRIVER [NOT WRITTEN]
I haven’t investigated the mouse or the mouse driver. The format of the serial data is documented (see {JAM}’s documents for the basic information) but I have nothing on its use of the timer tick interrupt or the CTC hardware. This section may (or may not :-) be completed at a later date. Any information is welcomed. (*)
10.6 NETWORKS
I have no experience with networks, so I will quote (paraphrased) from {JAM}’s documents (see section 1.7).
The int 8 overhead is increased when network software is installed, because the network software uses the interrupt to check whether the network is still functioning properly. This increase is not really significant. Details are documented in the Netware book (see the references section). However, the network card interrupts the processor via the network card’s own interrupt, whenever the processor must process and respond to a data packet. This occurs even if the computer is not using the network at the time, because the network still checks regularly that the computer is present. {JAM} continues: “Other machines were checked with just Pathworks or just Novell and the errors are similar to this. In fact, for machines using Novell over broadband networks, delays in the order of 1.5 to 2 milliseconds were not uncommon. The actual numbers presented here should be taken with a grain of salt; they are going to differ widely with different networks, loads, CPU speeds, and network cards”.
10.7 SOUND GENERATION
Though the PWM method of sound generation is widely used, the specific method of generating it on a PC, described in this section and subsections, was (to my knowledge) first described Mark Feldman the PC-GPE (PC Games Programmer’s Encyclopedia) guru (see section 1.7), and subsequently developed by Peter Moylan and Tim Channon (see section 1.7 and 10.7.4). It has probably been independently developed by others. The documentation and the coding of the sample program are my own.
The PC’s basic beep sound makes the speaker cone move between two positions - in and out. This is shown by the following ‘waveform’ which graphs speaker position (on the vertical axis) against time (horizontal axis).
    IN        =================                   =================
CONE       |                 |                 |                 |
    OUT ===|                 |=================|                 |=========
           1        2        3        4        5        6        7        8 ms
        TIME...
This is digital (on or off) control, and this level of control severely limits the type and subtlety of the sounds that can be generated. Better sound requires the speaker to be put in more than two positions. For example, an 8-bit sound card such as a Sound Blaster gives 256 discrete output voltages or speaker positions, using an analogue signal which can assume any of 256 discrete values, and CDs and good quality sound cards use a 16-bit converter that gives 65536 discrete values.
A digital control can approximate this to a limited degree using a technique called Pulse Width Modulation (PWM), where a digital signal made up of pulses at a high frequency is averaged by the hardware. The width of the pulses is adjusted (‘modulated’) and this varies the average voltage of the signal when it is averaged over a short period of time. If the pulse rate is high enough, the speaker will not be able to follow the pulses themselves, but will follow the average value. If the pulse widths, and therefore the average value, are varied at audio frequency, the average value, and therefore the speaker cone position, varies at audio frequency, and audible sound is generated.
10.7.1 PULSE WIDTH MODULATION (PWM) PRINCIPLE
5V   ==        ==        ==
    |  |         |     |        |  |        25% duty cycle
0V ==   ======    ======    ======= Average voltage = 1.25V

5V    ====      ====      ====
     |    |    |    |    |    |     50% duty cycle
0V ==      ====      ====      ==== Average voltage = 2.5V

5V    ======    ======    ======
     |      |  |      |  |      |   75% duty cycle
0V ==        ==        ==        == Average voltage = 3.75V
Simple PWM (shown above) uses a fixed pulse rate, and varies the pulse width. Notice that the rising edges on the above waveforms are all in sync and regular.
The diagram below shows a PWM pulse stream, with pulse start points marked, and the corresponding approximate average value, showing the audio content in the signal. If the pulse rate is high enough, only the audio component is audible.
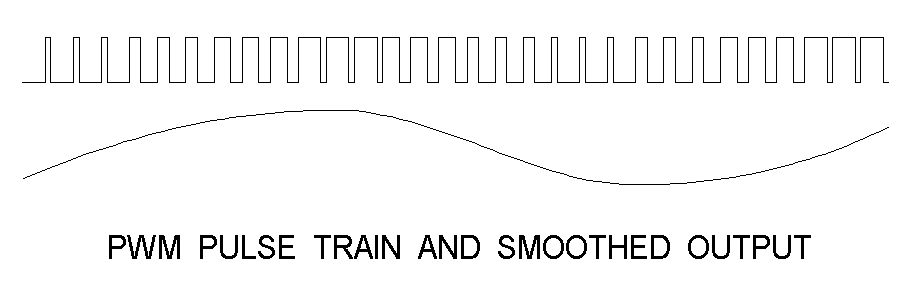 Figure 6
10.7.2 PWM AUDIO GENERATION IMPLEMENTATION
PWM audio generation can be done directly by the microprocessor, but this is unreliable due to memory caching and other factors that may affect the speed of the processor’s operation. The generic method uses CTC channels zero and two, and gives more consistent operation. Channel zero is used to generate interrupts at the pulse rate, typically 11kHz or higher, and the int 8 handler uses channel two to generate the pulses.
10.7.3 SAMPLE PROGRAM: DTMF GENERATION USING PWM
The following sample program uses PWM to generate DTMF (dual tone multiple frequency) tones, also known as touch tones, which are used for signalling numbers being dialled on a touch tone telephone.
The audio output from the program is very quiet, so I have not been able to confirm that it will actually dial a telephone, but its main purpose is to present the techniques and sample code.
This program takes over the timer tick interrupt, operating it at about 18000 interrupts (PWM pulses) per second. It does not chain to the BIOS handler, and it does not restore the correct DOS time from the RTC on termination. This program will cause loss of time when run. The time can be corrected by rebooting the machine.
        NAME    SAMPLE19

; Sample program #19
; Demonstrates DTMF (touch tone) generation using PWM sound techniques
; Part of the PC Timing FAQ / Application notes
; By K. Heidenstrom ([email protected])
;
; This program assembles into SAMPLE19.COM, a small command-line driven program
; which generates DTMF (dual tone multiple frequency) tones, also known as
; touch tones, using PWM sound techniques through the PC speaker, according to
; the command line parameters.
;
; Save this file to SAMPLE19.ASM and assemble with:
;    masm SAMPLE19;
;    link SAMPLE19;
;    exe2bin SAMPLE19.exe SAMPLE19.com
; or
;    tasm SAMPLE19;
;    tlink /t SAMPLE19;
;
;
; Note - this program will _not_ run properly under OS/2, Linux, Windows, or
; anything other than plain DOS.  If possible, it should be run without EMM386
; or QEMM or any other memory manager, particularly on slower machines such as
; 386SX or slow 386 machines.

PulseDivisor    =    66        ; Interrupt rate is 1.1931816666... MHz
                    ;   divided by this value
Fifty        =    PulseDivisor/2    ; Pulse width for roughly 50% duty

; The chosen PulseDivisor of 66 gives an interrupt rate of about 18,079
; interrupts per second.

; The following GW-BASIC program generates the 256-entry sinewave table with
; maximum spans of +/- 16, centre zero, using signed values.  The span must
; be chosen so that when two sinewaves are added together and added to the
; 'Fifty' value (which represents half the number of CTC clocks between PWM
; pulses), the range of possible pulse widths is within the tolerance of the
; PWM interrupt rate.  In this case, the maximum excursion for two summed
; sinewaves is taken to be +/- 32 (two sinewaves, each at +/- 16).  When added
; to the 'Fifty' value (33), the pulse width range is 1 to 65.
; If you change the pulse rate, you must change the span (the 16# in line 20)
; appropriately.  I chose a span of roughly (PulseDivisor - 2) / 4.
;
; 10 OPEN "SINE.DMP" FOR OUTPUT AS#1 : A# = 0 : I# = 3.141592653589793#/128#
; 20 FOR P = 0 TO 255 : S# = SIN(A#) : V = INT((S# * 16#) + .5#) : PRINT #1,V
; 30 A# = A# + I# : NEXT : CLOSE #1 : SYSTEM
;
; I used the following GW-BASIC program to generate lists of delta sequences
; for indexing into the 256-entry sinewave table.  The A#=... value in line 20
; specifies the sample rate; the last number in the equation is PulseDivisor.
; If you change PulseDivisor, modify this and rerun the program.
; To use the program, input the desired frequency, and it will calculate
; possible delta sequences and prompt you.  Initially, just press Enter at
; the prompt, until you have chosen the delta sequence you will use.  Then
; break and rerun the program, and at the prompt for the chosen sequence,
; type 'y <enter>'.  The program will append to a file '$CALC.DMP' and list
; the delta sequence.
;
; 10 REM $CALC - Calculation for DTMF generator program
; 20 A#=14318180#/12#/66# : INPUT F : PRINT "There are" A#/F "samples/cycle"
; 30 I# = 256 * F / A# : PRINT "Samples are spaced at intervals of" I#
; 40 X# = 0 : D = 1 : R = 0
; 50 R = R + 1 : X# = X# + I# : Z = ABS(X# - INT(X# + .5#)) : IF Z >= D THEN 50
; 60 PRINT R "samples, error is" Z;: D = Z : INPUT Q$ : IF Q$ <> "y" GOTO 50
; 70 OPEN "$CALC.DMP" FOR APPEND AS#1 : PRINT#1, F ":" R "values" : S# = 0
; 80 I = 0 : FOR P = 1 TO R : SD = -I : S# = S# + I# : I = INT(S# + .5#)
; 90 SD = SD + I : PRINT#1, SD;: NEXT : PRINT#1,"" : CLOSE #1 : END

Code        SEGMENT
        ASSUME    cs:Code,ds:Code,es:nothing,ss:nothing

        ORG    100h
Begin:        jmp    Begin2        ; Skip data

SignOnMsg    DB    "Sample program #19 - DTMF generator demonstrating PWM sound generation",13,10
        DB    "Part of the PC Timing FAQ / Application notes",13,10
        DB    "By K. Heidenstrom ([email protected])",13,10,13,10
        DB    "Characters 0-9, *, #, and A-D generate DTMF pairs",13,10
        DB    "Characters a-h generate single tones",13,10
        DB    "A comma generates a 1/2-second pause",13,10,"$"

        ALIGN    2

ParmPointer    DW    81h        ; Pointer into command tail
OldInt8Ofs    DW    0        ; Old int 8 handler offset
OldInt8Seg    DW    0        ; Old int 8 handler segment
PWMBufferGet    DW    0        ; 'Get' offset for PWMBuffer (volatile)
PWMBufferPut    DW    0        ; 'Put' offset for PWMBuffer
PIC0IMR        DB    0        ; PIC IMR before we stopped all but IRQ0

        ALIGN    2

Tone0Ctrl    DW    0,0        ; Delta and sinewave table pointers
Tone1Ctrl    DW    0,0        ; Same, for other tone of the pair

CharScanTable:    DW    "0",Row4,Col2
        DW    "1",Row1,Col1
        DW    "2",Row1,Col2
        DW    "3",Row1,Col3
        DW    "4",Row2,Col1
        DW    "5",Row2,Col2
        DW    "6",Row2,Col3
        DW    "7",Row3,Col1
        DW    "8",Row3,Col2
        DW    "9",Row3,Col3
        DW    "*",Row4,Col1
        DW    "#",Row4,Col3
        DW    "A",Row1,Col4
        DW    "B",Row2,Col4
        DW    "C",Row3,Col4
        DW    "D",Row4,Col4
        DW    "a",Row1,0
        DW    "b",Row2,0
        DW    "c",Row3,0
        DW    "d",Row4,0
        DW    "e",Col1,0
        DW    "f",Col2,0
        DW    "g",Col3,0
        DW    "h",Col4,0
PastCharTable    =    $

Row1        DW    10,10,10,9,10,10,10,10,Row1 ; 697 Hz
Row2        DW    11,11,11,11,11,10,11,11,11,11,Row2 ; 770 Hz
Row3        DW    12,12,12,12,12,12,12,13,12,12,12,12,12,12,12,Row3 ; 852 Hz
Row4        DW    13,14,13,Row4        ; 941 Hz
Col1        DW    17,17,17,17,18,17,17,17,Col1 ; 1209 Hz
Col2        DW    19,19,19,19,19,19,18,19,19,19,19,19,Col2 ; 1336 Hz
Col3        DW    21,21,21,21,21,20,21,21,21,21,21,21,Col3 ; 1477 Hz
Col4        DW    23,23,23,23,24,23,23,23,Col4 ; 1633 Hz

SineTable    DB    0,0,1,1,2,2,2,3,3,4,4,4,5,5,5,6,6,6,7,7,8,8,8,9,9,9,10
        DB    10,10,10,11,11,11,12,12,12,12,13,13,13,13,14,14,14,14
        DB    14,14,15,15,15,15,15,15,15,16,16,16,16,16,16,16,16,16,16
        DB    16,16,16,16,16,16,16,16,16,16,16,15,15,15,15,15,15,15,14
        DB    14,14,14,14,14,13,13,13,13,12,12,12,12,11,11,11,10,10,10
        DB    10,9,9,9,8,8,8,7,7,6,6,6,5,5,5,4,4,4,3,3,2,2,2,1,1,0,0,0
        DB    -1,-1,-2,-2,-2,-3,-3,-4,-4,-4,-5,-5,-5,-6,-6,-6,-7,-7,-8
        DB    -8,-8,-9,-9,-9,-10,-10,-10,-10,-11,-11,-11,-12,-12,-12
        DB    -12,-13,-13,-13,-13,-14,-14,-14,-14,-14,-14,-15,-15,-15
        DB    -15,-15,-15,-15,-16,-16,-16,-16,-16,-16,-16,-16,-16,-16
        DB    -16,-16,-16,-16,-16,-16,-16,-16,-16,-16,-16,-15,-15,-15
        DB    -15,-15,-15,-15,-14,-14,-14,-14,-14,-14,-13,-13,-13,-13
        DB    -12,-12,-12,-12,-11,-11,-11,-10,-10,-10,-10,-9,-9,-9,-8
        DB    -8,-8,-7,-7,-6,-6,-6,-5,-5,-5,-4,-4,-4,-3,-3,-2,-2,-2,-1
        DB    -1,0

        ALIGN    4        ; No need to do this, really.

PWMBuffer    DB    256 DUP(?)    ; PWM width-value data buffer (circular)

Begin2:        mov    dx,OFFSET SignOnMsg ; Point to sign-on message
        mov    ah,9        ; Function number
        int    21h        ; Output the message
        cld            ; Upwards direction
        call    InitialisePWM    ; Initialise and start PWM stuff
DigitLoop:    mov    bx,ParmPointer    ; Get pointer into command tail
        inc    ParmPointer    ; Bump it
        mov    al,[bx]        ; Get character from command tail
        cmp    al,13        ; End of command tail?
        je    DigitsDone    ; If so
        cmp    al," "        ; Whitespace?
        jbe    DigitLoop    ; If so, skip it
        cmp    al,","        ; Comma?
        jne    NotComma    ; If not
        mov    cx,7850        ; If so, pause for half a second
        call    MakeDelay
        jmp    SHORT DigitLoop    ; Loop
NotComma:    mov    bx,OFFSET CharScanTable-6 ; Point to before first entry
NextCharScan:    add    bx,6        ; Point to next
        cmp    bx,OFFSET PastCharTable ; Scanned whole table?
        jae    DigitLoop    ; If not found, skip it
        cmp    al,[bx]        ; Check for match
        jne    NextCharScan    ; If not, loop
        mov    ax,[bx+2]    ; Get first tone pointer
        mov    dx,[bx+4]    ; Get second tone pointer
        mov    cx,3140        ; 200 ms duration
        call    MakeDTMF
        mov    cx,785        ; 50m ms pause
        call    MakeDelay
        jmp    SHORT DigitLoop    ; Loop

DigitsDone:    call    UninstallPWM
        mov    ax,4C00h
        int    21h
        int    20h

MakeDTMF    PROC    near
        mov    Tone0Ctrl,ax
        mov    Tone0Ctrl+2,0
        mov    Tone1Ctrl,dx
        mov    Tone1Ctrl+2,0
DTMFLoop:    mov    bx,OFFSET Tone0Ctrl
        call    GetPulseWidth
        mov    bx,OFFSET Tone1Ctrl
        cmp    WORD PTR [bx],0
        jz    SingleTone
        xchg    ax,dx
        call    GetPulseWidth
        add    al,dl
SingleTone:    add    al,Fifty
        call    PutPWM
        loop    DTMFLoop
        ret
MakeDTMF    ENDP

MakeDelay    PROC    near
DelayLoop:    mov    al,Fifty
        call    PutPWM
        loop    DelayLoop
        ret
MakeDelay    ENDP

GetPulseWidth    PROC    near        ; Call with BX pointing to first or
        cld            ;   second tone control structure
        mov    si,[bx]        ; Get delta table pointer
        lodsw            ; Get a delta or pointer
        test    ah,ah        ; Was it a pointer?
        jz    GotDelta    ; If not
        mov    si,ax        ; If pointer, reset pointer
        lodsw            ; Get it, and increment pointer
GotDelta:    mov    [bx],si        ; Return the delta table pointer
        mov    si,[bx+2]    ; Get sine table pointer
        add    si,ax        ; Add delta
        and    si,0FFh        ; Wrap around
        mov    [bx+2],si    ; Restore sine table pointer
        mov    al,SineTable[si] ; Get sine table entry
        ret
GetPulseWidth    ENDP

InitialisePWM    PROC    near

; Get the current int 8 handler address, to be restored later

        mov    ax,3508h    ; Get interrupt vector for int 8
        int    21h        ; Call DOS
        mov    OldInt8Ofs,bx    ; Store offset
        mov    OldInt8Seg,es    ; Store segment

; Initialise PWM array with 50% duty cycle entries

        xor    bx,bx        ; Zero offset
        mov    al,Fifty    ; 50% duty cycle
FillPWMBuf:    mov    PWMBuffer[bx],al ; Set entry
        inc    bl        ; Bump offset
        jnz    FillPWMBuf    ; Do all entries

; Wait for all floppy drives to turn off

        xor    ax,ax        ; Zero
        mov    es,ax        ; Address BIOS data area with ES
WaitMotors:    test    BYTE PTR es:[43Fh],0Fh ; Any floppy drive motors active?
        jnz    WaitMotors    ; If so, wait

; Disable all interrupt sources on the primary (or only) PIC.  Keep the
; original IMR contents, to be restored later.

        cli
        in    al,21h        ; Read primary PIC IMR
        jmp    SHORT $+2    ; Short delay
        mov    PIC0IMR,al    ; Store it for later
        mov    al,0FFh        ; Mask off _everything_
        out    21h,al

; Set up Port B and CTC channel 2

        in    al,61h        ; Read Port B
        jmp    SHORT $+2    ; Short delay
        and    al,11111101b    ; Speaker enable OFF
        or    al,00000001b    ; Timer 2 gate ON
        out    61h,al        ; Write it back
        jmp    SHORT $+2    ; Short delay
        mov    al,10010000b    ; Channel 2, lobyte access, mode 0
        out    43h,al        ; Set mode of channel 2 (no values yet)
        sti            ; Allow interrupts

; Now grab int 8, the timer tick interrupt.  DOS should leave the PIC IMR alone.

        mov    dx,OFFSET NewInt8 ; Offset of new int 8 routine
        mov    ax,2508h    ; Set interrupt vector for int 8
        int    21h        ; Call DOS to do it

; Reprogram CTC channel 0 with the new interrupt rate

        cli            ; Lock out interrupts again
        mov    al,00110110b    ; Channel 0, lobyte/hibyte, mode 3
        out    43h,al        ; Write mode/command register
        jmp    SHORT $+2    ; Short delay
        mov    al,LOW PulseDivisor ; Lobyte of new divisor
        out    40h,al        ; Send it
        jmp    SHORT $+2    ; Short delay
        mov    al,HIGH PulseDivisor ; Hibyte of new divisor
        out    40h,al        ; Send it
        jmp    SHORT $+2    ; Short delay

; Enable the speaker

        in    al,61h
        jmp    SHORT $+2    ; Short delay
        or    al,00000011b    ; Timer 2 gate and speaker enable ON.
        out    61h,al
        jmp    SHORT $+2    ; Short delay

; Enable int 8 (IRQ0) in the PIC

        mov    al,11111110b    ; All masked except IRQ0
        out    21h,al        ; Set primary PIC IMR
        jmp    SHORT $+2    ; Short delay

; Start interrupts and return to caller

        sti            ; Tag!    You're it :-)
        nop
        mov    al,BYTE PTR PWMBufferGet ; Get 'get' pointer
        dec    ax        ; Back up one
        mov    BYTE PTR PWMBufferPut,al ; Output one bufferful
        ret
InitialisePWM    ENDP

UninstallPWM    PROC    near

; Disable the speaker

        pushf            ; Preserve interrupt flag
        cli            ; Lock out interrupts around this
        in    al,61h        ; Read Port B
        jmp    SHORT $+2    ; Short delay
        and    al,11111100b    ; Disable Timer 2 and speaker
        out    61h,al        ; Write it back
        jmp    SHORT $+2    ; Short delay

; Disable all interrupt sources in the primary PIC

        mov    al,0FFh        ; Mask all IRQ0-7
        out    21h,al        ; Set PIC0 IMR

; Restore normal operation of CTC channel 0

        mov    al,00110110b    ; Channel 0, lobyte/hibyte, mode 3
        out    43h,al        ; Write mode/command word
        jmp    SHORT $+2    ; Short delay
        xor    al,al        ; Zero
        out    40h,al        ; Write loword of reload value
        jmp    SHORT $+2    ; Short delay
        out    40h,al        ; Write hiword of reload value
        popf            ; Interrupts are safe (PIC is blocked)

; Restore original int 8 handler address

        push    ds        ; Will need to destroy DS for this
        mov    dx,OldInt8Ofs    ; Get offset
        mov    ds,OldInt8Seg    ; Get segment
        ASSUME    ds:nothing    ; DS no longer points to this segment
        mov    ax,2508h    ; Set int 8 vector
        int    21h        ; Call DOS
        pop    ds        ; Restore DS

; Restore original IMR

        mov    al,PIC0IMR    ; Get old IMR contents
        out    21h,al        ; Restore IMR
        ret
UninstallPWM    ENDP

; The following function stuffs a pulse width value into the circular buffer,
; first waiting for the interrupt routine's outgoing data pointer to catch up,
; if necessary.  This prevents the foreground code from generating data more
; quickly than the interrupt routine is taking it, and maintains synchronisation
; between the two processes, unless the foreground code generates the data too
; slowly.

PutPWM        PROC    near        ; Put width in AL into buffer
        mov    bx,PWMBufferPut    ; Get the 'put' offset
        mov    PWMBuffer[bx],al ; Store the width value in buffer
        inc    bl        ; Bump 'put' pointer
        mov    PWMBufferPut,bx    ; Store it back
WaitBufFull:    cmp    bl,BYTE PTR PWMBufferGet ; If buffer is full...
        je    WaitBufFull    ;   ... wait until there's a gap
        ret
PutPWM        ENDP

        ASSUME    ds:nothing

; This program uses CTC channel 0 as a timebase, generating int 8 at regular
; intervals, and CTC channel 2 producing variable width pulses.  The interrupt
; routine programs an 8-bit count value into channel 2 on every invocation, and
; channel 2 produces a pulse of the corresponding length on the speaker output
; signal.  Because the interrupt rate is constant and the pulse width varies,
; pulse width modulation (PWM) sound is generated.
; This is the int 8 handler.  It gets data from PWMBuffer, using PWMBufferGet
; as an offset into PWMBuffer indicating where it's currently up to.  It bumps
; this variable on each timer interrupt.  The bump increments the lobyte only,
; so that the offset wraps around from 255 back to 0 again (the buffer is 256
; bytes in size).  This code does not check to see whether PWMBufferGet has
; been bumped past PWMBufferPut.  The foreground code must be fast enough to
; keep the buffer full - if not, the int 8 processing will repeat-play the
; buffer.
; Each entry in the buffer is one byte, and corresponds to the pulse width of
; one pulse.  The data in this buffer is generated by the foreground code.
; The following code could be optimised somewhat - by page-aligning the
; PWM buffer, the MOV AL,PWMBuffer[BX] could be replaced with a direct load
; using a self-modified pointer, also removing the need to preserve BX.

NewInt8        PROC    far
        push    bx        ; Preserve
        push    ax        ; Preserve
        mov    bx,PWMBufferGet    ; Get pointer to data coming from buffer
        mov    al,PWMBuffer[bx] ; Get one pulse-width byte from buffer
        out    42h,al        ; Tell CTC channel 2 to make a pulse
        inc    BYTE PTR PWMBufferGet ; Bump pointer (256-byte buffer)
        mov    al,20h        ; EOI command
        out    20h,al        ; Send to primary PIC
        pop    ax        ; Restore
        pop    bx        ; Restore
        iret            ; Return from interrupt
NewInt8        ENDP

Code        ENDS
        END    Begin
10.7.3.1 SAMPLE PROGRAM EXPLANATION
Channel 0 is operated in mode 2 or 3, and generates interrupts (int 8) at regular intervals. Each int 8 will trigger the start of one pulse. The int 8 handler, NewInt8, will output a pulse-width value to the CTC channel 2 data register, and CTC channel 2 will produce a pulse of the corresponding length.
Channel 2 is operated in mode 0, known as ‘interrupt on terminal count’ mode (see section 7.8.2). When CTC channel 2 has been initialised for this mode, and the Timer 2 Gate output in the Port B register (see section 7.5) is set to enable clocking of CTC channel 2, writing a count value to the channel 2 reload register will cause the CTC channel 2 output to go low for a period of time determined by the value written to the channel 2 register. By controlling the values written to the channel 2 register, the pulse width can be varied.
The pulse width will be the CTC clock period (0.838 us) multiplied by the value written to the channel 2 register. To improve efficiency, because pulses are typically much less than 256 CTC clocks wide, CTC channel 2 is configured in lobyte-only access mode. Only one I/O access, to write a byte of data to CTC channel 2, is required to trigger a pulse on CTC channel 2. If the Speaker Data bit in Port B is set, the pulse will be sent to the PC’s speaker.
The above description covers the PWM output code, which consists of an interrupt handler, triggered at regular intervals via int 8 from CTC channel 0. The handler writes an 8-bit pulse-width value to the CTC channel 2 data register.
The data that it writes is taken from a circular buffer. The interrupt handler maintains a pointer, the ‘get’ pointer, called PWMBufferGet, which lets it keep track of where it is up to in the buffer. On every interrupt, it loads the BX register from the ‘get’ pointer, reads a pulse-width value from the circular buffer at the appropriate position, and ‘bumps’ the ‘get’ pointer. The term ‘bump’ means to increment, but in this case, also wrap around from the end of the buffer to the start, as the buffer is circular.
The actual data in the buffer is generated by the foreground code, and inserted into the buffer by the PutPWM function. This function maintains synchronisation between the foreground code and the interrupt handler, by checking that it will not overfill the buffer, before putting a byte into the buffer. This slows down the mainline code. As long as the mainline runs quickly enough, synchronisation between the mainline and the interrupt routine is maintained.
The initialisation steps are fairly involved. All initialisation is done by the InitialisePWM function. First, the current int 8 handler address is stored so it can be restored later. Then the circular PWM buffer is filled with the ‘Fifty’ value, so that when the interrupt is started later, before the mainline has filled the buffer, it will play silence instead of garbage. The code then waits for all floppy drives to turn off. Because the replacement int 8 handler does not chain to the original handler, any actions normally done by the int 8 handler, such as updating the BIOS timer tick count variable and turning off floppy drives after two seconds of inactivity, will not be performed during the execution of this program, so we must wait for the disk drives to turn off before replacing the int 8 handler, otherwise they will remain on during the program’s execution.
The initialisation code then disables all interrupt sources on the primary interrupt controller. IRQ0 (int 8), the timer tick interrupt, will be enabled shortly. The code then initialises Port B, initially with Speaker Enable off, and programs the operating mode (mode 0, interrupt on terminal count) and the access mod (lobyte-only) in CTC channel 2. It then redirects int 8 to its own int 8 handler, reprograms CTC channel 0 with the new interrupt rate (18,079 interrupts per second), enables the Speaker Enable, and enables IRQ0 in the interrupt controller. Other interrupt sources are not enabled in the interrupt mask register of the primary PIC. This prevents interrupts due to a keypress from disturbing the sound generated. The system will not respond to keypresses while the program is running. It then enables interrupts, resets the ‘put’ pointer for the PWM buffer, and returns.
Once this initialisation has been done, the interrupt routine will run quite happily in the background, outputting pulse widths from the circular buffer of pulse-width values. It will loop repeatedly through the buffer. Foreground code is required to set up the data in the buffer, and keep track of the ‘get’ pointer used by the interrupt routine, so it can control the flow of data into the circular buffer.
The actual DTMF waveform generation is done via a 256-entry sinewave table with a span of +/- 16. The table contains one cycle of sinewave, and is indexed via a delta sequence table. Each of the eight possible frequencies has its own delta sequence table. The delta sequence table tells the program how many entries in the sinewave table to skip between PWM pulses (samples). For a high frequency, the deltas are large, so the program steps through the 256 entries of the sinewave table fairly quickly, and for lower frequencies, the delta is smaller. A table of deltas is required, to give the effect of a non-integral delta value so that reasonable frequency accuracy can be achieved.
Running int 8 at these high rates causes a significant load on the machine, especially with slower machines. Using EMM386 adds interrupt overhead, and on slower machines, programs using this technique may not run properly with EMM386 installed. I have done limited testing with the sample program, and found that it works properly on a 10MHz 286, but I can’t guarantee its performance on, say, a 386SX-16 running EMM386, or on an XT.
10.7.3.2 OTHER METHODS OF SOUND GENERATION
The same fast int 8 handler can be modified to output an 8-bit unsigned sample value to a parallel port, which is connected to a DAC (digital to analogue converter). This gives much better sound quality than the PWM technique.
The digital to analogue converter can be a chip, such as the Ferranti ZN429 or various devices from other manufacturers such as Analog Devices / PMI, Maxim, Burr-Brown, etc, or the el cheapo R-2R ladder DAC made from a chain of resistors. Commercial parallel port DAC units are available - the Speech Thing device is just a DAC on the parallel port.
Sound cards have an 8-bit or 16-bit DAC, but are usually operated in DMA mode, where the sound card periodically requests an 8-bit or 16-bit data transfer from a buffer area in system memory and sends the value to the DAC. The DMA method gives much lower overhead, because the processor does not get involved in the transfer, and also removes the problem of sample timing jitter.
10.7.4 PETER MOYLAN’S MUSIC PACKAGE
Peter Moylan’s music package was written by Peter Moylan (see section 1.7) and Tim Channon. It uses CTC channel 0 with a divisor of 64, and CTC channel 2 in interrupt on terminal count mode (mode 0). It does not chain to the original int 8 handler, and does not fix up the DOS time on termination. This package produces 3-part polyphonic (i.e. three simultaneous pitches) music and supports several timbral qualities. It is noticeably out of tune, particularly at higher pitches, but this is due to limitations in the waveform generation algorithm, not the hardware technique used. Seven demonstration programs and source code in Modula-2 and assembler are included in the package, which is available on the Internet as: ftp://ee.newcastle.edu.au/pub/PMOS/music302.zip. The version number (3.02) may have changed.
10.8 RELATED SOFTWARE PACKAGES
Here are my comments on some timing-related software packages available on the Internet. Many of these packages are several years old, so contact details may be well out of date. I have not checked any of the contact details.
10.8.1 THE ATIM PACKAGE
ftp://oak.oakland.edu/SimTel/msdos/at/atim.zip
Date: 19881125 Size: 4783
This package contains a small program called ATIM which will run another program and time its execution, using the RTC periodic interrupt for timing (approximately one millisecond resolution). The program is written in assembler, and commented source and brief documentation is included. The package was written by Howard Vigorita, NYACC (whatever that means :-), December 27, 1986. I presume it is public domain, though he doesn’t say so.
The program seems to work quite nicely. I’m not sure about the algorithm he uses to convert 1/1024ths to 1/1000ths of seconds, though. The only problem I noticed was that “COMMAND.COM” was hardcoded as the command interpreter name if the program is assembled to use the DOS EXEC function instead of the back door execute function - after all, this program is nearly nine years old!
10.8.2 THE MSCHRT AND TCHRT PACKAGES
ftp://oak.oakland.edu/SimTel/msdos/c/mschrt3.zip
Date: 19910604 Size: 53708
ftp://oak.oakland.edu/SimTel/msdos/turbo_c/tchrt3.zip
Date: 19910605 Size: 53436
MSCHRT and TCHRT version 3 are Microsoft C and Turbo C compatible versions of a “high resolution timer toolbox” distributed as a library, from Ryle Design, P.O. Box 22, Mt. Pleasant, Michigan 48804, (517) 773-0587, CI$ 73047,1765. They also have an equivalent package for Turbo Pascal, called TPHRT. The package is shareware, $20 per copy. This company also sells a fully-functional timing toolbox called PCHRT, version 4, which also supports running the timer tick interrupt at a user-specified rate, and can be ordered from Ryle Design (order form included with MSCHRT V3 and TCHRT V3) for $49.95. This, and registered versions of MSCHRT, TCHRT, and presumably TPHRT, include library source and support. I have not checked that they are still contactable.
The is clearly a very professionally designed package, which includes thorough documentation and has obviously been designed to make the user’s task as easy and successful as possible. It provides 42 functions including the ability to produce formatted reports! It includes a self-calibration function, presumably to take into account the different amount of time required to read a timestamp on different machines.
The timing functions can operate with interrupts enabled, or disabled (in this case, periods longer than 54.925 ms will not be measured correctly). It presumably sets CTC channel zero to mode 2, though the manual doesn’t describe this correctly.
Suggested applications are: timer or profiler to determine code performance, benchmarking programs, precise delays for hardware or process control, subject testing (e.g. reaction timing, race timing and scoring systems).
The package also supports profiling and reporting on BIOS function interrupts (e.g. int 10h video, int 13h disk) - the vector is hooked and logging logic is installed, then complete information can be generated for that interrupt. Functions specifically to delay a specified length of time are also available. The package includes the library file, explanatory material, function reference, and five demo programs.
There is no date in the manual, but the newest file in the archive is dated
- I did not test this package - it’s probably safe to assume that it works well.
10.8.3 THE TCTIMER PACKAGE
ftp://oak.oakland.edu/SimTel/msdos/turbo_c/tctimer.zip
Date: 19891029 Size: 15609
This is a public domain absolute timestamping package for Turbo C. It contains functions to enable mode 2 on CTC channel zero, to restore normal operation in mode 3 at exit, to read an absolute timestamp, and to calculate elapsed time in units of one microsecond using floating point arithmetic. The timestamp value is comprised of the count in progress and the bottom 16 bits of the BIOS timer tick variable, returned as a long (dword), therefore periods longer than one hour cannot be measured (this is mentioned in the documentation file). The documentation file says it was “written by Richard S. Sadowsky, 8/10/88, Version 1.0, released to the public domain, based on TPTIME.ARC which was written by Brian Foley and Kim Kokkonen of TurboPower Software and released to the public domain”. Source code is included.
This package appears to have the following problems.
- Registers SI and DI are not preserved by the readtimer() function, usually causing the calling function to crash if it uses register variables.
- The readtimer() function has many unnecessary I/O accesses and is fairly slow as a result.
- Timing will be incorrect if the timed period spans a change of day, because just before midnight the loword of the BIOS tick count counts to 0AF hex then resets. This is not handled by this package. I tested the code briefly, after fixing the SI and DI problem, and it appeared to work correctly (apart from the midnight problem).
10.8.4 THE MILLISEC PACKAGE
ftp://oak.oakland.edu/SimTel/msdos/c/millisec.zip
Date: 19911204 Size: 37734
This package was released by Fred C. Smith (uunet!samsung!wizvax!fcshome!fredex) and is a modified version of a release by Dean Pentcheff ([email protected] .edu) which is a modified version of the TCTIMER package (see previous section). Source is included.
At some stage in the evolution of this package, the resolution seems to have been reduced to one millisecond. Dean Pentcheff’s package (the ‘missing link’ :-) apparently returned elapsed time as a floating point number in units of one second, with three decimal places. This package returns elapsed time in units of one millisecond, to avoid floating point calculations. Also the CTC clock has been approximated to 1193000 Hz, resulting in a proportional error of 152.254 ppm (0.0152254%; 13.155 seconds per day).
These routines use CTC channel zero in mode 2, as per the TCTIMER package, and the timer-reading function is identical to TCTIMER’s one. The problems that I noted for TCTIMER still apply to this package.
10.8.5 THE MSEC_12 PACKAGE
ftp://oak.oakland.edu/SimTel/msdos/c/msec_12.zip
Date: 19920319 Size: 8484
This package was released by David Kirschbaum ([email protected]) and is a further modification of the MILLISEC package (see the previous section). David has moved the inline assembly stuff into a separate file, and fixed the problem with destroying SI and DI, though the rest of the read-timer function is the same as that of the TCTIMER package, so the remaining two problems are still present.
The package uses one millisecond resolution, and approximates the CTC clock to 1193000 Hz, resulting in a proportional error of 152.254 ppm (0.0152254%; 13.155 seconds per day).
Source and makefiles for TCC, BCC, and QC are included.
10.8.6 THE ERTIMER PACKAGE
ftp://x2ftp.oulu.fi/pub/msdos/programming/docs/ertimer.zip
Date: 19950506 Size: 9092
This ZIP file contains a message, a header file, and a C source file for an includable timing module that provides a user-selectable number of independent timers, each with 0.8381 us resolution, implemented via CTC channel 0 operating in mode 2 and using the loword of the BIOS timer tick count variable. Written by Ethan Rohrer, comments dated 19941204. Nicely written and fairly well commented, but cannot measure times longer than about an hour, and does not handle the problem of the CTC count synchronisation with the BIOS tick count, nor the midnight wraparound where the loword of the tick count counts to 0AF hex then wraps back to zero. Also does not lock out interrupts around hardware access sequences. Not reliable.
10.8.7 THE FASTCLOK PACKAGE
ftp://x2ftp.oulu.fi/pub/msdos/programming/docs/fastclok.zip Date: 19950506 Size: 2588
This package consists of a C source file and a header file. The package runs the timer tick interrupt at 64 times its normal speed, using its own interrupt handler which chains to the BIOS handler correctly. Does not lock interrupts properly when installing and uninstalling. It installs an atexit() function to uninstall the fast timer and restore normal operation. The author does not identify him/herself. A comment in the source file says: “The gettimeofday() routine acts like the Unix version, with the exception that time zone does not matter. The time will be returned in timeval structures that match thier Unix counterparts”. The program doesn’t seem to include a gettimeofday() function, though. :-\
10.9 BENCHMARKING CONSIDERATIONS
When using absolute timestamping to benchmark a section of code, remember that because interrupts are enabled during execution of the code being timed, they will contribute to the time measured.
During otherwise idle time, the timer tick interrupt will be active (every 54.9254 ms), the keyboard keystroke interrupt will occur every time a key is pressed or released, or repeatedly while the key is held down, and if a mouse driver is installed and enabled, the mouse’s interrupt will occur several times every time the mouse is moved or the buttons change state.
If the code being timed takes a short time, e.g. less than 100 milliseconds, the effect of the timer tick interrupt may be detectable. If the period is shorter than 54.9 ms, it can be measured with interrupts locked out, because interrupts are only required to ensure that the BIOS tick count variable is updated correctly on every cycle of CTC channel zero.
The other factors can be avoided by not touching the keyboard or mouse during the test.
Other factors have an effect on benchmarks, such as the processor cache state and, for file processing programs, the disk cache state. The latter problem can be avoided by disabling the disk cache, or ensuring that the input file is already in the cache (providing that the cache is big enough to hold it) by entering ‘copy /b filename nul:’ to force the entire file to be read from disk.
Finally, adding the code which reads the timer adds to the execution time. For example, if you call a function to read an absolute timestamp twice in succession, the times read will differ by the amount of time taken to read the timestamp. For example, the assembly language get-timestamp function given in the sample program in section 9.2 takes between 7 and 9 CTC clocks (about 6.5 us) to execute on my 486DX2-66.
I have no experience or information on ways to determine processor clock speed. If anyone can help, please let me know. (*)
10.10 GRANULARITY AND UNCERTAINTY
This may seem obvious, but the accuracy of any time measurement is limited by the granularity of the timing source, and its uncertainty. Granularity, or resolution, refers to the fineness of the unit in which the time or duration can be measured. For example, using 54.9254 ms timer ticks to measure the time taken by a short section of code is going to be of limited use. On most of the test runs, no time will appear to have elapsed, but occasionally, one tick, or 54.9254 ms, will appear to have elapsed. The resolution is not high enough, and a different approach is required - for example, running the section of code repeatedly in a loop, and measuring the total time taken.
If 1000 iterations of the code are timed using the timer tick, by sampling the BIOS Tick Count variable, running the code 1000 times, then re-reading the BIOS Tick Count and using the difference in tick counts to calculate the amount of time elapsed, we might find that five ticks, or about 275 ms, have elapsed, but how accurate is this figure?
Code execution   ___________************************_______

Timer ticks      ___|____|____|____|____|____|____|____|___
                       1    2    3    4    5    6    7    8
(You will need a monospaced display to see the above diagram properly).
In the above example, when the code started, the tick count was 2. When it finished, the tick count was 7. The execution time was 5 ticks.
Code execution   _________*****************************____

Timer ticks      ___|____|____|____|____|____|____|____|___
                    1    2    3    4    5    6    7    8
Above, when the code started, the tick count had just changed to 2, and when it finished, the tick count was 7, just about to change to 8. The measured time was 5 ticks, as before, but the actual execution time was nearly 6 ticks.
Code execution   ____________**********************________

Timer ticks      ___|____|____|____|____|____|____|____|___
                    1    2    3    4    5    6    7    8
Above is the opposite case. The measured time is again from 2 to 7, 5 ticks, but the execution time was actually only slightly longer than 4 ticks.
These examples demonstrate uncertainty of up to one tick at both the start and the end of the sampling time. The uncertainty at the start of the sample is due to the granularity, or resolution, of the timing source, and the fact that it is free-running or asynchronous (not synchronised) to the event being timed. The uncertainty at the end of the sampling time is the unavoidable effect of the resolution of the timing source. The total uncertainty of the sample is two ticks.
If we wait for the tick count to change, then start the code, we can eliminate (or greatly reduce) the uncertainty at the start of the sampling time. The worst cases would then be:
Code execution   _________*************************________

Timer ticks      ___|____|____|____|____|____|____|____|___
                    1    2    3    4    5    6    7    8
and
Code execution   _________*****************************____

Timer ticks      ___|____|____|____|____|____|____|____|___
                    1    2    3    4    5    6    7    8
Sometimes it is possible to synchronise the time reference and the event to be timed, either by delaying the start of the event (as in the above example) or by starting the time reference from a known part of its cycle when the start of the event is detected.
Sometimes it is not possible to do this. For example, the Refresh Detect signal described in section 7.37 has a period of about 15 us, but cannot safely be stopped and restarted at a particular point so that it is synchronised to the start of some event. When using such a time base, you must either synchronise the event to the time base (as in the third method of reading the joystick position in section 10.4.4) or live with the fact that there is a 30 us uncertainty in any event that is timed using this method.
Also see the sample program section 4.7 (timeouts implemented using the timer tick) where the uncertainty is actually at the start of the timing period, not at the end.
10.11 CONVERTING BETWEEN MICROSECONDS AND CTC CLOCKS
Conversion between microseconds and CTC clocks requires fairly accurate arithmetic, namely multiplication by 1.193181666… or 0.838095…
This can be done using floating point, however this is slow on machines without a math coprocessor, and is inefficient, and does not necessarily give very good accuracy, even if you are not using a Pentium :-) And as floating point is not usually required in the remainder of the program, it seems silly to require it for this purpose only.
For comparatively painless implementation on all x86 processors under DOS, the method described here uses a function that multiplies two long values (32 bits each) together, giving a 64-bit result, and returns the top 32 bits of the result as a 32-bit long. If bit 31 of the 64-bit result is set, then the return value is rounded up.
Using longs to represent microseconds or CTC clocks limits the maximum period that can be expressed to about 59 minutes and 59.592 seconds (0xFFFFFFFFL CTC clocks), i.e. slightly less than one hour.
The function definition follows. I have used Borland’s register pseudovariables (_AX and _DX), so this must be changed for other compilers.
unsigned long mul64shift32(unsigned long value, unsigned long mult) {
    asm {
        push    si
        mov    ax,WORD PTR value
        mul    WORD PTR mult
        mov    si,dx
        mov    ax,WORD PTR value+2
        mul    WORD PTR mult+2
        mov    bx,ax
        mov    cx,dx
        mov    ax,WORD PTR value
        mul    WORD PTR mult+2
        add    si,ax
        adc    bx,dx
        adc    cx,0
        mov    ax,WORD PTR value+2
        mul    WORD PTR mult
        add    si,ax
        adc    bx,dx
        adc    cx,0
        shl    si,1
        adc    bx,0
        adc    cx,0
        mov    ax,bx
        mov    dx,cx
        pop    si
        }
    return (_DX << 16) + _AX;    /* Should optimise out to nothing */
    }
The arithmetic expression for this function is:
return_value = int ((value * mult / (2^32)) + 0.5)
Note there is no way for overflow to occur in this function, because even with value and mult of 0xFFFFFFFFL, the 64-bit result is only 0xFFFFFFFE00000001.
This function can be used in the conversion of microseconds to CTC clocks and vice versa, by the appropriate choice of the ‘mult’ value. The ‘mult’ value is defined as the desired multiplication factor (e.g. 0.838…) multiplied by 2^32.
For conversion from CTC clocks to microseconds (multiplication by 0.838095…), the ‘mult’ value is 3599592096L (0xD68D6AA0L). For conversion from microseconds to CTC clocks (multiplication by 1.193181666…), ‘mult’ would be 5124676237, which is too large to express as a long (because the factor of 1.193181666… is greater than 1), so this conversion is done by multiplying by the fractional part of the conversion factor, 0.193181666…, then adding the original value. The fractional part of the conversion factor equates to a ‘mult’ value of 829708941L (0x31745A8DL).
Here are the two conversion functions, which use mul64shift32() internally.
unsigned long clocks_to_usec(unsigned long clocks) {
    return mul64shift32(clocks, 3599592096L);
    }

unsigned long usec_to_clocks(unsigned long usecs) {
    if (usecs > 3599592094L)
        return 0xFFFFFFFFL;
    return usecs + mul64shift32(usecs, 829708941L);
    }
Note the check in usec_to_clocks(). The maximum number of microseconds that can be represented by a 32-bit number of CTC clocks is 3599592095, which equates to 0xFFFFFFFFL CTC clocks. This represents a time of about 59 minutes and 59.592 seconds, just under one hour.
Because of the unrelated units of the two quantities, conversion between clocks and microseconds using integer values inevitably introduces rounding errors, so conversions should not be done cumulatively. For example, if you are summing several durations, your measurements should be kept in clocks and converted to microseconds after the summation.
Other than integer rounding error, the above functions contribute a proportional error of less than 0.00000001% (0.0001 ppm, 9 us per day, about five orders of magnitude better than typical crystal accuracy :-).
10.12 MAINTAINING A MILLISECOND OR MICROSECOND COUNT
The sample program in section 4.7 uses the BIOS Tick Count variable as a time indication. This variable is in units of one tick, i.e. 54.9254 ms. There may be cases where you want to maintain a time value which is in units of some more sensible value, for example, milliseconds, or maybe microseconds.
Converting between absolute tick count and absolute milliseconds is messy, but it is easy to maintain a variable, in units of one millisecond or microsecond, which is updated cumulatively using the timer tick. For example, you could define a 32-bit variable that will contain the number of milliseconds since the program started, and call this the milliseconds variable.
When and where the milliseconds variable is updated depends on your program design. The variable needs to be updated every time a timer tick occurs. You can achieve this by hooking int 1C hex (see section 6.35 and 6.36) or by hooking int 8 (see section 6.33), or if there is a convenient ‘idle’ point in your program where it can read the BIOS tick count variable, the update can be done there, by checking whether the tick count has changed from the previous tick count, and if so, updating the millisecond variable and updating the previous tick count, but with this last method, the logic is a bit untidy because the update must behave correctly if more than one tick has elapsed since the update routine was last called.
Updating the milliseconds variable involves adding the number of milliseconds that have elapsed, into the variable. If CTC channel zero is running with its normal divisor of 65536, every timer tick interrupt represents 54.9254 ms of elapsed time. But since the milliseconds variable is a 32-bit integer (no fractional part), you can’t add 54.9254 to it. You have to keep another variable that keeps track of the remainder. On most interrupts, you will add 55 to the milliseconds variable, but on some interrupts, you will add only 54. This can be done using a scheduling variable to control whether the ‘add’ value will be 54, or 55.
On every interrupt, we will add either 54 or 55 to the milliseconds variable. But the elapsed time is 54.9254 ms. A remainder variable keeps track of the fractional part of the real time, and allows us to decide whether to add 54 or to add 55.
The fractional part of the tick period (in milliseconds) is 0.9254, or more accurately, 0.9254164984656, which is roughly 12/13. 65536 multiplied by this value is about 60648. If we add 60648 to a 16-bit count which represents a number of 1/65536ths-of-a-millisecond, every time the addition carries (which will be about 12 out of every 13 times), another millisecond has accumulated, so we would add 55 to the millisecond variable. If the remainder variable did not carry after adding the 60648, we would add 54 to the milliseconds instead.
Over a reasonable period of time, and (most importantly) over a long period of time, the milliseconds variable will be accurate. The error contributed by this technique (due to approximating 65536 x 0.9254… to 60648) is only 0.02657 ppm, or less than one second per year. The error contributed by crystal inaccuracy will be about three orders of magnitude higher.
The code to do the update comes out very nicely in assembler:
        add    Remainder,60648        ; Add 65536 x 0.9254
        adc    MillisecL,54        ; Add 54 or 55 to loword
        adc    MillisecH,0            ; Carry into hiword
The three variables Remainder, MillisecL, and MillisecH, are all 16-bit. MillisecL and MillisecH are loword and hiword of the milliseconds variable.
For a microsecond counter, the same technique applies, but instead of adding 54 or 55 on each tick, you are adding 54925, and the remainder is 65536 x 0.4164984656, or 27295.
        add    Remainder,27295        ; Add 65536 x 0.4164984656
        adc    MicrosecL,54925        ; Add 54925 or 54926 to loword
        adc    MicrosecH,0            ; Carry into hiword
These techniques don’t magically give you millisecond or microsecond timing resolution from a 54.9254 ms clock tick, of course. The resolution is still only 54.9254 ms. But they do provide a way to get a time value with a sensible unit.
The same technique can be used when the timer tick is operated at a faster rate (see section 8 and subsections), though the constants change. For example, to get an actual timing resolution of about 500 us, you could use a channel 0 divisor of 596, giving an interrupt rate of one tick every 499.504825334 us. Using a microsecond variable, the update would add 499 plus the carry from adding 33084 to the remainder variable, and 499 plus carry to the microseconds variable:
        add    Remainder,33084        ; Add 65536 x 0.504825334
        adc    MicrosecL,499        ; Add 499 or 500 to loword
        adc    MicrosecH,0            ; Carry into hiword
With these values, cumulative error due to approximation of 65536 x 0.5048… to 33084, is 0.00712 ppm.
Choosing to use a millisecond timing variable may make your program easier to port to (or from) an environment where the system time is kept in units of one millisecond. For example, OS/2’s system time is kept in units of 1ms, though it does not have a 1ms resolution - is actually only updated every 31.25 ms.
10.12.1 SAMPLE PROGRAM: MILLISECOND COUNT USING INT 1CH
The following program uses int 1Ch with the critical error handling module from section 5.8, and demonstrates maintaining a milliseconds count. The timing resolution of the program is only 54.9254 ms, as it does not modify the timer tick rate, but the time is reported in units of one millisecond, rather than units of 54.9254 ms.
Int 1Ch should not be used in TSRs - see section 6.35 for details.
Every time the user presses a key, the current millisecond count is displayed. Pressing the Escape key terminates the program.
/*
Sample program #20
Demonstrates a milliseconds count using int 1Ch
Part of the PC Timing FAQ / Application notes
By K. Heidenstrom ([email protected])

Save and assemble the critical error module CRIT_ERR
Save this sample code to SAMPLE20.C
Compile this module with:
    bcc -c -I<inc_path> -ms sample20.c
Link the modules with:
    tlink /c /x <c0_path>\c0s.obj sample20.obj crit_err.obj,
        sample20, nul, <lib_path>\cs
Where inc_path is the path to your C header files, c0_path is the path to your
startup modules C0x.OBJ and lib_path is the path to your C libraries Cx.LIB.
*/

#include <dos.h>    /* Needed for enable(), disable(), MK_FP() */
#include <io.h>        /* Needed for _open() and _write() */
#include <stdio.h>    /* Needed for printf() */
#include <stdlib.h>    /* Needed for exit() */

#define FALSE 0
#define TRUE 1

#define STDERR 2    /* DOS handle for standard error */

void crit_err_intercept(void);        /* Provided in CRIT_ERR.OBJ */
unsigned int is_at_crit_prompt(void);    /* Provided in CRIT_ERR.OBJ */

typedef void interrupt (far *intfuncp)(); /* Pointer to interrupt handler */

intfuncp old_int_1Ch = (intfuncp)0xFFFFFFFFL;

static unsigned int remainder;
static volatile unsigned long milliseconds;

void abort_cleanup(int dos_is_safe) {
    if (dos_is_safe) {
        if (old_int_1Ch != (intfuncp)0xFFFFFFFFL) {
            setvect(0x1C, old_int_1Ch);
            old_int_1Ch = (void far *)0xFFFFFFFFL;
            }
        }
    else {
        disable();            /* Probably superfluous */
        if (old_int_1Ch != (intfuncp)0xFFFFFFFFL) {
            *((intfuncp far *)MK_FP(0, 0x1C << 2)) = old_int_1Ch;
            old_int_1Ch = (void far *)0xFFFFFFFFL;
            }
        }
    return;
    }

void interrupt ctrl_c_handler(void) {
    static char message[] = "\r\nProgram terminated by Ctrl-Break or Ctrl-C\r\n";
    if (is_at_crit_prompt())
        abort_cleanup(FALSE);
    else {
        abort_cleanup(TRUE);
        _write(STDERR, &message, sizeof(message));
        }
    exit(255);
    }

void interrupt new_int_1Ch(void) {
    asm {
        add    remainder,60648
        adc    WORD PTR milliseconds+0,54
        adc    WORD PTR milliseconds+2,0
        }
    return;            /* From interrupt */
    }

void intercept_int_1Ch(void) {
    old_int_1Ch = getvect(0x1C);
    setvect(0x1C, new_int_1Ch);
    return;
    }

unsigned long get_milliseconds(void) {
    static unsigned long rv;
    asm pushf;
    asm cli;
    rv = milliseconds;
    asm popf;
    return rv;
    }

void main(void) {
    int n;

    milliseconds = 0;

    printf("Sample program #20 - Demonstrates millisecond count using int 1Ch\n");
    printf("Part of the PC Timing FAQ / Application notes\n");
    printf("By K. Heidenstrom ([email protected])\n\n");

    crit_err_intercept();        /* Trap critical errors */
    setvect(0x23, ctrl_c_handler);    /* Trap Ctrl-C interrupt */
    intercept_int_1Ch();        /* Intercept int 1Ch */
    printf("Press any key to display current millisecond count\n");
    printf("Press <Esc> to exit\n\n");
    do {
        while (bioskey(1) == 0)
            ;
        n = bioskey(0);
        printf("Millisecond count is: %ld\n", get_milliseconds());
        } while ((n & 0xFF) != 27);
    abort_cleanup(TRUE);
    exit(0);
    }
10.13 NOTES ON MICROSOFT WINDOWS
I have no interest in Windoze, but I have received a few comments regarding timing under Windoze which you may find useful.
{TOR} Tor Sjowall ([email protected]) said (slightly paraphrased):
A regular 18Hz clock interrupt routine (int 8 or int 1Ch) in a DOS box under Windows works as usual as long as the DOS box has the focus, but when another window has the focus, the DOS box’s timer tick interrupt rate slows down to one tick every 800 ms. The tick counter however is incremented as usual. This has driven me crazy…
As far as I can gather from the documentation, this is the correct behaviour. The reason being that Windows wants to use as much of the CPU capacity as possible. Also I have not found any ‘back door’ into the 386 mode timer interrupt routine that will allow my program to catch the ticks.
The RTC periodic interrupt sort-of works under Windows. The problem is that each DOS box has its own Virtual Machine, plus one for Windows itself. So all these VMs each get a simulated hardware interrupt from the real 386 mode interrupt handler. This works well enough, but the overhead is large. Actually, Windows has a real ugly wart here: If the hardware interrupt was enabled in the PIC before Windows was started, all the VMs under Windows will get a simulated hardware interrupt with I/O ports trapped, etc etc. If the interrupt was disabled on the PIC, only the VM that enabled the interrupt on the PIC gets the interrupt. There is a text on the Developer CD, ‘The Tao of Interupts’, that describes this in all its gory detail.
The overhead is enormous: the V86 DOS interrupt has only 7% of the throughput of a native DOS interrupt routine. A 90Mhz Pentium is a good idea…
Thanks Tor for that information.
10.14 DOS FILE DATE AND TIME STAMPS
{TOR} also suggested this topic, as it is related to timing.
DOS’s FAT (File Allocation Table) file system stores the date and time of last modification of every file. Date and time values are each 16 bits (two bytes) wide. In the directory structure, the date value is at offset 24 into the directory entry, and the time value is at offset 22. In the findfirst/find- next structure in the DTA, returned by DOS when findfirst or findnext are requested, the date is also at offset 24 and the time at offset 22.
The file date word is constructed as follows.
    F E D C B A 9 8 7 6 5 4 3 2 1 0
    * * * * * * * . . . . . . . . .  Year minus 1980 (range 0-119)
    . . . . . . . * * * * . . . . .  Month (range 1-12)
    . . . . . . . . . . . * * * * *  Day of month (range 1-31)
The file time word is constructed as follows.
    F E D C B A 9 8 7 6 5 4 3 2 1 0
    * * * * * . . . . . . . . . . .  Hours (range 0-23, 24-hour format)
    . . . . . * * * * * * . . . . .  Minutes (range 0-59)
    . . . . . . . . . . . * * * * *  Seconds / 2 (range 0-29)
Note that the time is only stored with a resolution of two seconds, so the time stamp on a file modified at 12:34:56 is the same as the time stamp on a file modified at 12:34:57.
The date and time fields can be combined into an unsigned long value (date in the hiword, time in the loword) and compared with other date/time fields in the same format to see which file is newer or whether the date and time are the same.
10.15 DOS AND THE DATE AND TIME
Under DOS, the current date and time is not stored in the DOS kernel, but is provided as required, by the CLOCK$ driver. Whenever DOS wants to know the date and time, it issues a 6-byte read request to the clock driver, which it identifies via the CLOCK bit in the device attribute word. Traditionally the driver name is “CLOCK$” but this is not required.
See section 3.3 for a replacement CLOCK$ driver that uses the AT’s RTC.
The CLOCK$ driver supports reading and writing. Six bytes are always read and written. These bytes encode the full date and time. The six bytes of data are all in binary form. The structure is:
0     WORD    Number of days since 1st January 1980 (0-up)
2     BYTE    Minutes (0-59)
3     BYTE    Hours    (0-23)
4     BYTE    Hundredths of seconds (0-99)
5     BYTE    Seconds (0-59)
DOS will write to the CLOCK$ driver when int 21h, functions 2Bh or 2Dh (the DOS set date and set time functions) are issued. It will read the CLOCK$ driver when int 21h, functions 2Ah or 2Ch (DOS get date and get time functions) are issued, or when it wants to know the date and time for timestamping a disk file.
The standard CLOCK$ driver supplied with DOS reads the date from the RTC on initialisation (i.e. at reboot time), and converts this date to a count of days elapsed since 1st January, 1980. It maintains the date internally in this form, as this is the form used by DOS in the CLOCK$ read and write function calls. The standard CLOCK$ driver uses the BIOS timer tick count variable to keep track of the time of day. This variable is set up by the computer’s BIOS from the RTC time of day, as part of the power-on self-test (POST) procedure, so it is correct when DOS boots.
The CLOCK$ driver issues BIOS interrupt 1Ah, function 0, Get Tick Count, every time it is asked to supply the current date and time. This function returns a flag in AL called the midnight flag. The flag is set by the BIOS int 8 handler when the tick count variable wraps around from 1800AFh to 0, and is true the first time BIOS int 1Ah function 0 is called following a change of day. After the BIOS has reported the flag true, it clears the flag, and it will only be true again on the next change of day.
This is also described in section 4.2.
When the date and time are requested from the CLOCK$ driver, it calls the BIOS function, checks the midnight flag and if set, increments its count of days since 1st January 1980. It then converts the tick count into hours, minutes, seconds, and hundredths of seconds. Of course the tick count has a resolution of only 54.9254 ms, much more coarse than the 10ms resolution provided by the hundredths of seconds value. I do not know what algorithm the CLOCK$ driver uses to calculate the hours, minutes, seconds, and hundredths from the tick count.
When the date and time are set, the CLOCK$ driver’s days since 1980 count is set, and the CLOCK$ driver presumably calculates an appropriate tick count value and uses int 1Ah function 1 to set the tick count. I believe that the CLOCK$ driver also updates the RTC date and time, presumably through int 1Ah functions 3 and 5.
The DOS kernel contains the code to convert between days, months, and years, and number of days since 1st January 1980. It can convert both ways, as the date is both requested (int 21h function 2Ah) and set (int 21h function 2Bh) in days, months, and years format.
So to summarise, at reboot, the BIOS sets up the tick count using the RTC time, DOS boots and the CLOCK$ initialisation code calculates the number of days since 1 January 1980 from the RTC date and stores this internally. When the date and time is requested from the CLOCK$ driver, it calls int 1Ah function 0, checks the returned midnight flag and increments its day count if set, calculates the hours, minutes, seconds, and hundredths values from the tick count, and returns these values. When the date and time is set by writing to the CLOCK$ driver, the driver updates its day count to the specified value, and presumably calculates an appropriate tick count, sets it via int 1Ah function 1, sets the RTC time via int 1Ah function 3, and calculates days, months, and years from the day count and sets the RTC date via int 1Ah function 5.
If anyone has disassembled any DOS CLOCK$ drivers, please let me know what you found out. (*) I will eventually do this anyway.
10.15.1 DOS DATE ROLLOVER BUGS
There are two problems related to the change of day under DOS’s CLOCK$ driver.
The first is that int 1Ah, function 0, only returns the midnight flag set the first time it is called following a change of day. If an application program or TSR calls this function, and happens to call it after a change of day but before the CLOCK$ driver calls it, the application or TSR will see the change of day but the CLOCK$ driver will miss it. Therefore, no program should use int 1Ah function 0. Also see section 4.2.
The second problem is that there is no way to tell how many midnights have passed, since the midnight flag is just a flag, not a count. This problem usually affects computers that run constantly but are unattended, where the date and time may not be requested for a long time - more than 24 hours. Two or more midnights may pass, but when the date and time is requested, the date in the CLOCK$ driver is only incremented by one. I have heard that some BIOSes actually implement the midnight flag as a count, and the CLOCK$ driver may possibly respond to values other than 0 or 1 and update the date correctly, but I don’t know for sure. (*)
10.16 SIMULATING A VERTICAL RETRACE INTERRUPT
The aim of this technique is to provide an interrupt which is synchronised to the screen refresh (i.e. vertical scan) so that certain functions that must be performed during the vertical retrace period can be done via this interrupt, in the background. For more details on this, see section 7.33.
Some video cards (notably EGA cards) are able to generate a vertical retrace interrupt themselves, usually on IRQ2/9, but this facility is not standard on VGA cards. The vertical retrace interrupt can be simulated using CTC channel 0.
Vertical retrace emulation is sometimes a hot topic on comp.os.msdos.programmer and comp.lang.asm.x86, with many people interested in how it can be done, but I (and my correspondent Anders Roar Nielsen, [email protected]) don’t believe that it is necessary in most applications. Retrace can be detected by polling, the field time can be measured, and CTC channel 0 can be used to estimate where the video circuitry is ‘up to’ (at the default divisor, there are at least three field scans per CTC channel 0 wraparound). These techniques of maintaining code synchronisation to the screen refresh, using the CTC, will generally have much lower overhead and less impact on other aspects of the machine’s performance.
The triple buffering technique, described in section 10.16.3, does rely on vertical retrace interrupt simulation, however.
10.16.1 VERTICAL RETRACE INTERRUPT SIMULATION DESCRIPTION
The technique described in this section is based on an apparently well-known algorithm. I saw it suggested by Tommy Marshall ([email protected]), in his message <[email protected]> of Sat 05 Aug 1995. I have enhanced the algorithm to improve its performance under adverse conditions, and added thorough documentation. In his posting, Tommy mentions that some demo source code is available on his web site: http://www.owt.com/users/tommym/index.html. Thanks to Anders Roar Nielsen ([email protected]) for his help with this subject.
The following diagram will only make sense if viewed on a monospaced screen.
The above diagram shows the retrace signal graphed against time (time is on the horizontal axis). The numbers on the diagram are in units of one CTC clock (0.8381 us). The values are as measured on my Tseng ET4000 W32i card operating in standard 25-line, 80-column colour VGA text mode (720x400 pixels). The pulses are the retrace indication from the video card, readable on the video status input port. At point A, when the retrace indication becomes active, the entire screen has been scanned and the electron beam is beginning its vertical retrace - retracing its steps back to the top of the screen. The retrace pulses are fairly short - in this case, only 76 CTC clocks, or about 64 us long. The actual vertical retrace time (the time taken for the electron beam to return to the top of the screen and start scanning the displayable part of the picture) is much longer than the pulse indicates; Klaus Hartnegg ([email protected]) reports that a typical VGA vertical blanking period is about 2 ms. The visible part of the next vertical scan starts a little later - say at point B. At point D, the scan ends and the next retrace begins, ready for the next scan which starts at E.
During the retrace period, i.e. between point A and point B, it is safe to modify certain parameters in the video subsystem, for example to perform page flipping or some types of screen updates, without causing flicker or other visible interference.
10.16.1.1 MEASURING THE FIELD TIME
The field time, i.e. the time span between the same edge of two adjacent retrace pulses, can be measured by initialising CTC channel 0 in mode 2, waiting for a rising (or falling) edge on the retrace indication, reading the count in CTC channel 0, waiting for the next edge of the same type, and re-reading the count in CTC channel 0, and calculating the number of CTC clocks elapsed between the two samples. This is done with interrupts disabled. In this case, a time of 17088 CTC clocks was measured, with a fluctuation of +/- 1 CTC clock period. The field period is this number multiplied by 0.8381 us (the CTC clock period). In this case the field period is 14.321 ms. The field rate (number of fields per second) is the reciprocal of the field time - in this case, about 69.8 fields per second, i.e. a vertical scan rate of about 69.8 Hz.
10.16.1.2 CONTROLLING THE CTC INTERRUPT
Having determined the field period, 17088 CTC clock periods, we can program CTC channel 0 to give an interrupt a short time before the rising edge of the next retrace pulse will be due. We wait for a start of retrace, i.e. point A, and immediately reset and program CTC channel 0 for mode 2 with a count of slightly less than 17088, so that it will generate an interrupt shortly before the start of the next retrace, say at point C.
During normal operation, CTC channel 0 will issue an interrupt at point C. The int 8 handler will loop, waiting for the start of the retrace (point D). When this occurs, the interrupt handler resets and reprograms CTC channel 0, so that it will interrupt again at point F. The important screen updates that must be done during retrace, can now be performed. The interrupt handler then exits, and the mainline gets execution until point F, at which point the CTC triggers another interrupt and the cycle repeats as if from point C.
This technique assumes that the video mode does not change during execution and is not reset. A video mode reset may cause the scanning to restart out of sync. The interrupt will resynchronise in the latter case, but may lock interrupts for an unusually long amount of time when doing so, as it may potentially remain in the retrace wait loop for a long time.
10.16.1.3 SIGNIFICANCE OF THE SAFEMARGIN VALUE
The number of CTC clocks which are subtracted from the field period to give the CTC count value is important. I will call it the SafeMargin value. The sample program uses a default SafeMargin of 120 CTC clocks, or about 100 us. The significance of the SafeMargin value is that it determines the maximum interrupt latency that can be tolerated. This latency is made up of interrupt acceptance delay (due to interrupts being locked out) and interrupt overhead (e.g. overhead caused by EMM386).
If, for example, interrupts were locked out at point ‘*’, by a CLI instruction issued by the mainline or some code that was called by the mainline, then the interrupt would be signalled (by the CTC) at point C, but would not be accepted immediately. If the acceptance was delayed past point D, the start of the retrace period, then the int 8 handler is going to see that the retrace has already started. If this occurs, the int 8 handler cannot guarantee that there is enough time for the screen manipulation, before the visible part of the scan begins and the manipulation will cause visible interference.
Therefore, if interrupts are being locked out periodically by the mainline or code called by the mainline, the SafeMargin value must be long enough to cover the longest period for which interrupts will be locked out, plus any delays in interrupt acceptance (EMM386 overhead), so that in the worst case, if interrupts were locked out just before the CTC channel 0 interrupt was signalled, they will be enabled in time for the interrupt to be accepted and the int 8 handler to be entered and to check the retrace flag before the retrace actually starts, so that there is almost the entire retrace period available for the screen update.
The sample program allows the SafeMargin value to be set from the command line via a decimal number which represents the number of CTC clocks (units of 0.8381 us) for the SafeMargin value. The default SafeMargin value is 120, giving a safety margin of about 100 us including interrupt overhead.
If you use a short SafeMargin value, it is essential that no foreground code locks out interrupts for any reasonable length of time. On the other hand, a large SafeMargin value reduces the amount of time available for other processes (i.e. the mainline), as a larger amount of time is spent in the loop in the int 8 handler, waiting for the start of retrace, between points C and D.
If SafeMargin is increased to more than about half of the vertical scan time, the system falls apart, giving widely varying loop counts and a jumpy display. I haven’t bothered to try to figure out why this occurs, because half a field period is normally at least 6 ms, so SafeMargin should never be anywhere near this long, but I noticed that it can be fixed by moving the instructions that prepare the CTC to accept its new count, back to just after the CTC count in progress is read, so that the CTC is frozen during the wait-for-retrace loop.
10.16.1.4 OVERHEAD DUE TO LARGE SAFEMARGIN AND SCREEN UPDATE
Depending on the SafeMargin value you choose, you may also need to take into account the time spent between points C and D, as it will take a chunk of processing time, and operates with interrupts locked out. Remember that the operations performed by the retrace function (screen updates, etc) are also performed with interrupts locked out, so if they are extensive, this may have a significant impact on latency for other interrupts.
For example, don’t try to use this technique in a game that communicates via a serial link or a modem (multi-player multi-computer games) unless you’re using a very low data rate, or carefully controlling the outgoing flow control lines to prevent loss of incoming characters!
10.16.1.5 ENHANCED HANDLING OF MISSED RETRACE START
The above algorithm can be improved in cases where the start of retrace is missed due to interrupt latency. First, if we keep track of the last reload value that was programmed into the CTC, we can read the count in progress in the CTC and subtract it from that value, to determine the number of CTC clocks by which the interrupt was delayed. By subtracting our SafeMargin value, we can determine how many CTC clocks into the retrace period we are. We may be able to make use of a retrace interrupt even if it was delayed past the start of retrace, if we know that there is still enough time to execute screen update code before the start of the next visible scan. Also, we can correct for the error by reprogramming CTC channel 0 even if we cannot get a timing reference from the video subsystem. I will now explain these enhancements in detail, using an example.
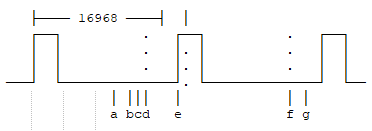
Using the above diagram as an example, assume that the field period is 17088
clocks, SafeMargin is 120, and the visible scan starts at point E. The CTC
was programmed with a count of 16968. An interrupt is signalled at point A
but interrupts are locked out by the mainline or some code called by the
mainline. At point B, retrace has already started, but our interrupt routine
is still prevented from executing. Then interrupts are enabled at point C.
The interrupt handler starts immediately, but discovers that retrace has already
started. It reads the CTC count in progress at point D, and gets a value of,
say, 16728. At point A, the CTC reloaded with a count of 16968, so by
subtracting the count in progress from the last CTC count, i.e. 16968-16708,
which is 260 CTC clocks, we can calculate the number of CTC clocks between
point A and point D (point D being now). This value is the amount of time
by which the interrupt was delayed, and includes delay caused by interrupts
being locked out, and delay in the actual interrupt acceptance process, e.g.
delay caused by EMM386. I will call this value the Latency value.
We can then subtract SafeMargin (which is a fairly accurate estimate of the time between points A and B) from the Latency value, to calculate the time between point B (start of retrace) and point D (now). This gives a result of 140 clock cycles between B and D. If the start of visible scan at point E is known to be, say, 1300 CTC clocks after point B (the start of retrace), we can calculate how much time remains before the visible scan begins, by subtracting the number we just calculated (140, the time between B and D) from the 1300 (the time between B and E), to get 1160 CTC clocks, the amount of time left before the visible scan starts. If the screen update code is known to take comfortably less than this amount of time, then it can still be executed.
If that was tricky, it gets trickier! If interrupt acceptance was delayed so long that the interrupt routine executed after the end of the retrace pulse, it would not know that it had missed the pulse altogether, and would sit in its wait loop, waiting for the start of retrace, for the entire displayed field, until the next retrace started! During this time, the mainline could not execute, and interrupts would be locked out! We can detect this, again by reading the CTC count in progress on entry to the int 8 handler and determining how long the interrupt acceptance was delayed (i.e. the Latency value). If the Latency is significantly longer than SafeMargin, we can assume that we have at least missed the start of the retrace, and possibly the end as well.
When the interrupt is accepted within the SafeMargin period, we can wait for the start of retrace, then resynchronise the CTC by resetting it and setting the count to the field period minus SafeMargin (16968) again. But when we miss the start of retrace, because interrupt acceptance was delayed for longer than SafeMargin, we no longer have a video timing reference from which we can resynchronise CTC channel 0. But since we know how long interrupt acceptance was delayed (the measured Latency value), we can estimate a new count to program into CTC channel 0, that will cause an interrupt at roughly the correct point in the next cycle.
For example, in the above example, at point D we know that 260 clocks have elapsed since point A when the interrupt was signalled by the CTC. We want the next interrupt to be signalled at point F, which is SafeMargin clocks before the start of the next retrace, at point G. The count to be programmed into CTC channel 0 is therefore the field time minus the measured Latency. CTC channel 0 is reset and programmed with a count of 17088 - 240, or 16848. 16848 CTC clocks later, it will generate the interrupt at point F.
This method is not 100% accurate, as there will be some delay in reading and setting the CTC count, as well as some delay between the two. This would result in the interrupts getting progressively later, if retraces were missed repeatedly. As soon as an interrupt is accepted within SafeMargin, the CTC is resynchronised from the retrace signal. I thought of a better method that would have kept better synchronisation in these circumstances, and it should have worked, but it didn’t. Oh well.
10.16.1.6 OTHER NOTES
There may be special considerations for interlaced video modes. If you are using these modes, you will probably already know enough to figure out whether there will be any problems :-)
Also, because this technique intercepts int 8, the standard precautions as described in section 5 should be taken, to ensure that the program is not terminated without being able to clean up and restore the original int 8 handler and standard divisor on CTC channel 0.
I found it very interesting to run various programs from the DOS shell and see the effect they have on interrupt latency. For example, on my 486DX2-66, the background interrupt latency is typically 15 to 20 CTC clock cycles, and no retraces are missed at SafeMargin = 120. My COMSPEC points to a file on a RAM drive - if my command processor was on the hard disk, and was uncached, the interrupt latency due to the DOS EXEC call that invokes the command processor would probably make it impossible to determine the background latency. The DOS EXEC call could be replaced with a delay loop, to determine the background latency in this case (if you wanted to).
Listing a directory increases the longest int 8 latency slightly, but few if any retraces are missed. But, running CHKDSK gives a longest latency of about 7000 to 8000 CTC clocks, and many missed retraces. With the SMARTDRV.SYS disk cache installed, after CHKDSK has run once, it does not need to physically access the hard drive again, and the maximum interrupt latency drops to about 80 CTC clocks, with no missed retraces (SafeMargin = 120).
10.16.2 SAMPLE PROGRAM: SIMULATING A VERTICAL RETRACE INTERRUPT
NAME SAMPLE21
; Sample program #21
; Demonstrates a simulated vertical retrace interrupt
; Part of the PC Timing FAQ / Application notes
; By K. Heidenstrom ([email protected])
;
; This program assembles into SAMPLE21.COM, a program which implements an
; simulated vertical retrace interrupt using CTC channel 0. It installs its
; interrupt handler, and shells to DOS, allowing other programs to be run
; while its interrupt handler is installed. The interrupt handler causes the
; screen text to move up and down, in a seasickness-inducing fashion.
;
; This program requires a VGA card able to operate in video mode 3 (80x25,
; colour mode) but does not check that this is present.
;
; Save this file to SAMPLE21.ASM and assemble with:
; masm SAMPLE21;
; link SAMPLE21;
; exe2bin SAMPLE21.exe SAMPLE21.com
; or
; tasm SAMPLE21;
; tlink /t SAMPLE21;
;
; The techniques used in this program cannot safely be used in a TSR or a
; program that shells to DOS in a general way to run any DOS program. This
; technique is intended to be used as part of an application, where the
; behaviour of the 'foreground' code is known and controlled as much as
; possible. Though this program does shell to DOS, it is not intended to be
; used to run all types of programs. The shell to DOS feature is just to
; demonstrate that the screen updates are in fact being done under interrupt.
;
; This program can be assembled with or without the performance monitoring and
; reporting capability. Set the REPORT conditional to 0 for no performance
; monitoring and reporting, or to 1 for performance monitoring and reporting.
; Additional code in the int 8 handler is enabled if REPORT is enabled.
; The performance and behaviour monitoring functions will often be useless in
; production code.
REPORT = 1 ; Enable for report stuff
Code SEGMENT
ASSUME cs:Code,ds:Code
ORG 100h
Main: jmp Main2
SignOnMsg DB 13,10,"SAMPLE21 -- Demonstrates simulated vertical retrace interrupt",13,10
DB "Part of the PC Timing FAQ / Application notes",13,10
DB "By K. Heidenstrom ([email protected])",13,10,13,10
DB "Usage: SAMPLE21 [Safety-margin]",13,10,13,10
DB "This program assumes, but does not check for, a VGA card in 80x25 mode",13,10,13,10
DB "Type EXIT at the DOS prompt to quit this program",13,10,13,10,"$"
ComspecMsg DB "SAMPLE21: Can't locate COMSPEC in environment",13,10,"$"
IF REPORT
Msg0 DB 13,10," Chosen safety margin: $"
Msg1 DB " CTC clocks",13,10," Measured field time: $"
Msg2 DB " CTC clocks",13,10," Total retraces: $"
Msg3 DB 13,10,"Missed retrace starts: $"
Msg4 DB 13,10,"Longest int 8 latency: $"
Msg5 DB " CTC clocks",13,10," Longest retrace wait: $"
Msg6 DB " loops",13,10,"Shortest retrace wait: $"
Msg7 DB " loops",13,10,"$"
ENDIF
ComSpecTxt0 DB "COMSPEC=" ; Text to find COMSPEC in environment
ComSpecTxtL = $ - ComSpecTxt0 ; Length of same
ComspecPtr DW 0 ; Pointer to COMSPEC in environment
ALIGN 2
ExecParmBlock: ; EXEC parameter block
EnvirSeg DW 0 ; Segment-paragraph of environment
DW ShellCommand ; Pointer to command line
SetToCS1 DW 0 ; Segment part for above
DW 5Ch ; Let it use our FCBs
SetToCS2 DW 0 ; Segment part again
DW 6Ch ; Ditto
SetToCS3 DW 0 ; Ditto
ShellCommand DB 0,13 ; Command tail length and contents
IF REPORT
ReportTbl DW MsgPrint,Msg0
DW PrintDec,SafeMargin
DW MsgPrint,Msg1
DW PrintDec,FieldPeriod
DW MsgPrint,Msg2
DW PrintDec,Retraces
DW MsgPrint,Msg3
DW PrintDec,MissedStarts
DW MsgPrint,Msg4
DW PrintDec,MaxLatency
DW MsgPrint,Msg5
DW PrintDec,Longest
DW MsgPrint,Msg6
DW PrintDec,Shortest
DW MsgPrint,Msg7
DW Continue,0
ENDIF
SafeMargin DW 120 ; Interrupt 100us early (default)
FieldPeriod DW 0 ; Number of CTC clocks in each field
; (frames per second = 1,193,181.66666... / FieldPeriod)
LastCTC DW 0 ; Last CTC count programmed
Latency DW 0 ; Actual latency for this interrupt
Int8Sched DW 0 ; Scheduler for calling BIOS int 8
IF REPORT
First DW 1 ; Flag whether first retrace
Retraces DW 0 ; Count of retraces
MissedStarts DW 0 ; Count of missed retrace starts
MaxLatency DW 0 ; Worst int 8 delay (CTC clocks)
Longest DW 0 ; Longest retrace wait (loops)
Shortest DW 0FFFFh ; Shortest retrace wait (loops)
ENDIF
Cycler DW 0 ; Cycle control variable
; The sinewave table was created using the following GW-BASIC program using a
; number of entries of 64, range of values of 16, and centre offset of 7.5.
; The program generated one '16' in the middle of the '15' values, but I just
; manually fixed this to 15. A value of 16 causes the screen to jump.
;
;10 PRINT"This program will generate a sinewave table. The table is written to"
;20 PRINT"a disk file called SINE.DMP. The file is in text form, and contains"
;30 PRINT"one line per entry, in ASCII decimal representation. All entries are"
;40 PRINT"integers. Parameters required are: number of entries in table, range"
;50 PRINT"of values (peak to peak), and centre offset. One cycle of sine wave"
;60 PRINT"is written.":PRINT:INPUT"Number of entries in table :",NE#
;70 INPUT"Peak to peak value range :",PP#:INPUT"Zero offset :",ZO#
;80 OPEN "SINE.DMP" FOR OUTPUT AS#1 : A# = 0 : I# = 6.283185307179586#/NE#
;90 FOR P = 1 TO NE# : S# = SIN(A#) : V = INT((S# * PP# / 2) + ZO# + .5#)
;100 PRINT #1,V : A# = A# + I# : NEXT : CLOSE #1 : SYSTEM
CycleTbl DB 8,8,9,10,11,11,12,13,13,14,14,15,15,15,15,15
DB 15,15,15,15,15,15,14,14,13,13,12,11,11,10,9,8
DB 7,7,6,5,4,4,3,2,2,1,1,0,0,0,0,0
DB 0,0,0,0,0,0,1,1,2,2,3,4,4,5,6,7
Main2 PROC near
cld ; Upwards string direction
mov si,81h ; Command tail
Loop1: lodsb ; Get character
cmp al,13 ; C/R yet?
je NoParam ; If so
cmp al," " ; Whitespace?
jbe Loop1 ; Loop if so
; Parse decimal number parameter to replace default SafeMargin value
xor bx,bx ; Clear calculated value
ReadNumLp: sub al,"0" ; Convert "0"-"9" to 0-9
cmp al,9 ; Check for valid char
ja ReadNumFin ; If not, terminator
cbw ; Zero AH
xchg ax,bx ; New digit to BL, old total to AX
mov dx,10 ; Ten to unused register
mul dx ; Multiply old value by ten
add bx,ax ; Add to new digit
lodsb ; Read char from command tail
jmp SHORT ReadNumLp ; Loop for more
ReadNumFin: mov [SafeMargin],bx ; Store adjustment value
NoParam: mov es,[ds:2Ch] ; Get segment of environment
mov [EnvirSeg],es ; Set up for command processor
xor di,di ; Start at start of environment
ScanEnvLoop: mov si,OFFSET ComSpecTxt0 ; Point at 'COMSPEC='
mov cx,ComSpecTxtL ; Get length to compare
push di ; Keep pointer to start
repe cmpsb ; Compare to 'COMSPEC='
pop cx ; Restore pointer to start
je GotComspec ; If found it
mov di,cx ; Go to start of entry again
mov cx,8000h ; Maximum length to scan
xor al,al ; Null terminator to scan for
repne scasb ; Scan for null terminator
jne EnvirError ; If error in environment
cmp BYTE PTR es:[di],0 ; Final entry in environment?
jne ScanEnvLoop ; If not, keep looking
EnvirError: mov dx,OFFSET ComspecMsg ; Point to message
mov ah,9
int 21h ; Display it
mov ax,4C01h ; Errorlevel 1
int 21h
int 20h ; In case DOS-1 (!)
GotComspec: mov [ComspecPtr],di ; Store offset into environment
mov [SetToCS1],cs ; Set up segment-paragraphs in EXEC
mov [SetToCS2],cs ; parameter block for command
mov [SetToCS3],cs ; interpreter
; Relocate stack and shrink memory allocation
push cs
pop es ; ES to Code
mov sp,OFFSET StackTop ; Relocate stack
mov bx,OFFSET FreeSpace+15 ; Account for partial paragraph
mov cl,4 ; Shift count
shr bx,cl ; Shift to paragraph count
mov ah,4Ah
int 21h ; Shrink memory to minimum necessary
; First, set the VGA card to the required mode. It must be a colour mode,
; otherwise the retrace flag appears in a different I/O port and the code
; will fail. Any required mode tweaking would be done here, too.
mov ax,3 ; Screen mode
int 10h ; Set screen mode
mov dx,OFFSET SignOnMsg ; Point to sign-on message
mov ah,9
int 21h ; Display it
; Set CTC channel 0 for a known mode and reload value - mode 2, 65536.
cli ; No interrupts here please
mov al,00110100b ; Channel 0, lobyte/hibyte, mode 2, bin
out 43h,al ; Prepare channel 0 for new divisor
jmp SHORT $+2 ; Short delay
xor al,al ; Divisor is 0 (65536)
out 40h,al ; Write lobyte of divisor
jmp SHORT $+2 ; Short delay
out 40h,al ; Write hibyte of divisor
; Time the number of CTC clocks between two retraces
call StampRetrace ; Load the processor cache
call StampRetrace ; Wait for start of retrace, read CTC
mov bx,ax ; Keep it
call StampRetrace ; Do the same again
sub ax,bx ; Calculate difference
mov [FieldPeriod],ax ; Store retrace period (in CTC clocks)
; Calculate the value to be programmed into CTC channel 0 from now on
sub ax,[SafeMargin] ; Subtract the desired safety margin
mov [LastCTC],ax ; Store as last programmed value
; Program the timer to interrupt just before the next retrace starts
xchg ax,dx ; To DX
mov al,00110100b ; Channel 0, lobyte/hibyte, mode 2, bin
out 43h,al ; Prepare channel 0 for new divisor
jmp SHORT $+2 ; Short delay
mov al,dl ; Lobyte of divisor
out 40h,al ; Write lobyte of divisor
jmp SHORT $+2 ; Short delay
mov al,dh ; Hibyte of divisor
out 40h,al ; Write hibyte of divisor
sti
mov ax,3508h
int 21h ; Get int 8 vector
mov [Old8Ofs],bx ; Store offset
mov [Old8Seg],es ; Store segment
mov dx,OFFSET New8 ; Point to new handler
mov ax,2508h
int 21h ; Set vector
push cs
pop es ; ES back to Code
; Now execute the command processor
mov bx,OFFSET ExecParmBlock ; Point to EXEC parameter block
mov dx,[ComspecPtr] ; Get offset to command specification
mov ds,[EnvirSeg] ; Get segment of environment
ASSUME ds:nothing
mov ax,4B00h
int 21h ; Execute command interpreter
push cs
pop ss ; Restore SS
mov sp,OFFSET StackTop ; Reset stack
push cs
pop ds ; Restore DS
ASSUME ds:Code
; Restore VGA CRTC register 8 to its default value
mov dx,3D4h ; Address VGA CRTC
mov ax,8 ; Register number and value (0)
out dx,ax ; Restore it
; Restore normal mode and divisor in CTC channel 0
cli ; No interrupts around this bit
mov al,00110110b ; Channel 0, lobyte/hibyte, mode 3
out 43h,al ; Prepare channel 0 for new divisor
jmp SHORT $+2 ; Short delay
xor al,al ; Divisor is 0 (65536)
out 40h,al ; Write lobyte of divisor
jmp SHORT $+2 ; Short delay
out 40h,al ; Write hibyte of divisor
sti ; Interrupts are OK now
lds dx, [DWORD PTR Old8Ofs] ; Get old int 8 handler
ASSUME ds:nothing
mov ax,2508h
int 21h ; Restore int 8 vector
push cs
pop ds ; DS back to Code
ASSUME ds:Code
; Generate report if REPORT conditional enabled
IF REPORT
cld ; Just make sure
mov si,OFFSET ReportTbl
ReportLp: lodsw ; Handler address
xchg ax,cx ; To CX
lodsw ; Parameter
xchg ax,bx ; to BX
mov ax,[bx] ; Get value (if applicable)
mov dx,bx ; Pointer to DX
call cx ; Call handler
jmp SHORT ReportLp ; Loop
Continue: pop ax ; Fix up stack
ENDIF
mov ax,4C00h
int 21h
Main2 ENDP
; This function waits for the start of a vertical retrace then reads the count
; in progress in CTC channel 0. It assumes a VGA card, running in a colour
; mode. It also assumes CTC channel 0 is operating in lobyte-hibyte access
; mode and operating mode 2, and returns the count in AX, converted to an
; up-count. It first waits for any retrace currently in progress to end, then
; waits for the next retrace to start and immediately reads the CTC count.
; This function must be called with interrupts disabled. Destroys AX and DX.
StampRetrace PROC near
mov dx,3DAh ; VGA status port in colour modes
WaitRetr1: in al,dx ; Read status
test al,00001000b ; Check retrace flag
jnz WaitRetr1 ; If set, we are already in a retrace
WaitRetr2: in al,dx ; Read status
test al,00001000b ; Check retrace flag
jz WaitRetr2 ; If clear, keep waiting for retrace
xor al,al ; Command to latch channel 0
out 43h,al
jmp SHORT $+2 ; Short delay
in al,40h ; Read lobyte of count in progress
jmp SHORT $+2 ; Short delay
mov ah,al ; Keep it in AH
in al,40h ; Read hibyte of count in progress
xchg al,ah ; To correct registers
neg ax ; Convert to up-count
ret ; Return in AX
StampRetrace ENDP
; This function prints AX in ASCII decimal representation. Output is via DOS
; function 2. AX, BX, CX, and DX are all destroyed.
PrintDec PROC near
xor cx,cx ; Zero digit counter
PrintDec1: xor dx,dx ; Clear high word of value in DX|AX
mov bx,10 ; Base
div bx ; Divide by 10
add dl,"0" ; DL is remainder, convert to ASCII
push dx ; Store on stack
inc cx ; Increment char counter
test ax,ax ; Any more digits left?
jnz PrintDec1 ; If so, loop
PrintDec2: pop dx ; Get char back
mov ah,2 ; Print char
int 21h ; Call DOS
loop PrintDec2 ; Loop for all chars
ret ; Done
PrintDec ENDP
MsgPrint PROC near ; Print message pointed to by DX
mov ah,9
int 21h ; Print message ('$' terminated)
ret
MsgPrint ENDP
; The following function is the replacement int 8 handler. There is a lot of
; conditional code that is enabled by the REPORT conditional. The version
; with reporting is very instructive, and useful during development, but you
; may prefer to base production code on the version without the performance
; monitoring code.
ASSUME ds:nothing
New8 PROC far ; New int 8 handler
cli ; Make sure
push ds
push cs
pop ds ; Address this segment with DS
ASSUME ds:Code
push dx
push cx
push bx
push ax
pushf
cld ; Ensure DF is known
; Read count in progress in the CTC to CX
xor al,al ; Command to latch channel 0
out 43h,al
jmp SHORT $+2 ; Short delay
in al,40h ; Read lobyte of count in progress
jmp SHORT $+2 ; Short delay
xchg ax,cx ; To CL
in al,40h ; Read hibyte of count in progress
mov ch,al ; To CH - now CX = count in progress
; Now have count in progress, in CX. Calculate the latency on this interrupt
; invocation. This can be determined from the reload value last programmed
; into the CTC (which is stored in LastCTC). The difference between LastCTC
; and the count in progress, is the latency. This value is left in CX.
; If reporting, update the MaxLatency variable if appropriate.
neg cx ; Convert count in progress to negative
add cx,[LastCTC] ; Now have latency for this interrupt
mov [Latency],cx ; Store as measured latency
IF REPORT
cmp cx,[MaxLatency] ; Update MaxLatency
jbe NotWorse ; If not exceeded current value
mov [MaxLatency],cx ; If exceeded, update
ENDIF
; Check for this interrupt handler being entered too late. This occurs if a
; retrace was already in progress when the interrupt routine was entered, or
; if the measured latency is significantly greater than the SafeMargin value
; (at least, say, 10 or 20 CTC clocks later, to allow for timing alignment
; errors - I have chosen 20 CTC clocks; anything less than this will always
; be picked up by the retrace being already active).
;
; If this occurs, the interrupt was delayed longer than the SafeMargin value,
; and the start of the retrace interval (and possibly the whole retrace pulse)
; has been missed.
;
; The logic is that either the interrupt was accepted in time, in which case
; we will wait for the start of retrace and reset the CTC with the correct
; delay again, or the interrupt was delayed past the start of retrace (and
; possibly even past the end of retrace!) In this case, we must find out
; how 'late' we are, not wait for the start of retrace (as it has already
; started and may even have finished), and program the CTC with an adjusted
; delay (adjusted downwards), so that the next interrupt will be signalled
; on schedule.
; This technique does not resynchronise the CTC interrupt to the video system,
; and does not include compensation for the delays in the code, so if retraces
; are missed repeatedly, the timing of the interrupts is likely to drift.
; After the first successful interrupt entry, however, the CTC will be
; resynchronised to the video retrace.
NotWorse: xor bx,bx ; Zero loop counter / flag for later
mov dx,3DAh ; VGA status port
in al,dx ; Get status
test al,00001000b ; Check for retrace
jnz MissedRetrace ; If active, we missed the start
mov ax,[SafeMargin] ; Get ideal interrupt acceptance delay
add ax,20 ; Get maximum expected safety window
cmp cx,ax ; Measured interrupt acceptance delay
jae MissedRetrace ; Oh dear, we missed it completely!
; The latency (interrupt acceptance delay) was comfortably smaller than
; SafeMargin, and retrace is not active, so presumably the interrupt was
; accepted within the safe period. We can now wait for the retrace to
; start, then reprogram the CTC with the standard delay (from FieldPeriod
; minus SafeMargin). In report mode, count the loops while waiting.
Retrace1: IF REPORT
cmp bx,0FFFFh ; Check for overflow
adc bx,0 ; Increment if not
ENDIF
in al,dx ; Read status
test al,00001000b ; Check retrace flag
jz Retrace1 ; If clear, keep waiting for retrace
; We have just successfully completed the wait-for-retrace loop. If in report
; mode, update longest and shortest wait times but only if this is not the
; first retrace.
IF REPORT
cmp [First],0 ; Is it the first retrace?
jnz IsFirst ; If so
cmp bx,[Longest] ; Longer than longest?
jbe NotLonger ; If not
mov [Longest],bx ; If so
NotLonger: cmp bx,[Shortest] ; Shorter than shortest?
jae NotShorter ; If not
mov [Shortest],bx ; If so
IsFirst: mov [First],0 ; Reset First flag if set
NotShorter: ELSE
inc bx ; Flag that retrace was safe
ENDIF
mov cx,[FieldPeriod] ; Total field time minus safe margin
sub cx,[SafeMargin] ; Prepare value to load into CTC
jmp SHORT ResetCTC ; Go to set up CTC
; We missed the start of retrace because the interrupt was delayed, probably
; by some foreground code locking interrupts out for a long time. This can't
; be helped now, but we must adjust the value programmed into the CTC to
; trigger the next interrupt, so that it will interrupt proportionally sooner,
; otherwise we will miss the next retrace, etc.
; Calculate the new value to be programmed into the CTC. This is simply the
; retrace period (FieldPeriod) minus the measured latency, which is already in
; CX from earlier calculations. This gives an adjusted value to load into the
; CTC for the next delay, so that it will interrupt at roughly the correct
; point next time.
MissedRetrace: IF REPORT
inc [MissedStarts] ; Flag we missed a retrace start
ENDIF
neg cx ; Get minus interrupt acceptance delay
add cx,[FieldPeriod] ; Get adjusted CTC load value
; At this point, we have either missed the start of retrace and calculated a
; reduced value to load into the CTC for the next delay, or we have just had
; the start of retrace and have the standard value (FieldPeriod - SafeMargin)
; to load into CTC channel 0. CX contains the value to be loaded into the CTC
; to determine the delay from now until the next interrupt is signalled.
; Reset and restart the CTC using this value.
ResetCTC: mov [LastCTC],cx ; Store as last programmed value
mov al,00110100b ; Channel 0, lobyte/hibyte, mode 2, bin
out 43h,al ; Prepare channel 0 for new divisor
jmp SHORT $+2 ; Short delay
xchg ax,cx ; Get CTC count value
out 40h,al ; Write lobyte of divisor
jmp SHORT $+2 ; Short delay
mov al,ah ; Hibyte of divisor
out 40h,al ; Write hibyte of divisor
; Set carry flag according to whether retrace missed, and call RetraceFunc.
; BX was cleared before the test for retrace already started, so if retrace
; had already started (i.e. retrace start missed), BX will still be zero.
; If not, BX will be at least 1, as it is incremented in the wait loop (if
; reporting is enabled) or explicitly (if reporting is not enabled).
cmp bx,1 ; Set carry if retrace had started
call RetraceFunc ; Do retrace stuff
; Increment retrace count (but not above 0FFFFh)
IF REPORT
cmp [Retraces],0FFFFh ; Check for overflow
adc [Retraces],0 ; Increment if not
ENDIF
; Either chain to BIOS int 8 handler, or send EOI to PIC and return from
; interrupt. The decision is made via the Int8Sched variable, which is
; incremented by the number of CTC clocks in each field (FieldPeriod).
; If it carries, the BIOS int 8 handler is called. Otherwise, we just send
; an EOI and return from interrupt.
; In production code, this logic could be modified to remove the Int8Sched and
; the conditional chain to the BIOS int 8 handler, and always send the EOI and
; return. If this is done, the system time will stop updating while the handler
; is installed. There is little to be gained by doing this, as the interrupt
; rate is not very high, so I suggest leaving the chaining code intact.
mov ax,[FieldPeriod] ; Get number of CTC clocks elapsed
add [Int8Sched],ax ; Add into BIOS int 8 scheduler variable
cli ; Don't allow stack growth
jc CallOld8 ; If it carried, chain to the BIOS
mov al,20h ; EOI command
out 20h,al ; Send to primary PIC
popf ; Restore registers
pop ax
pop bx
pop cx
pop dx
pop ds
ASSUME ds:nothing
iret
CallOld8: popf ; Restore registers
pop ax
pop bx
pop cx
pop dx
pop ds
DB 0EAh ; JMP xxxx:xxxx
Old8Ofs DW 0 ; Offset of BIOS int 8 handler
Old8Seg DW 0 ; Segment of BIOS int 8 handler
New8 ENDP
; RetraceFunc is called by the replacement int 8 handler on every retrace, just
; shortly after the start of retrace (unless the start of retrace was missed,
; see shortly). On entry, the main segment is addressable via DS, the direction
; flag is clear, and interrupts are disabled - they may be enabled within
; RetraceFunc, but since IRQ0 (the highest priority interrupt) is in progress,
; no other interrupt sources will get through anyway, so there is no point in
; issuing an STI. The flags and the four scratchpad registers (AX, BX, CX, and
; DX) may be destroyed, but any other registers must be preserved - specifically
; BP, SI, DI, and ES must be preserved. The int 8 handler does not perform a
; stack switch, so stack usage must be kept to a minimum. On entry, the carry
; flag indicates whether a full retrace period is available, and the Latency
; variable can be used to determine how much time remains if the full period
; is not available.
; The timer interrupt normally triggers a certain time (set by SafeMargin)
; prior to the start of a retrace, giving a safety margin in case interrupts
; are locked out and the timer interrupt is not actioned immediately when it
; is signalled by CTC channel 0. If interrupts are locked out for more than
; the safety margin period, the timer interrupt may be delayed until after
; the start of retrace, possibly even until after the end of the retrace pulse.
; The int 8 handler detects this condition, and sets the carry flag on entry to
; RetraceFunc if this occurred. Normally, carry will be clear on entry to
; RetraceFunc.
; This function may make use of the Latency variable, which contains the
; number of CTC clocks by which the current interrupt was delayed. Typically
; this will be in the order of 15 to 20, but it will be much higher if this
; interrupt entry was delayed by interrupts being disabled by foreground
; code. If the time between the start of retrace and the start of the next
; visible scan is known, it is possible to use the Latency variable to find
; the amount of time remaining before the visible scan starts.
; See the explanatory text for this program for more details.
;
; This function would be changed to a user-specific function.
;
; This function must obey the normal guidelines for hardware interrupt handlers,
; for example it must not try to call any DOS functions. Some BIOS functions
; are generally safe to call from hardware interrupt handlers, but in general,
; special operations such as page flipping, palette changing, font programming,
; etc should be done at a hardware level, and the mainline code should be aware
; that these operations are being done 'in the background' if there may be some
; interaction.
RetraceFunc PROC near
pushf ; Preserve carry flag
mov bx,[Cycler] ; Get current point
inc bx ; Bump offset
and bx,3Fh ; Mask
mov [Cycler],bx ; Store back
popf ; Restore carry flag
jc DontUpdate ; If missed start of retrace
mov ah,[CycleTbl+bx] ; Get position for this cycle step
mov dx,3D4h ; Address VGA CRTC
mov al,8 ; Register number
out dx,ax ; Set vertical start position
DontUpdate: ret
RetraceFunc ENDP
DB 256 DUP(?) ; Stack space
StackTop = $ ; Top of stack point
FreeSpace = $ ; End of memory required
Code ENDS
END Main
10.16.3 DOUBLE AND TRIPLE BUFFERING
Thanks to Paul Ross ([email protected]) for his help with this subject.
Double buffering uses two screen buffers. While one buffer is being displayed, the other buffer is being updated with data for the next frame. The video card is told to change to the other buffer only during a vertical retrace, so the animation is smooth and flicker-free.
The general flow is as follows:
    while (1) {
    /*    Generate next frame using currently non-displayed buffer;
        Wait for vertical retrace to begin;
        Tell video card to swap to other buffer; */
        }
There is no requirement for a vertical retrace interrupt, because the software simply creates a buffer of data then waits until the retrace starts, then flips pages and starts creating the next buffer, and so on.
If one frame of picture data can be generated in less than one vertical scan, the buffer alternates every retrace, and the frame update rate is equal to the vertical scan rate, i.e. 70 frames per second (or whatever). The software wastes time waiting for the vertical retrace, but if the software is still able to keep up with the maximum frame display rate of the video hardware, this is not a problem. But if it takes slightly longer than one frame to generate the next frame, a lot of time is wasted in the loop waiting for retrace.
These diagrams may make more sense (if viewed on a monospaced display). The first diagram shows the software able to generate a new frame more quickly than the video card’s frame rate:
Retraces:    !               !               !               !
Software:     1111111111wwwwwf2222222222wwwwwf1111111111wwwwwf22222...
Display:      222222222222222 111111111111111 222222222222222 11111...

    Key:    1 = Generating data for, or displaying, buffer 1
            2 = Generating data for, or displaying, buffer 2
            w = Waiting for vertical retrace
            f = Flipping pages on video card
The above diagram showed the buffers alternating every retrace, giving the maximum displayable frame update rate. The next diagram shows what happens with double buffering when it takes longer than one displayed frame for the software to create data for the next frame:
Retraces:    !       !       !       !       !       !       !
Software:     1111111111wwwwwf2222222222wwwwwf1111111111wwwwwf22222...
Display:      2222222 2222222 1111111 1111111 2222222 2222222 11111...
As you can see, if the software is too slow to keep up with the frame rate of the video card (as is often the case), the same frame will be displayed twice or three times (or whatever), while the software is creating the next frame. Once the software has a new frame ready, it then starts waiting for the start of the next frame, wasting up to nearly a whole frame time doing nothing.
If the code takes, say, 1.3 frames to generate a picture, it will always flip pages every two frames, because it can’t do anything while waiting for the retrace. So the screen updates are always evenly spaced (assuming that each frame takes the same amount of time to generate), but if you could use that waiting time, you could actually flip pages on two out of every three frames, like this:
Retraces:    !       !       !       !       !       !       !
Software:     111111111122222f2222233f3333333f111111111222222222333...
Display:      3333333 3333333 1111111 2222222 3333333 3333333 11111...
Comments:               ^1ready    ^2ready    ^3ready   ^1ready
So you get the page flips spaced unevenly, but the frame rate goes up.
This is called triple buffering, and it helps by allowing you to get a higher frame rate but with uneven frame timing. For example if it takes 1.3 frames of time to generate a new frame of data, with double buffering you would spend 0.7 frames every two frames (i.e. 35% of the processor time) waiting for the next retrace, so you would get one new frame of data every two scans, i.e. 35 fps. But with triple buffering, you could start creating a new frame during that 0.7 of a frame, so that it could be ready sooner. So you would get unevenly spaced frames, but a higher frame rate.
To implement triple buffering, first of all you must use a video mode where three (or more) pages are available. Then to detect retrace, you can either poll the card (but remember the retrace pulse may be only about 64 us wide!), or use some method based on polling the CTC, or use the vertical retrace interrupt or an emulated vertical retrace interrupt.
Using the vertical retrace interrupt or emulated vertical retrace interrupt method, your mainline (frame data generation) must keep some variable to show which frame contains the most recent valid data, and a flag to say that a new frame is available, which could be combined with the other variable. The interrupt routine, which is triggered every retrace, would then check to see if a new frame is available, and if so, flip pages to enable the most recently updated page to be displayed.
So the mainline code flow would be something like:
    Set newframe variable to -1;
    Set workframe variable to 0;
    while (1) {
        Generate frame in buffer specified by workframe variable;
        Set newframe variable to workframe variable;
        Increment workframe variable modulo 3 (0,1,2,0,1,2,0...);
        }
And the vertical retrace interrupt handler flow would be:
    If newframe variable is not -1 {   /* Only flip if new data available */
        Flip displayed page to be equal to newframe variable;
        set newframe variable to -1;
        }
11 QUESTIONS AND ANSWERS
Well, since this is supposed to be a FAQ, I suppose I should include some frequently asked questions and my answers to them :-) Most of these questions are from Usenet newsgroups alt.msdos.programmer, comp.os.msdos.programmer, comp.lang.asm.x86, and related newsgroups. I have paraphrased most of them.
11.1 TIMING ACCURACY
What is the inherent inaccuracy in DOS’s timekeeping and how can it be avoided in an application where long term time accuracy is important?
There are 1,573,042.24 ticks in a day, but when the BIOS was written, the 1.19318166666… MHz frequency was approximated to 1.193180 MHz, so the BIOS writers used 1,573,040 (001800B0 hex) ticks per day. This contributes a ‘by-design’ error of 1.42166 parts per million, but this is swamped by the error due to initial accuracy, temperature stability, and long term drift in the 14.31818 MHz system clock crystal, which is 5 ppm for a good quality crystal, and maybe 50 ppm for the crap ones that are often found in cheap PCs.
One solution would be to write a DOS device driver for the CLOCK$ device, which accesses the RTC (either directly, or through the BIOS functions), so that the DOS time no longer relates to the time maintained by the BIOS in the timer tick count variable.
However, the errors (initial, temperature, and long term) in the clock frequency of the RTC are probably going to be unacceptable also, unless your motherboard has a trimmer capacitor to fine-tune the oscillator frequency, and you have lots of time to spend adjusting it :-) Also the RTC only has a resolution of one second.
If you really need high accuracy, there are several approaches.
-
Measure the accuracy over a one day or one week period and install an adjustment factor in the software to compensate for the initial frequency error (has to be done individually for each machine that will run the software). This method doesn’t help against temperature and long-term drift.
-
Install a more accurate crystal or a high quality crystal oscillator module.
-
Use an external frequency source - either a clock controlled from a high quality crystal in a temperature controlled environment (crystal oven) or something derived from an external clock source (such as the mains frequency, or perhaps radio time signals?), into an input such as the parallel port ACK line which can generate an interrupt.
I want to implement a 10 millisecond clock, i.e. an interrupt every 10 ms. The PIT clock is 1.19318 Mhz, so a count of 11931 will give an interrupt at a rate of 11931/1193180 = 9.99933 ms. Using a divisor of 11931, I counted interrupts over a long period and got 9.99849 ms per tick.
The PIT clock is 14.31818/12, or 1.19318166666…. MHz. The absolute accuracy is normally better than +/- 100 ppm, often under +/- 10 ppm, depending on the accuracy of the crystal. Modern motherboards may not use accurate crystals, because there is not normally any reason to - the RTC determines the long-term accuracy and this is is clocked separately and read on every reboot. Try again using the correct value for the timer clock frequency - this should give a closer result, but you may not be able to get the accuracy you need.
I tried a count of 11932. This should give a tick interval of greater than 10 ms, but instead, I get the 9.99933 ms tick interval I expected with a count of 11931. Even worse, all of this happens only on some machines; others work as expected.
Clock frequencies vary from machine to machine, also with age and temperature, again depending on the quality of the crystal used. If the program just has to run on one machine, and its clock frequency is slightly off but at least stable, you may be able to calculate the actual clock frequency and modify the program to accommodate it.
Also, you can get non-integer division by alternating or cycling the reload value between two different numbers, e.g. using 11930 on one cycle then 11931 on the next to get 11930.5 (long term, that is :-)
One more thing - are you maintaining the BIOS timer tick interrupt? It is supposed to be called every 65536 clocks. You can use a 16-bit scheduler variable, and on every 10ms interrupt, add 11930 (or whatever you used) to the scheduler variable, and when the add causes a carry, 65536 clocks have elapsed so you should chain to the old int 8 handler rather than sending an EOI and returning.
11.2 TIMER INTERRUPTS (INT 8, INT 1CH, RTC INTERRUPT)
If there are no TSRs hooking into it, what does the timer-tick interrupt do other than being used for counting the number of ticks since midnight?
The traditional functions of int 8 (the hardware timer tick interrupt) are (a) updating the BIOS tick count variable which is used by DOS to determine the time of day, and setting the midnight flag if a midnight has passed, and (b) turning off the floppy drives after about two seconds since the last access.
BIOSes may use int 8 for anything else that they like. For example they could use int 8 for green functions (e.g. spinning down the hard drive if it has not been accessed for a while on a laptop or killing the video drive if no video accesses have been made). I am not saying that BIOSes do this, just that it is their perogative to do this, so it’s not safe to assume that int 8 is only used to update the tick count and turn off the floppy drives.
Also, any number of TSRs and device drivers, such as screen savers and disk caches, could be using int 8 and/or int 1Ch.
I have seen TSRs that hook int 1Ch rather than int 8, this implies that an application program should chain to the previous handler if it uses int 1Ch unless it has a good reason not to do so.
My understanding is that int 1Ch is intended for use by user programs only, and that it should be neither necessary, nor desirable, to chain to the original handler, as the original handler is just an IRET. The user program’s only obligation should be to restore the vector when it terminates. However, some TSR writers obviously didn’t think this way (or maybe just didn’t think :-) so there are TSRs that hook int 1Ch. For their benefit your application can and should chain int 1Ch. But I do not believe TSRs should use int 1Ch.
What are the advantages of using int 8 versus int 1Ch? Documents I’ve read recommend using int 1Ch. Why would you use int 8 instead?
It depends what you want to do with the interrupt. If you just want a 54.9254 ms regular interrupt in an application program (i.e. not a TSR), you can use either.
If you are writing a TSR, you should use int 8, not int 1Ch, because int 1Ch is intended for use by user programs, and a TSR is not a user program, it is more like an operating system extension, and a user program is within its rights to come along and hook int 1Ch without chaining to your handler. In this case (using int 8 in a TSR), you must chain to the original handler. The simplest way is just to JMP to it at the end of your intercepting code.
If you are modifying the timer tick rate, or doing vertical retrace emulation, or anything clever with the timer, you must use int 8, and ensure that the old int 8 handler is chained at appropriate intervals. This technique cannot safely be used inside a TSR because an application is at liberty to pull the same tricks and break the TSR.
In all cases, keep the amount of time spent in the interrupt handler to a minimum.
How can I increment a variable once every second, under interrupt?
Timed interrupts on the PC can be generated via channel 0 of the timer chip (8253 or 8254) and via the real time clock (RTC).
The timer cannot generate interrupts at one second intervals. It is normally operating at 18.2065 interrupts per second (this is called the ‘timer tick’). You can hook into this timer tick interrupt (int 8 or int 1Ch if you’re writing an application, int 8 only if you’re writing a TSR). You can then count off interrupts and increment your seconds counter every 18.2065 interrupts. This is done by incrementing it after 18 or 19 interrupts, and alternating between 18 interrupts between increments, and 19 interrupts between increments, to give over the medium term or long term, one increment every 18.2065 interrupts. This requires some simple arithmetic. Of course this will cause the seconds variable to be incremented slightly unevenly. If that’s acceptable, this is probably the best way to go. This technique can be used in an application or a TSR.
If a slight unevenness in timing is not acceptable, you can reprogram timer channel 0 to operate at a different rate, such as, say, 50 ticks per second, and hook int 8, and call the old int 8 handler (‘chain’) 18.2065 times per second. The timer cannot generate exactly 50 interrupts per second with a single divisor value, but this can be achieved by dynamically reloading the timer divisor on each interrupt. Of course this method makes the calls to the old int 8 handler uneven, but this is not a problem for the software that uses this interrupt. You then can count off 50 fast interrupts and increment your seconds variable. However, this technique cannot safely be used in a TSR.
The above techniques use the timer (8253/8254). If you know your program will always run on an AT or later, you can use the RTC. It is able to generate an interrupt every second, but this mode is not normally used. I’ve never tried using the update interrupt (once per second) but it should work, provided that you use the normal tricks to make sure the BIOS doesn’t turn off the interrupt source. Alternatively, you could use the RTC at 1024 interrupts per second and count off the interrupts yourself. This technique will definitely work, though you are more likely to miss interrupts because they are happening at a faster rate.
What is the difference, and interaction, between the timer tick interrupt and the real time clock’s periodic interrupt?
The timer interrupt is triggered by channel 0 of the timer chip, an Intel 8253 or 8254 or workalike. It is normally operated at 18.2065 interrupts per second (this is called the timer tick rate). The default handler is responsible for maintaining the system time (which is done through the BIOS Tick Count Variable in the BIOS Data Area) and turning off the floppy drive motors after two seconds of inactivity, and it is likely that some machines use it for other purposes too. The timer tick interrupt is IRQ0, which is int 8. This is the highest priority hardware interrupt request. As well as updating the time and turning off the floppy drive motors, the default handler issues int 1Ch on every tick. This interrupt is intended for use by user programs (not TSRs) as a regular interrupt source. TSRs and network software often intercept int 8 and use it for timing, timeout detection, regular updating, etc etc. The timer interrupt can be operated at a higher rate if desired (this technique cannot be used in a TSR). It can be programmed to occur at 1.19318166666…MHz divided by any integer from 2 to 65536 (very small divisors cause major overhead problems!). With trickery (the dynamic timer tick technique) it can be made to occur at a convenient rate, e.g. 1000 interrupts per second, etc. The program operating the timer at a higher rate must chain to the original handler at the correct rate, i.e. 18.2065 times per second. The timer and int 8 are present in all PC-compatible machines.
The RTC is only present in the AT and later machines, which these days is at least 99% of the market. It is connected to IRQ8, which is int 70h. This is the highest priority interrupt on the slave interrupt controller, so it is third highest priority on the machine (highest and second highest are int 8, the timer tick, and int 9, the keyboard scancode interrupt). IRQ8 interrupt is generated by the RTC (Real Time Clock) chip, which also holds the machine’s CMOS memory for storing BIOS settings. The interrupt can be programmed to occur at a particular time (through the Alarm function of the RTC), every second (the ‘update’ interrupt), or at one of the following rates (the periodic interrupt) - 2, 4, 8, 16, 32, 64, 128, 256, 512, 1024, 2048, 4096, or 8192 interrupts per second. The RTC interrupt is used by several BIOS functions, and the BIOS interrupt handler will sometimes turn off the interrupt, so when you hook this interrupt, you have to chain to the BIOS’s handler then turn the interrupt source back on, just in case.
11.3 INTERRUPT PRIORITIES AND NESTING
While an interrupt handler is in progress, if the interrupt flag is cleared, can the handler be interrupted by another hardware interrupt? Also, if an interrupt handler takes a long time to run, can it be interrupted by itself (for example, a keyboard interrupt handler)?
No hardware interrupt will be accepted if the interrupt flag is clear, as it is on entry to an interrupt handler. But, it is normal for most interrupt handlers to enable interrupts via an STI instruction fairly early on, so that higher priority interrupts will be able to interrupt them.
Hardware interrupts are prioritised by the 8259 interrupt controller(s). Lower IRQ numbers are higher priority (unless software has reprogrammed the interrupt controller modes). IRQ8-15 (not present on original PC and XT) fit in between IRQ1 and IRQ3. In other words, the priority order is:
   IRQ0       INT 8     Timer tick interrupt (HIGHEST PRIORITY)
   IRQ1       INT 9     Keyboard scancode interrupt
   IRQ2       INT 0Ah   Uncommitted (see IRQ9) (ONLY PRESENT ON ORIGINAL PC AND XT)
   IRQ8       INT 70h   RTC interrupt
   IRQ9       INT 71h   Redirected IRQ2, uncommitted (COM ports, vertical retrace)
   IRQ10   INT 72h   Unallocated
   IRQ11   INT 73h   Unallocated
   IRQ12   INT 74h   Bus mouse hardware interrupt
   IRQ13   INT 75h   Math coprocessor
   IRQ14   INT 76h   Hard disk (AT and later)
   IRQ15   INT 77h   Unallocated
   IRQ3       INT 0Bh   COM2, usually, or uncommitted
   IRQ4       INT 0Ch   COM1, usually
   IRQ5       INT 0Dh   Uncommitted (COM ports, sound cards, XT hard disk)
   IRQ6       INT 0Eh   Floppy disk hardware interrupt
   IRQ7       INT 0Fh   Parallel port, sound cards (LOWEST PRIORITY)
If an interrupt handler is in progress, say on IRQ4 for example, and the handler enables interrupts using STI, then a higher priority interrupt, such as the keyboard scancode interrupt or timer tick interrupt, if signalled, will interrupt the interrupt handler in progress. Once that higher priority interrupt has been processed, the lower priority interrupt handler will be resumed. But, a lower or equal priority interrupt will not interrupt the handler in progress, until that handler has sent an EOI (end of interrupt) command to the interrupt controller(s) (first interrupt controller for IRQ0-7, both interrupt controllers for IRQ8-15). The EOI command is value 20h, and is sent to I/O port 20h for the first interrupt controller, and port 0A0h for the second interrupt controller. The EOI command tells the interrupt controller that the interrupt that was signalled by the interrupt controller (which provides the interrupt vector to tell the processor where the interrupt handler begins) is now finished with, and it resets the interrupt controller’s logic. The interrupt controller will then signal any other interrupts that were pending. For example if an IRQ7 came along while IRQ4 was being processed, the interrupt controller would ignore it until the IRQ4 handler issued an EOI, then the interrupt controller would re-evaluate its pending interrupts and issue the highest priority pending interrupt, which would be IRQ7. To avoid the lower priority interrupt ‘nesting’ on top of the higher priority interrupt and causing stack growth, the EOI command is normally issued right at the end of the interrupt handler, and is issued with interrupts locked out, so that the interrupt handler will return to the main code before the lower priority interrupt is accepted.
If you specifically want a particular interrupt priority to be able to interrupt itself, this is normally possible - just send the EOI at an early stage in the interrupt handler, and make sure interrupts are enabled. The interrupt controller thinks the interrupt handler has finished, so it will signal the interrupt again if the interrupt is triggered again during processing of the same priority interrupt. Of course this also lets lower priority interrupts through as well.
The timer triggers IRQ0 (int 8) which has highest priority. Does this mean that it really interrupts another lower priority interrupt, or does it only mean that if there are several interrupts pending, IRQ0 will be chosen?
First, no IRQ will interrupt anything if the interrupt flag in the processor is clear (via CLI). This flag is also cleared automatically on entry to any interrupt handler, and must be explicitly set by the interrupt handler. Most software and hardware interrupt handlers will do this, unless they have some special reason for not doing so.
If a lower priority interrupt is in progress, and the interrupt flag is set (interrupts are enabled), then a higher priority interrupt will interrupt that interrupt handler. When the higher priority interrupt exits, the lower priority interrupt handler is resumed, in the normal way. If an interrupt of the same or lower priority occurs, it will not be serviced until the current interrupt handler has finished and sent an end of interrupt signal (more below).
If interrupts are locked out via the interrupt flag in the processor, the interrupt controller chip will continually evaluate its inputs, keeping track of the highest priority pending input, and when the processor is able to accept the interrupt, the interrupt controller will first issue the highest priority interrupt.
If a hardware interrupt request disappears while the interrupt controller is waiting for the processor to acknowledge its interrupt request (INTR), the interrupt controller is in the embarrassing position of having interrupted the processor but not having a valid interrupt request to issue. In this case, the interrupt controller issues an interrupt level 7. If the fleeting interrupt was on the primary interrupt controller (IRQ0, IRQ1, or IRQ3-7), this will cause IRQ7 (int 0Fh) to be executed. If the fleeting interrupt was on the secondary interrupt controller (IRQ8-15), this will cause IRQ15 (int 77h) to be executed. Any program handling IRQ7 and/or IRQ15 should be prepared for this possibility.
The interrupt controller keeps track of the current interrupt priority. It knows when the interrupt priority changes to a higher priority, because it issued the interrupt request itself. It also knows when the higher priority interrupt ends, and a lower priority interrupt resumes, via the end of interrrupt command.
What is an EOI (end of interrupt) and what type should I use?
Any hardware interrupt handler must notify the interrupt controller (or controllers, if it’s IRQ8 or higher) when it has completed, so that the interrupt controller can keep track of interrupt levels in progress, etc. It does this partly through the EOI (end of interrupt) command. There are two types of EOI - the non-specific EOI and the specific EOI. Specific EOI is not often used, though any 8259 compatible interrupt controller should support it. It simply tells the interrupt controller that a specific interrupt handler has finished. The non-specific EOI tells the interrupt controller that the currently executing, highest priority interrupt handler has finished. The command is sent like this. The interrupt controller knows the highest priority executing interrupt level, because it generated the interrupt request and provided the vector.
    Assembler       mov    al,20h
                    out    20h,al
    Micro$oft C     outp(0x20, 0x20);
    Borland C       outportb(0x20, 0x20);
    Pascal          port[$20]=$20;
    GW-BASIC        Just kidding :-)
If the interrupt handler is for IRQ8 or higher, it must send an EOI command (0x20) to the secondary interrupt controller, at I/O address 0xA0, as well. I don’t believe it really matters in what order these EOIs are sent in this case.
If you are hooking int 8, then you should chain to the original int 8 handler, unless you have a special reason for not doing so. The original int 8 handler is part of the BIOS. It will send the EOI for you.
How do I tell if my timer tick interrupt handler is taking too much time, and what would happen if the interrupt was to get called again while the handler was still running from the first time?
Until you send the EOI or chain to the original handler (in the case of int 8) or until you return (in the case of int 1Ch), the interrupt will not be called again while it is still running.
How are IRQ2 and IRQ9 related? I have run out of free IRQs except for IRQ2, which I have kept free, since I have IRQ9 in use, and wanted to avoid any problem. Can I use IRQ2?
If you have IRQ9 in use, you are going to have trouble ‘using’ IRQ2 because the slot bus pin that was IRQ2 on the PC and XT is IRQ9 on later machines, so IRQ2 doesn’t ‘exist’ any more :-)
IRQ2 was just a standard interrupt on the PC and XT, with no assigned purpose (often used for extra COM ports or special hardware boards). The AT added a second interrupt controller (Intel 8259) which provides IRQ8 through IRQ15 inputs, but required a ‘cascade’ interrupt input into the main interrupt controller, and IRQ2 was chosen as the cascade interrupt. The slot bus pin that used to carry IRQ2 was fed into IRQ9, on the second interrupt controller, and BIOS and DOS were modified to software-redirect IRQ9 to IRQ2 so that many programs that were able to use IRQ2 would still work properly and be none the wiser on ATs when they would really be using IRQ9. The default IRQ9 handler sends the EOI to the secondary interrupt controller, then invokes the IRQ2 handler through the IRQ2 vector. When the IRQ2 handler sends its EOI to the primary interrupt controller, the IRQ9 is fully acknowledged.
So that is the relationship between the two interrupts. IRQ2 is not accessible on the slot bus on ATs and later machines. This may not apply to MicroChannel motherboards, BTW, which were designed after the AT.
11.4 INTERRUPT HANDLER RESTRICTIONS
I’m writing a TSR that will make my computer beep several times when “RING” is received from my modem. I want to make it a hook int 1Ch and make it watch for “RING” using the BIOS serial functions interrupt 14h function 3, then activate the beep. Is it safe to call int 14h from within an int 1Ch handler?
First, TSRs shouldn’t use int 1Ch, use int 8 instead, and make sure you chain to the original handler. BIOS functions are nominally non-reentrant, but the int 14h services are so simple that provided the foreground program isn’t using them to access the same serial port (very unlikely, as any decent comms software goes direct to hardware and doesn’t use int 14h at all), you should be safe. But if you’re using int 14h and calling it from within your int 8 handler, you won’t call it quickly enough to catch the ‘RING’ string from the modem - you will get a receive overrun, unless you have an internal modem with an emulated serial port, which will hold the data until it is read. IOW, you should hook the serial interrupt for the serial port you’re monitoring, and enable the serial interrupt, etc, so you get an interrupt when the modem sends something. Finally, how are you planning to program the beep? I suggest going direct to hardware, rather than using int 10h, which can often be non-reentrant. That means you must turn the sound on and off using the timer interrupt.
When I add a call to puts() in my timer interrupt handler, the machine locks up or crashes with an EMM386 or QEMM exception. Why?
Because puts() calls DOS and DOS is non-reentrant. When the timer tick interrupt is signalled, various parts of your computer’s software and hardware may be ‘busy’, and calling most DOS functions and some BIOS functions will usually cause problems with reentrancy. If you want to output to the screen from within an interrupt handler, you either need to use TSR techniques to ensure that DOS or the BIOS is not busy, or write directly to screen memory. I find the latter technique more useful.
Can I save to disk some data which I collect in my interrupt handler?
Yes, absolutely. Especially if it’s not a TSR. You can’t write to disk from your int 8 handler, though - the BIOS might be in the middle of writing something else. There are lots of reasons why this would be very dangerous. Normally this would be done using a circular buffer, or ‘queue’, to pass data from your interrupt handler to your mainline. You have an area of memory (any size from a few bytes up to 32K or so) to be used circularly to store data, and have two pointers or offsets into the buffer, one being driven by the interrupt routine showing where the data is going in, and one controlled by the mainline which runs ‘in the foreground’ keeping track of data coming out of the circular buffer and being written to disk. Every time your interrupt routine puts data in the buffer, it ‘bumps’ the ‘ingoing’ pointer (increment pointer, check whether it has gone off the end of the buffer, and if so, reset it to the start of the buffer). Every time your mainline gets data out of the buffer, it bumps its outgoing pointer in the same way. If the two pointers are equal, there is no new data in the buffer. The interrupt handler should also handle a buffer overrun tidily, by checking for the ‘ingoing’ pointer crossing the ‘outgoing’ pointer and behaving accordingly (e.g. don’t update the ‘ingoing’ pointer, and set a global variable somewhere that the mainline can detect, that indicates a buffer overflow). The mainline would put the data from the circular buffer in to a linear buffer and write that buffer to disk using the standard file I/O routines or DOS services when it gets full.
11.5 HIGH SPEED TIMER TICK
I need to trigger an analog to digital converter (which does not have its own clock) 4000 times per second.
This can be done by speeding up the timer tick, see section 8 and subsections. To get exactly 4000 interrupts per second, you need to use the dynamic tick period technique described in section 8.6.
I have a 8kbps data stream that I want to capture. I need the computer to synchronise to the data stream. Could I do this in software?
Timer channel 0 can be made to run at 8000 samples per second, but the internal timing sources are difficult to synchronise to an external signal. It might be possible, but I’d first suggest an external PLL synchronised with the signal, triggering interrupts via the ACK pin on a parallel port or through a flow control line on a serial port.
11.6 DOS DATE AND TIME
Where and how does DOS store the date?
DOS stores the date as a number of days since 1/1/1980 internally in the CLOCK$ device driver, which is part of IO.SYS (MS-DOS) or IBMBIO.COM (other DOSes). There does not seem to be any way to locate the variable except manually, using a debugger.
I am using the RTC to keep the DOS clock in line. Just after midnight, the date counts back a day. If I don’t set the DOS clock there is no problem. There is a byte in the BIOS Data Area at 0040:0070 which tells the system that the date rolled over. How does this work?
The midnight flag at 0040:0070 is set to 1 (or just incremented by some BIOSes) by the BIOS’s int 8 (timer tick) handler when the tick count rolls over from 0x001800AF to 0x00000000 (i.e. at midnight).
Every time the BIOS request-tick-count function (int 1Ah with AH=00) is called, this flag is returned in AL, and the flag byte in memory is cleared. The flag byte is also cleared if the set-tick-count function (int 1Ah with AH=01) is called.
DOS relies on this flag when it calls the BIOS function. If your program is using the BIOS request-tick-count function, your program will be notified of the change of day, but DOS will not, because the flag is cleared as soon as it is reported - the BIOS doesn’t care whether your program, or DOS, called the function, so DOS misses out on seeing the flag, and doesn’t increment the date.
In other words, don’t use int 1Ah functions 00 and 01, and the DOS date will update properly. If you want to read or write the tick count, access it directly at 0040:006C.
11.7 ACCESSING HARDWARE
How can I read current time without using any BIOS and DOS function calls?
You can access the RTC chip directly. The RTC is not present in the original PC and XT and may not be present in non-hardware-compatible machines. The RTC also implements the CMOS which stores your BIOS parameter settings, so be careful when accessing it! See section 7.35. This gives a resolution of one second. Also, you can read the BIOS Tick Count variable, but this is not in convenient units. See section 4.
I have an acquisition card which measures voltage and frequency of electrical signals. This board can be configured to use IRQ2 through IRQ7 (jumper-selectable) and I/O address 300h. How can I access the devices via the I/O space?
The I/O space is accessed via the IN and OUT instructions of the CPU (if you’re writing in assembly). In C, use inportb() and outportb() (Borland) or inp() and outp() (Micro$oft). In Turbo Pascal, use port[]. The x86 processor in the PC can address up to 64K of I/O but the PC’s I/O space is usually limited to the range 0000h - 03FFh because ISA bus I/O cards only decode the bottom 10 bits of the address on I/O accesses.
Your card will probably have a CPU-addressable device such as an 8255 (parallel I/O chip) or similar, that will provide the interface between the hardware on the board, and the software that you write. If you can identify this chip (look for the biggest one, usually :-) and get the data sheet on it, you can find out how to talk to it. If it’s a proprietary ASIC, though, you might be on your own. You could try asking the manufacturer nicely. If that fails, you could try disassembling any software that came with the card and working out what the I/O accesses are doing.
Typically cards like that will occupy 4, 8, 16, or sometimes 32 adjacent I/O locations, and AFAIK the I/O space from 0300h to 031Fh is not normally used by any standard PC peripheral, so you should be safe putting it there.
And can I write an interrupt service routine that will perform I/O through port 300h? Is this a normal procedure?
Yes, and yes. The XT bus supports IRQ2-7. IRQ4 and IRQ3 are usually used for COM1 and COM2 respectively, IRQ6 is usually used for the floppy disk, and IRQ7 is sometimes used for the first parallel port, and for sound cards. IRQ5 is also sometimes used by sound cards, and is also often used by the hard drive on XTs. Assuming you want to put your XT bus card into an AT, you should be able to use IRQ2 or IRQ5 with it, without causing any conflicts. IRQ2 is actually remapped to IRQ9 on ATs (long story).
There are several parts involved in setting up an interrupt handler, and I’d suggest you first try just talking to the chips on the board, and do the interrupt stuff later, as it can get a bit messy.
I need to delay program execution for 1ms. I found some old assembly code that used timer 2 on the PIT. It sets the timer to square wave mode, then counts state changes. This code doesn’t work on a Pentium, 486, or 386 PC. How can I make this work on newer PCs? It appears that timer 2 output isn’t tied to bit 5 of port 0x62 on these machines. Is there something different about how timer 2 and/or the speaker is implemented on newer PCs?
Yes. The ye olde machines used an 8255 at 60h-63h and the Timer 2 read-back signal was on port C at 62h. The AT and later machines use a micro as the keyboard interface, and don’t implement any port at 62h at all (AFAIK). On these machines, Timer 2 readback is on bit 5 of port 61h and operates in the same way.
For your purposes, the Refresh Detect signal might be more appropriate. This is a read-only signal on bit 4 of the port at 61h, on all machines except the old PC and XT, though I wouldn’t guarantee it’s present on all IBM machines (they seem to be the least compatible, for some stupid reason). Anyway, this bit toggles state once every 15.0857 microseconds (or 216/14.31818, to be exact). This can easily be read in a loop, and you can get a fairly accurate delay using this method. It won’t work properly if the DRAM refresh rate has been changed, but people don’t do that much any more :-) This method has advantages over using Timer 2 because you can use it with interrupts enabled and not have to worry about a keyboard buffer full beep clobbering your timer, though of course any interrupts that are serviced during the delay will lengthen the delay.
11.8 MISCELLANEOUS
How do I check for a keypress with a timeout?
You need to check for a keypress in a loop, and also incorporate a timeout check in the loop. See the sample program in section 4.7 and the function in section 4.8. You can’t use getch() or any stream I/O functions, because they will wait indefinitely for keys to be pressed. If your compiler supports bioskey(1), you can use that, otherwise you can write a function that uses int 16h function 1, 11h, or 21h, or int 21h function 6, to poll for a keypress.
How do you create a clock that will run in the top right hand corner of the screen and let the user regain control of the computer in DOS? I think you have to ‘hook’ an interrupt to accomplish this.
Hook int 8, the timer interrupt (int 1Ch can also be used but is intended for use by applications, which may not chain to the old handler, so your TSR would stop updating while some apps are active). On every interrupt, check the time, either from the BIOS tick count or from the real time clock. You can redraw your time on the screen on every int 8 (i.e. 18.2065 times per second), or just when the second changes, whichever you prefer. There is a sample program in assembler that does this, in section 7.35.8.
In my Borland C++ program I need a delay of exactly 100 ms. How can I do it?
There are many ways to implement processor-independent delays on PCs. There may be a problem depending on how exact you need your delay to be. There are two approaches - wait in a loop for the appropriate length of time, or trigger an interrupt at the correct time. With the first approach, you should leave interrupts enabled during the loop (otherwise the machine will lose time, as the timer tick interrupt comes along every 54.9254 ms), so any interrupts that come in during the loop, or near the end of it, may cause your delay to be longer than you expected. If you use the other method, acceptance of the interrupt can be delayed by foreground code disabling interrupts, or by other interrupts occuring during the delay. So there is no ideal solution if you need a very accurate delay. If you can tolerate an error of, say, 1% to 5%, and your program just wants to wait without doing anything else, and the program will not need to run on old PC and XT machines, you can use the Refresh Detect delay method, which is pretty tidy. If you can tolerate a resolution of 1ms, you can use the BIOS delay functions (not supported on old PC and XT machines either). Otherwise you can use the interrupt method, which is fairly tricky to program, or a method based on timer 2 (normally used for making beeps) which has disadvantages too.
12 REFERENCES
These references are mostly from {JAM} John Mertus’s article. He has given me permission to include them. I have included comments on the subject matter of the books where appropriate. They are in author order. There is no guarantee that the books are still available, or that these are the latest editions.
Title:          Assembly Language Programming for the IBM Personal Computer
Author:         David J. Bradley
Published:      Prentice-Hall, 1984
Comments:       Possibly the first book to describe timing by reading the CTC
                May be no longer available

Title:          Interrupt List
Author:         Ralf Brown
Comments:       Electronic document available on Internet SimTel mirrors, e.g.
                Oak as ftp://oak.oakland.edu/SimTel/msdos/info/inter*.zip.
                Contains an exhaustive list of interrupt usage (mainly
                software interrupts), DOS data structures, etc, essential!

Title:          DOS Programmer's Reference, 3rd Edition
Author:         Terry Dettmann, Jim Kyle, Marcus Johnson
Published:      Que Corporation, 1992
ISBN:           0-88022-790-7; Library of Congress Catalog No. 91-66203

Title:          EGA/VGA - A Programmer's Reference Guide
Author:         Bradley Dyck Kliewer
Published:      Intertext Publications / Multiscience Press, Inc, McGraw-Hill
                Book Company, 11 West 19th Street, New York, NY 10011, 1988
ISBN:           0-07-035089-2
Comments:       Good as a reference but not recommended for beginners

Title:          IBM Personal System/2 Hardware Interface Technical Reference
Published:      IBM Corporation, Boca Raton, Florida, 1990

Title:          Technical Reference, Personal Computer XT
Published:      IBM Corporation, Boca Raton, Florida, April 1983

Title:          Peripheral Components Data Book
Published:      Intel Corporation, Mt. Prospect, Illinois, 1994
Comments:       Includes full data sheet on 8254, recommended.
                According to information in the data book, it can be ordered
                within USA from Literature Sales, P.O. Box 7641, Mt. Prospect,
                IL 60056-7641 or by phone from USA and Canada on (800) 548-4725
                voice or (708) 296-3699 fax, Intel order number 296467,
                ISBN 1-55512-207-8.  They accept credit cards, but you may
                need to complete an order form.

Title:          PC Programmer's Guide to Low-Level Functions and Interrupts
Author:         Marcus Johnson
Published:      Sams Publishing, 201 West 103rd Street, Indianapolis, Indiana,
                46290, 1994.
Comments:       Lots of useful low-level technical info, plus documentation on
                BIOS, DOS, EMS, XMS, DPMI, and other APIs.  Disk included.

Title:          Accurate Timing under Microsoft Windows without
                reprogramming the System Timer
Author:         Jerry Jongerius
Published:      Microsoft System Journal, 1991
Comments:       Reading the CTC

Title:          The MS-DOS Encyclopedia
Published:      Microsoft Press, 16011 NE 36th Way, Box 97017, Redmond,
                Washington 98073-9717, 1988
ISBN:           1-55615-174-8
Comments:       Includes sections on interrupt-driven communications, TSR
                programming, exception handlers, hardware interrupt handlers,
                and debugging, DOS and BIOS function reference, and usage for
                DOS utilities, highly recommended.  [KH]

Title:          The Peter Norton Programmer's Guide to the IBM PC
Author:         Peter Norton
Published:      Microsoft Press, 16011 NE 36th Way, Box 97017, Redmond,
                Washington 98073-9717, 1985
ISBN:           0-914845-46-2, Penguin ISBN 0-14-087-144-6
Comments:       There is a newer edition

Title:          The Winn Rosch Hardware Bible
Author:         Winn L. Rosch
Published:      Brady Books, New York, 1989

Title:          The IBM Personal Computer from the Inside Out
Author:         Murry Sargent and Richard L. Shoemaker
Published:      Addison-Wesley Publishing Co, Reading, Massachusetts, 1986

Title:          Netware, the Professional Reference (second edition)
Author:         Karanjit Siyan
Published:      New Rider Publishers, Carmel, Indiana, 1993

Title:          The Waite Group's MS-DOS Developer's Guide (second edition)
Published:      Howard W. Sams & Company, 4300 West 62nd Street, Indianapolis,
                Indiana 46268, 1989
ISBN:           0-672-22630-8 (Library of Congress Catalog Card 88-62227)
Comments:       Includes info on TSRs, serial port, EGA and VGA, and real-time
                programming.

Title:          Programmer's Guide to PC & PS/2 Video Systems
Author:         Richard Wilton
Published:      Microsoft Press, One Microsoft Way, Redmond, Washington
                98052-6399, 1987
ISBN:           1-55615-103-9
Comments:       Very readable book, recommended [KH]
          End of the PC Timing FAQ / Application notes

        Please drop me a line if you find this document
            useful, or if you have anything to add.

                    ----//----