
Rogue-like on Apple II: Raycasting a line of sight
In the previous post I discussed how to code an efficient tile engine running on Apple II computers that can be used to write a Rogue-like game.
This engine is neat but, alas, the player can see the entire portion of the dungeon that surrounds him: he gets the magic ability to see through walls. Getting lost in the dungeon and being surprised by enemies is important for such a game to be fun. Thus, we have to complete the engine with a convincing “line of sight” algorithm!
All the code is available on Github.
A better sense of immersion
Here are two versions of the engine:
 This one does not handle the line of sight. It is the very same presented in the previous post
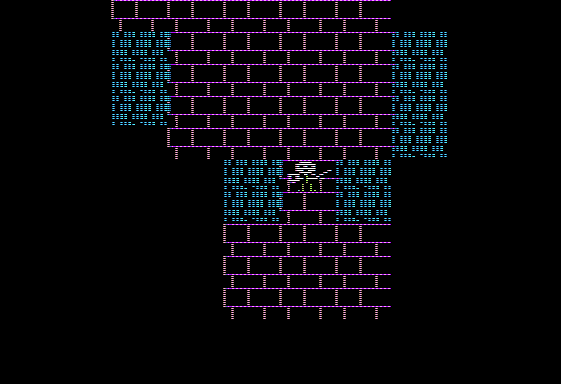 As you can see, it will be easier to get lost in the dungeon and to stumble upon hidden enemies. The sense of immersion will be way better
Raycasting
The easiest way to obtain a “realistic” line of sight from a point in the world is to perform “raycasting”. Imaginary “rays” are casted away from the player and sent in every direction. If they cross a new tile, it is displayed. If this tile is an obstacle, the rays stop here. Otherwise, it goes through the next tile, and so on
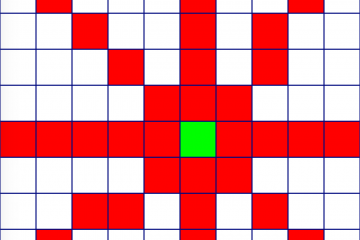 Eight rays (red) casted from the player (green), going to the edge of the view
 Ten rays going to the top edge of the view. No obstacle
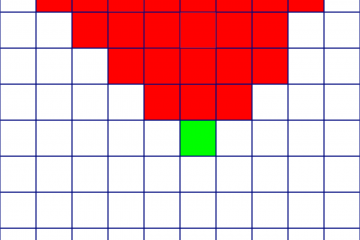
 The same rays, five of which are blocked by a non-transparent tile
This algorithm is easy to program and systematic: there is no special case. A tile either is transparent or is not. Quite simple!
But there are two drawbacks, which are apparent in the illustrations above.
- Many rays can traverse the very same tile, resulting in useless transparency tests. In our case of programming for Apple II, however, it is faster to accept it than to code something trying to avoid it.
- When the view sports a very low resolution, such as our 10×10 grid, the path taken by some rays may appear a little bit counter-intuitive.
Ray-casting is a very common technique. For instance, it is often the basis for pseudo 3D game engine such as Wolfenstein 3D. Rays are casted away from the screen and the distance traveled until bumping into an obstacle will be used to scale it, resulting in an impression of distance and perspective.
Implementation
Computing the rays
We know that we will project the rays from the player to the edge of the screen, but how will we devise their path?
Fortunately there is an algorithm perfectly suited for this task: the Bresenham’s line algorithm. Its purpose is to approximate a straight line in a raster space (aka a grid of pixels).
Alas, it would require a non-negligible amount of computing power, at least at the scale of the Apple II (remember: an 8-bit 6502 @1MHz!). But, in our tile engine, the player’s position is fixed in the screen. This is our saving grace: the rays will only have to follow a unique path that may be computed in advance. And that’s is exactly what we will do! A Python script will compute the 36 rays that are required and save them into a structure written in assembly that can be pasted into the code.
And the cherry on top is that there is a Python package implementing the Bresenham’s algorithm. When they say there is a Python package for everything, they don’t lie!
A ray will be represented as a list of offsets: the 8-bit offset from the upper left corner of the view, and the 16-bit offset corresponding to the same tile in the “World”. Note that we only need an 8-bit offset (thus an 8-bit addition) in the case of the View, because the view is 256-byte aligned and is less than 256 long.
Here is an extract of the python code generating the rays in assembly to be pasted into the engine’s code:
rays = []
    y2 = 0
    for x2 in range(0,SIZE_GRID):
        rays.append(list(bresenham(x1,y1,x2,y2)))
    x2 = SIZE_GRID-1
    for y2 in range(1,SIZE_GRID):
        rays.append(list(bresenham(x1,y1,x2,y2)))
    y2 = SIZE_GRID-1
    for x2 in range(SIZE_GRID-1,0,-1):
         rays.append(list(bresenham(x1,y1,x2,y2)))
    x2 = 0
    for y2 in range(SIZE_GRID-1,0,-1):
        rays.append(list(bresenham(x1,y1,x2,y2)))

[...]

    str_ray = "; Rays: length (nb_tiles), offset_from_view_in_world_low,  offset_from_view_in_world_high, offset_view\nRays:\n"
    for ray in rays:
        str_ray += ".byte    " + str(len(ray)-1)

        for tile in ray[1:]:
            offset_view = tile[0] + SIZE_GRID*tile[1]
            offset_world = (tile[0] + WIDTH_WORLD*tile[1])
            offset_world_low = offset_world & 0xFF
            offset_world_high = (offset_world >> 8) & 0xFF
            str_ray += ", " + str(offset_world_low) + ", " + str(offset_world_high) + ", " + str(offset_view)
        str_ray += "\n
Resulting in:
Nb rays: 36
; A ray: length (nb_tiles), offset_from_view_in_world_low,  offset_from_view_in_world_high, offset_view
Rays:
.byte    5, 4, 1, 44, 195, 0, 33, 130, 0, 22, 65, 0, 11, 0, 0, 0
.byte    5, 4, 1, 44, 195, 0, 33, 131, 0, 23, 66, 0, 12, 1, 0, 1
.byte    5, 4, 1, 44, 196, 0, 34, 131, 0, 23, 67, 0, 13, 2, 0, 2
.byte    5, 5, 1, 45, 196, 0, 34, 132, 0, 24, 67, 0, 13, 3, 0, 3
.byte    5, 5, 1, 45, 197, 0, 35, 132, 0, 24, 68, 0, 14, 4, 0, 4
.byte    5, 5, 1, 45, 197, 0, 35, 133, 0, 25, 69, 0, 15, 5, 0, 5
.byte    5, 5, 1, 45, 197, 0, 35, 134, 0, 26, 70, 0, 16, 6, 0, 6
.byte    5, 5, 1, 45, 198, 0, 36, 134, 0, 26, 71, 0, 17, 7, 0, 7
.byte    5, 6, 1, 46, 198, 0, 36, 135, 0, 27, 71, 0, 17, 8, 0, 8
.byte    5, 6, 1, 46, 199, 0, 37, 135, 0, 27, 72, 0, 18, 9, 0, 9
.byte    4, 6, 1, 46, 199, 0, 37, 136, 0, 28, 73, 0, 19
.byte    4, 6, 1, 46, 199, 0, 37, 200, 0, 38, 137, 0, 29
.byte    4, 6, 1, 46, 7, 1, 47, 200, 0, 38, 201, 0, 39
.byte    4, 70, 1, 56, 7, 1, 47, 8, 1, 48, 9, 1, 49
.byte    4, 70, 1, 56, 71, 1, 57, 72, 1, 58, 73, 1, 59
.byte    4, 70, 1, 56, 135, 1, 67, 136, 1, 68, 137, 1, 69
.byte    4, 134, 1, 66, 135, 1, 67, 200, 1, 78, 201, 1, 79
.byte    4, 134, 1, 66, 199, 1, 77, 200, 1, 78, 9, 2, 89
.byte    4, 134, 1, 66, 199, 1, 77, 8, 2, 88, 73, 2, 99
.byte    4, 134, 1, 66, 199, 1, 77, 7, 2, 87, 72, 2, 98
.byte    4, 134, 1, 66, 198, 1, 76, 7, 2, 87, 71, 2, 97
.byte    4, 133, 1, 65, 198, 1, 76, 6, 2, 86, 70, 2, 96
.byte    4, 133, 1, 65, 197, 1, 75, 5, 2, 85, 69, 2, 95
.byte    4, 133, 1, 65, 196, 1, 74, 4, 2, 84, 68, 2, 94
.byte    4, 132, 1, 64, 196, 1, 74, 3, 2, 83, 67, 2, 93
.byte    4, 132, 1, 64, 195, 1, 73, 3, 2, 83, 66, 2, 92
.byte    4, 132, 1, 64, 195, 1, 73, 2, 2, 82, 65, 2, 91
.byte    5, 132, 1, 64, 195, 1, 73, 194, 1, 72, 1, 2, 81, 64, 2, 90
.byte    5, 132, 1, 64, 131, 1, 63, 194, 1, 72, 193, 1, 71, 0, 2, 80
.byte    5, 68, 1, 54, 131, 1, 63, 130, 1, 62, 193, 1, 71, 192, 1, 70
.byte    5, 68, 1, 54, 67, 1, 53, 130, 1, 62, 129, 1, 61, 128, 1, 60
.byte    5, 68, 1, 54, 67, 1, 53, 66, 1, 52, 65, 1, 51, 64, 1, 50
.byte    5, 68, 1, 54, 67, 1, 53, 2, 1, 42, 1, 1, 41, 0, 1, 40
.byte    5, 68, 1, 54, 3, 1, 43, 2, 1, 42, 193, 0, 31, 192, 0, 30
.byte    5, 4, 1, 44, 3, 1, 43, 194, 0, 32, 193, 0, 31, 128, 0, 20
.byte    5, 4, 1, 44, 195, 0, 33, 194, 0, 32, 129, 0, 21, 64, 0, 10
Casting the rays
The cast function is quite simple. The only things it has to do are:
- Initialize all the tiles of the view as “non-visible” tiles.
- Iterate over the rays.
- For each tile of the ray read its value in the “world”
- If it’s a “visible” tile, copy its value into the view and process the next tile of the ray
- If it’s a “non-visible” tile, go to next ray
loop_rays:
        stx NB_ITER

        ; computing the pointer to the ray to be casted
        ; ptr_ray += sizeof(ray_elem)*nb elem
        lda NB_TILES_IN_RAY
        sta FAC1
        lda #3      ; sizeof(ray_elem) = 1 byte (offset_view) + 2 bytes (offset_world)
        sta FAC2
        jsr mul8    ; result is alway 8 bit
        inx         ; result += 1
        txa
        clc
        adc PTR_RAY ; incrementing the ptr to the current ray
        sta PTR_RAY
        lda #0
        adc PTR_RAY+1
        sta PTR_RAY+1

        ; loading nb tiles in ray
        ldy #0
        lda (PTR_RAY),Y
        tax
        stx NB_TILES_IN_RAY
        iny

        loop_ray:
            stx NB_TILES_IN_RAY_LEFT

            lda VIEW_WORLD
            clc
            adc (PTR_RAY),Y         ; offset_tile_world_low
            sta SRC_TILE_IN_WORLD
            lda VIEW_WORLD+1
            iny
            adc (PTR_RAY),Y         ; offset_tile_world_high
            sta SRC_TILE_IN_WORLD+1
            iny
            sty TMP
            lda (PTR_RAY),Y         ; offset_view
            tax
            ldy #0
            lda (SRC_TILE_IN_WORLD),Y
            sta View_Future,X
            ldy TMP
            iny
            ; break if non-transparent
            cmp #ACTORS::NOT_TRANSPARENT
            bcs end_loop_ray
            ; loop if tiles are left in the ray

            ldx NB_TILES_IN_RAY_LEFT
            dex
            bne loop_ray

        end_loop_ray:

        ldx NB_ITER
        inx
        cpx #NB_RAYS
        bne loop_rays

    end_loop_rays:
Computing the pointers to the source tile from the “World” and the destination in the “View” is only a matter of adding the 16-bit offset to the address of the World and the 8-bit offset to the start of the view.
Those offsets being constants, pre-calculated by our Python script, casting the rays is fast enough. Even on the 1MHz CPU.
ACTORS::NOT_TRANSPARENT is declared in the same enumeration as the TILES of the World. Every TILE inferior to ACTORS::NOT_TRANSPARENT is transparent. It is a floor, an opened door…
The time required to “build the view” using this code will be highly dependent of the player’s environment as the inner loop breaks on any non-transparent TILE.
This variability can be foreseen by counting the cycles.
- Max time:
- The player lies in open-space, such as a hall or a garden: around 20ms
- Min time:
- The player is surrounded by walls. Not very realistic regarding the gameplay 😉 : around 6ms
- “Realistic” Min time:
- The player is in the middle of a long corridor : around 8ms
By the way, manually counting the cycles is a pain in the ass. Sometime I’ll have to find a way to properly profile my code 😉!